Stylish Revamp

Redecorating on a Budget

  • Home
  • About
  • Home Tour
  • Projects
  • Disclosure

Dressing Up my Pantry with a Vintage Door

July 14, 2019 By stylishrevamp Leave a Comment

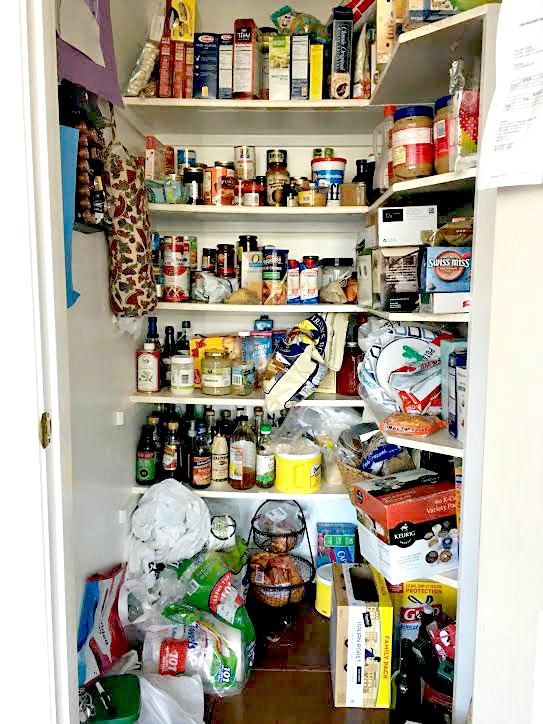
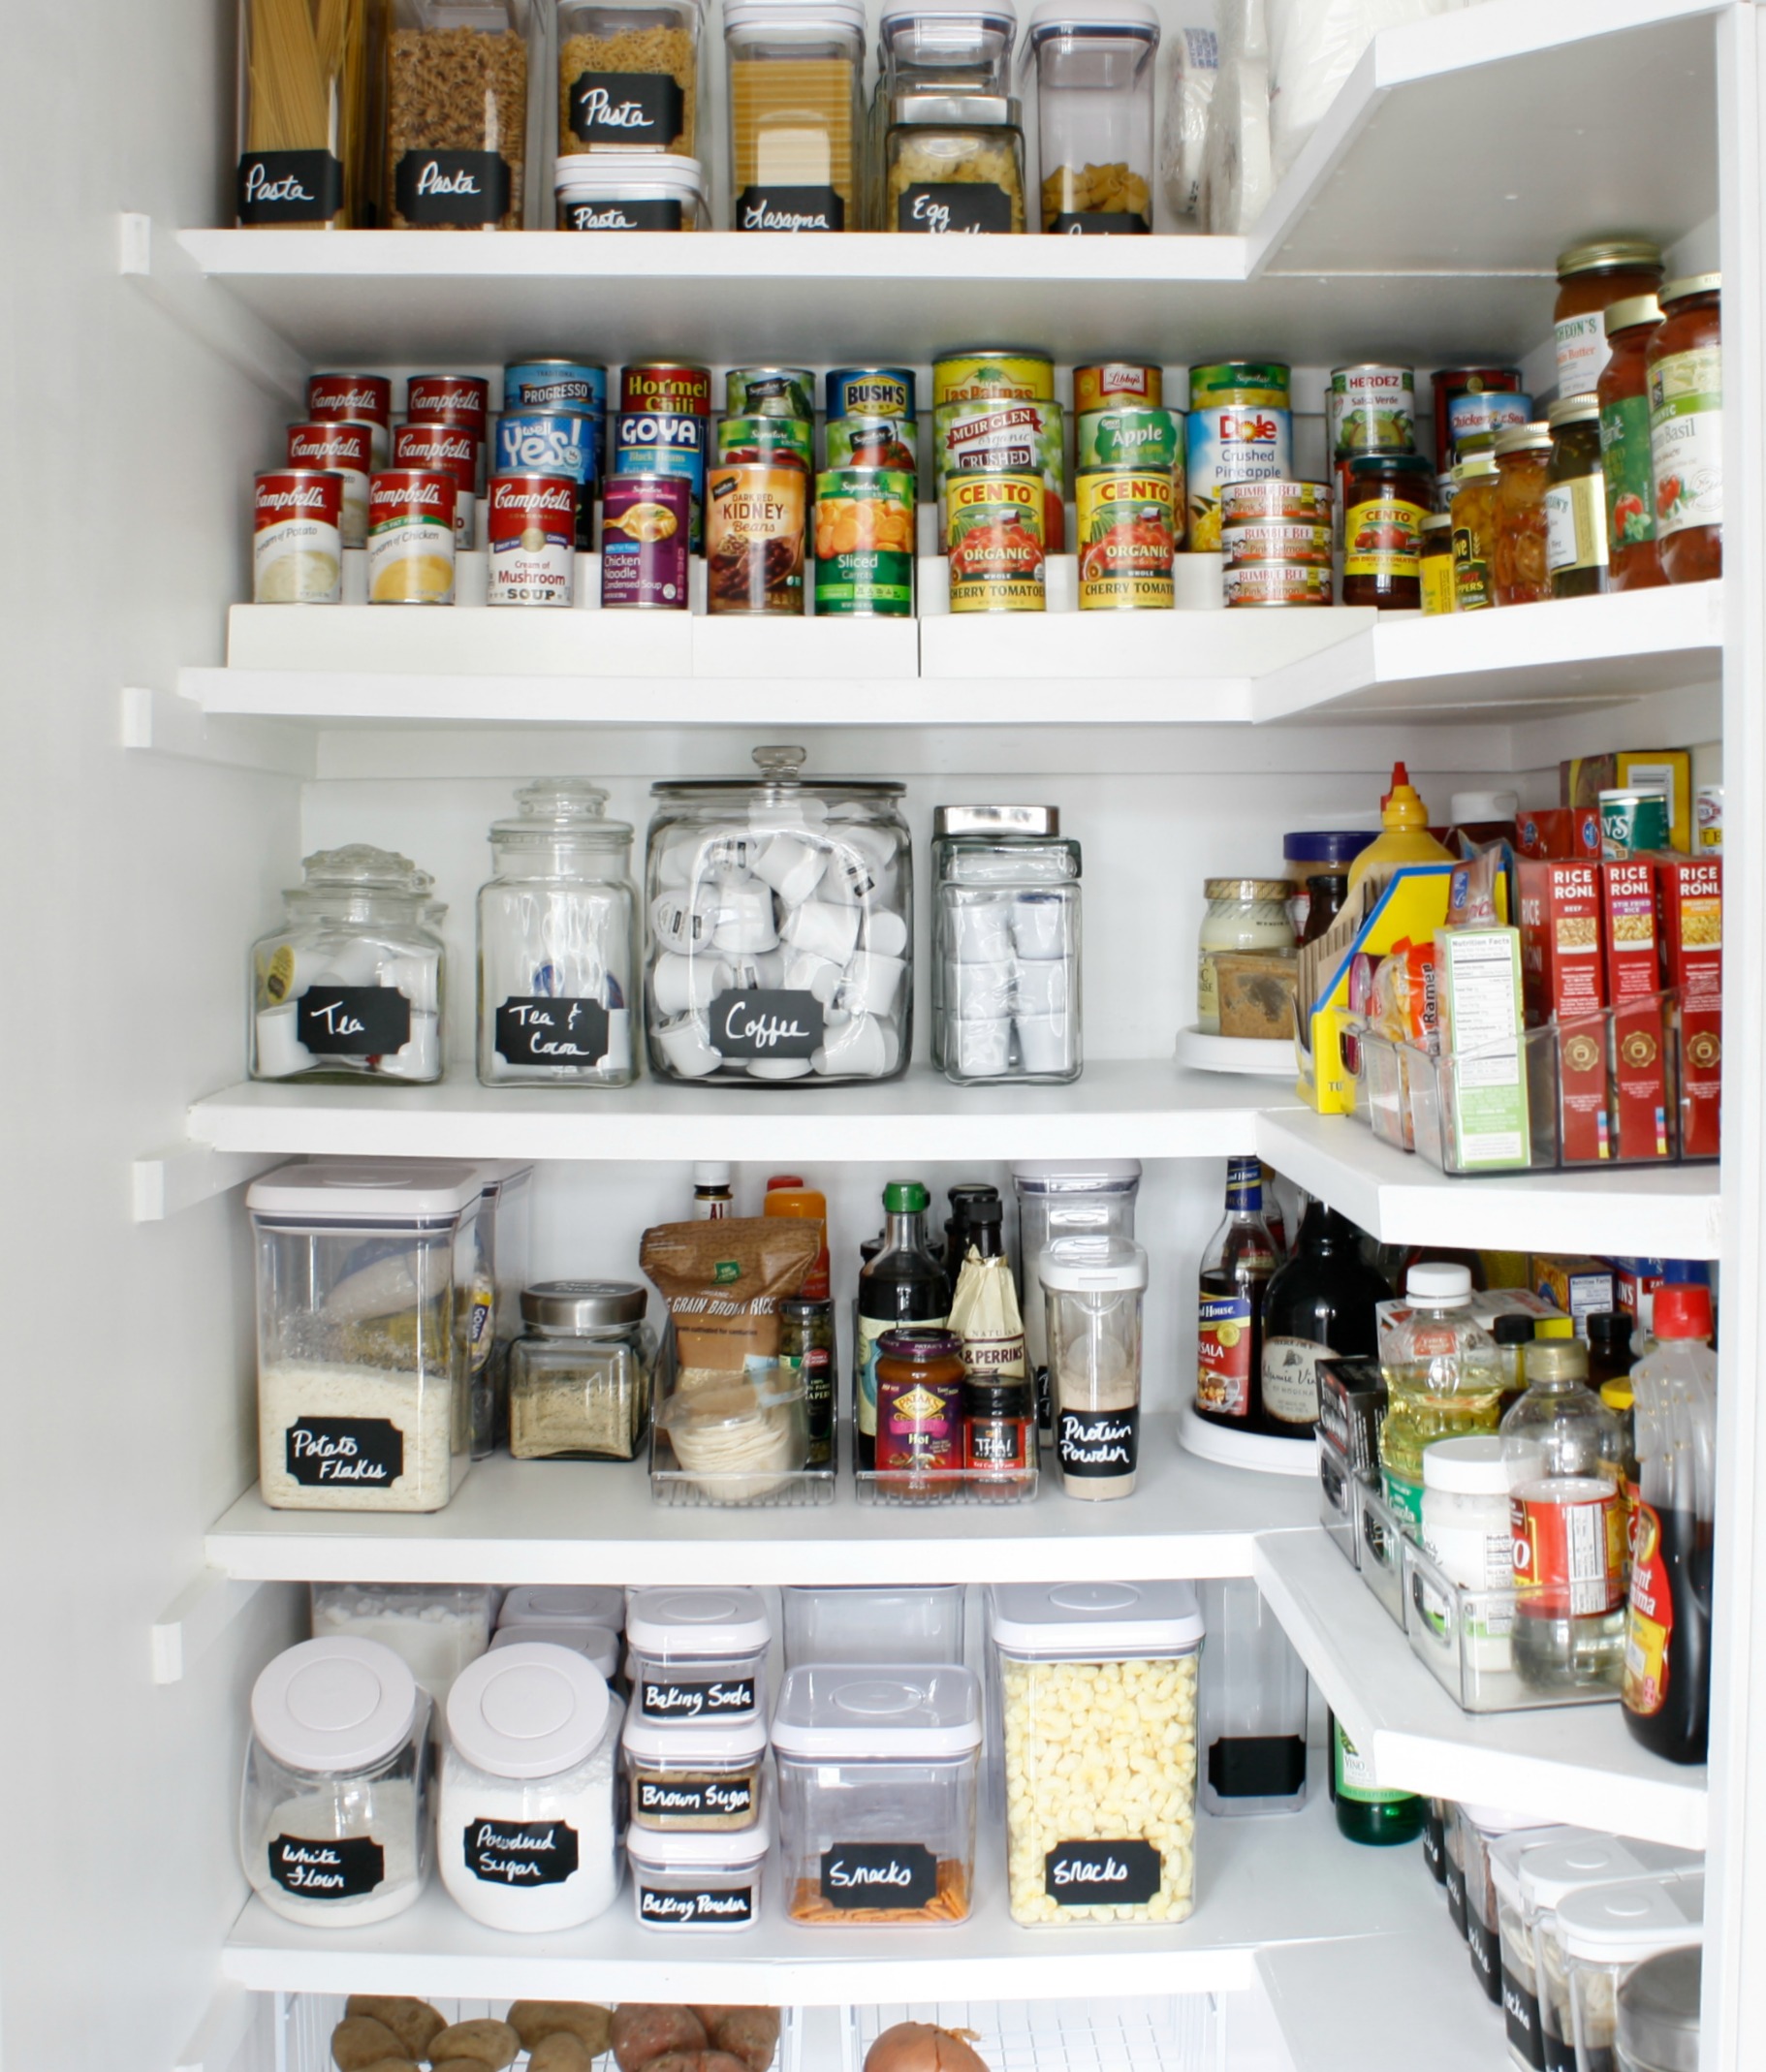
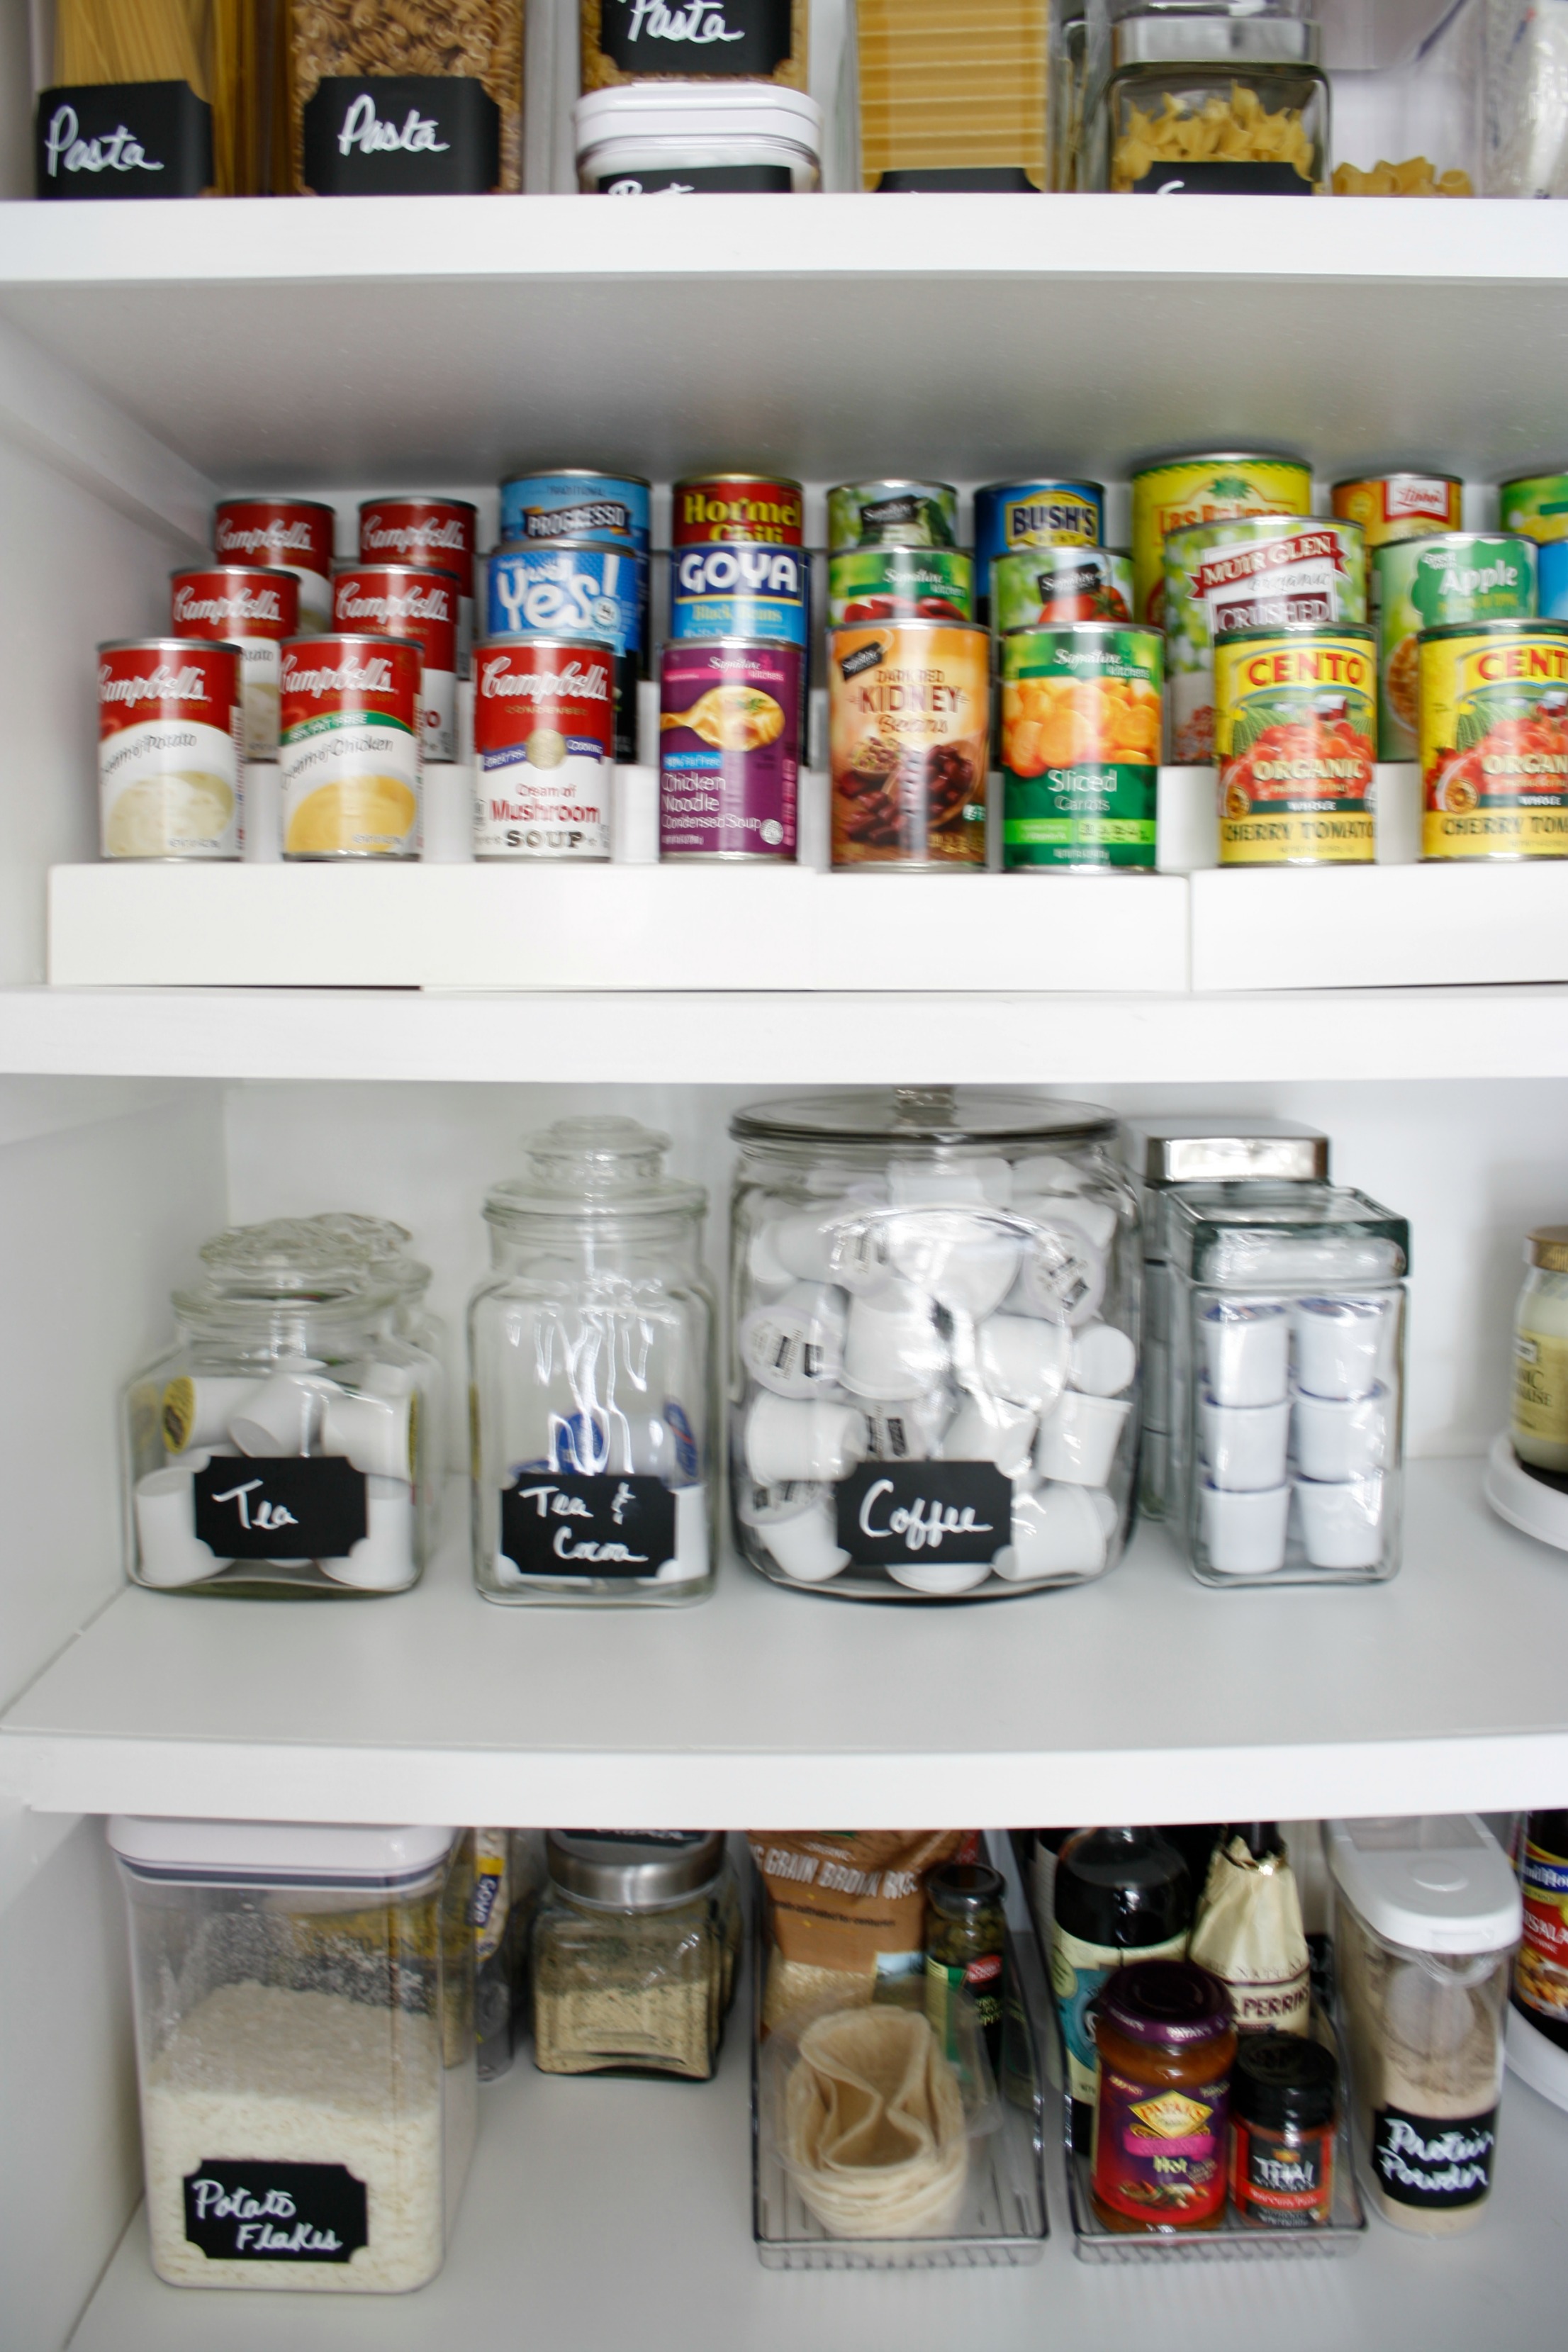
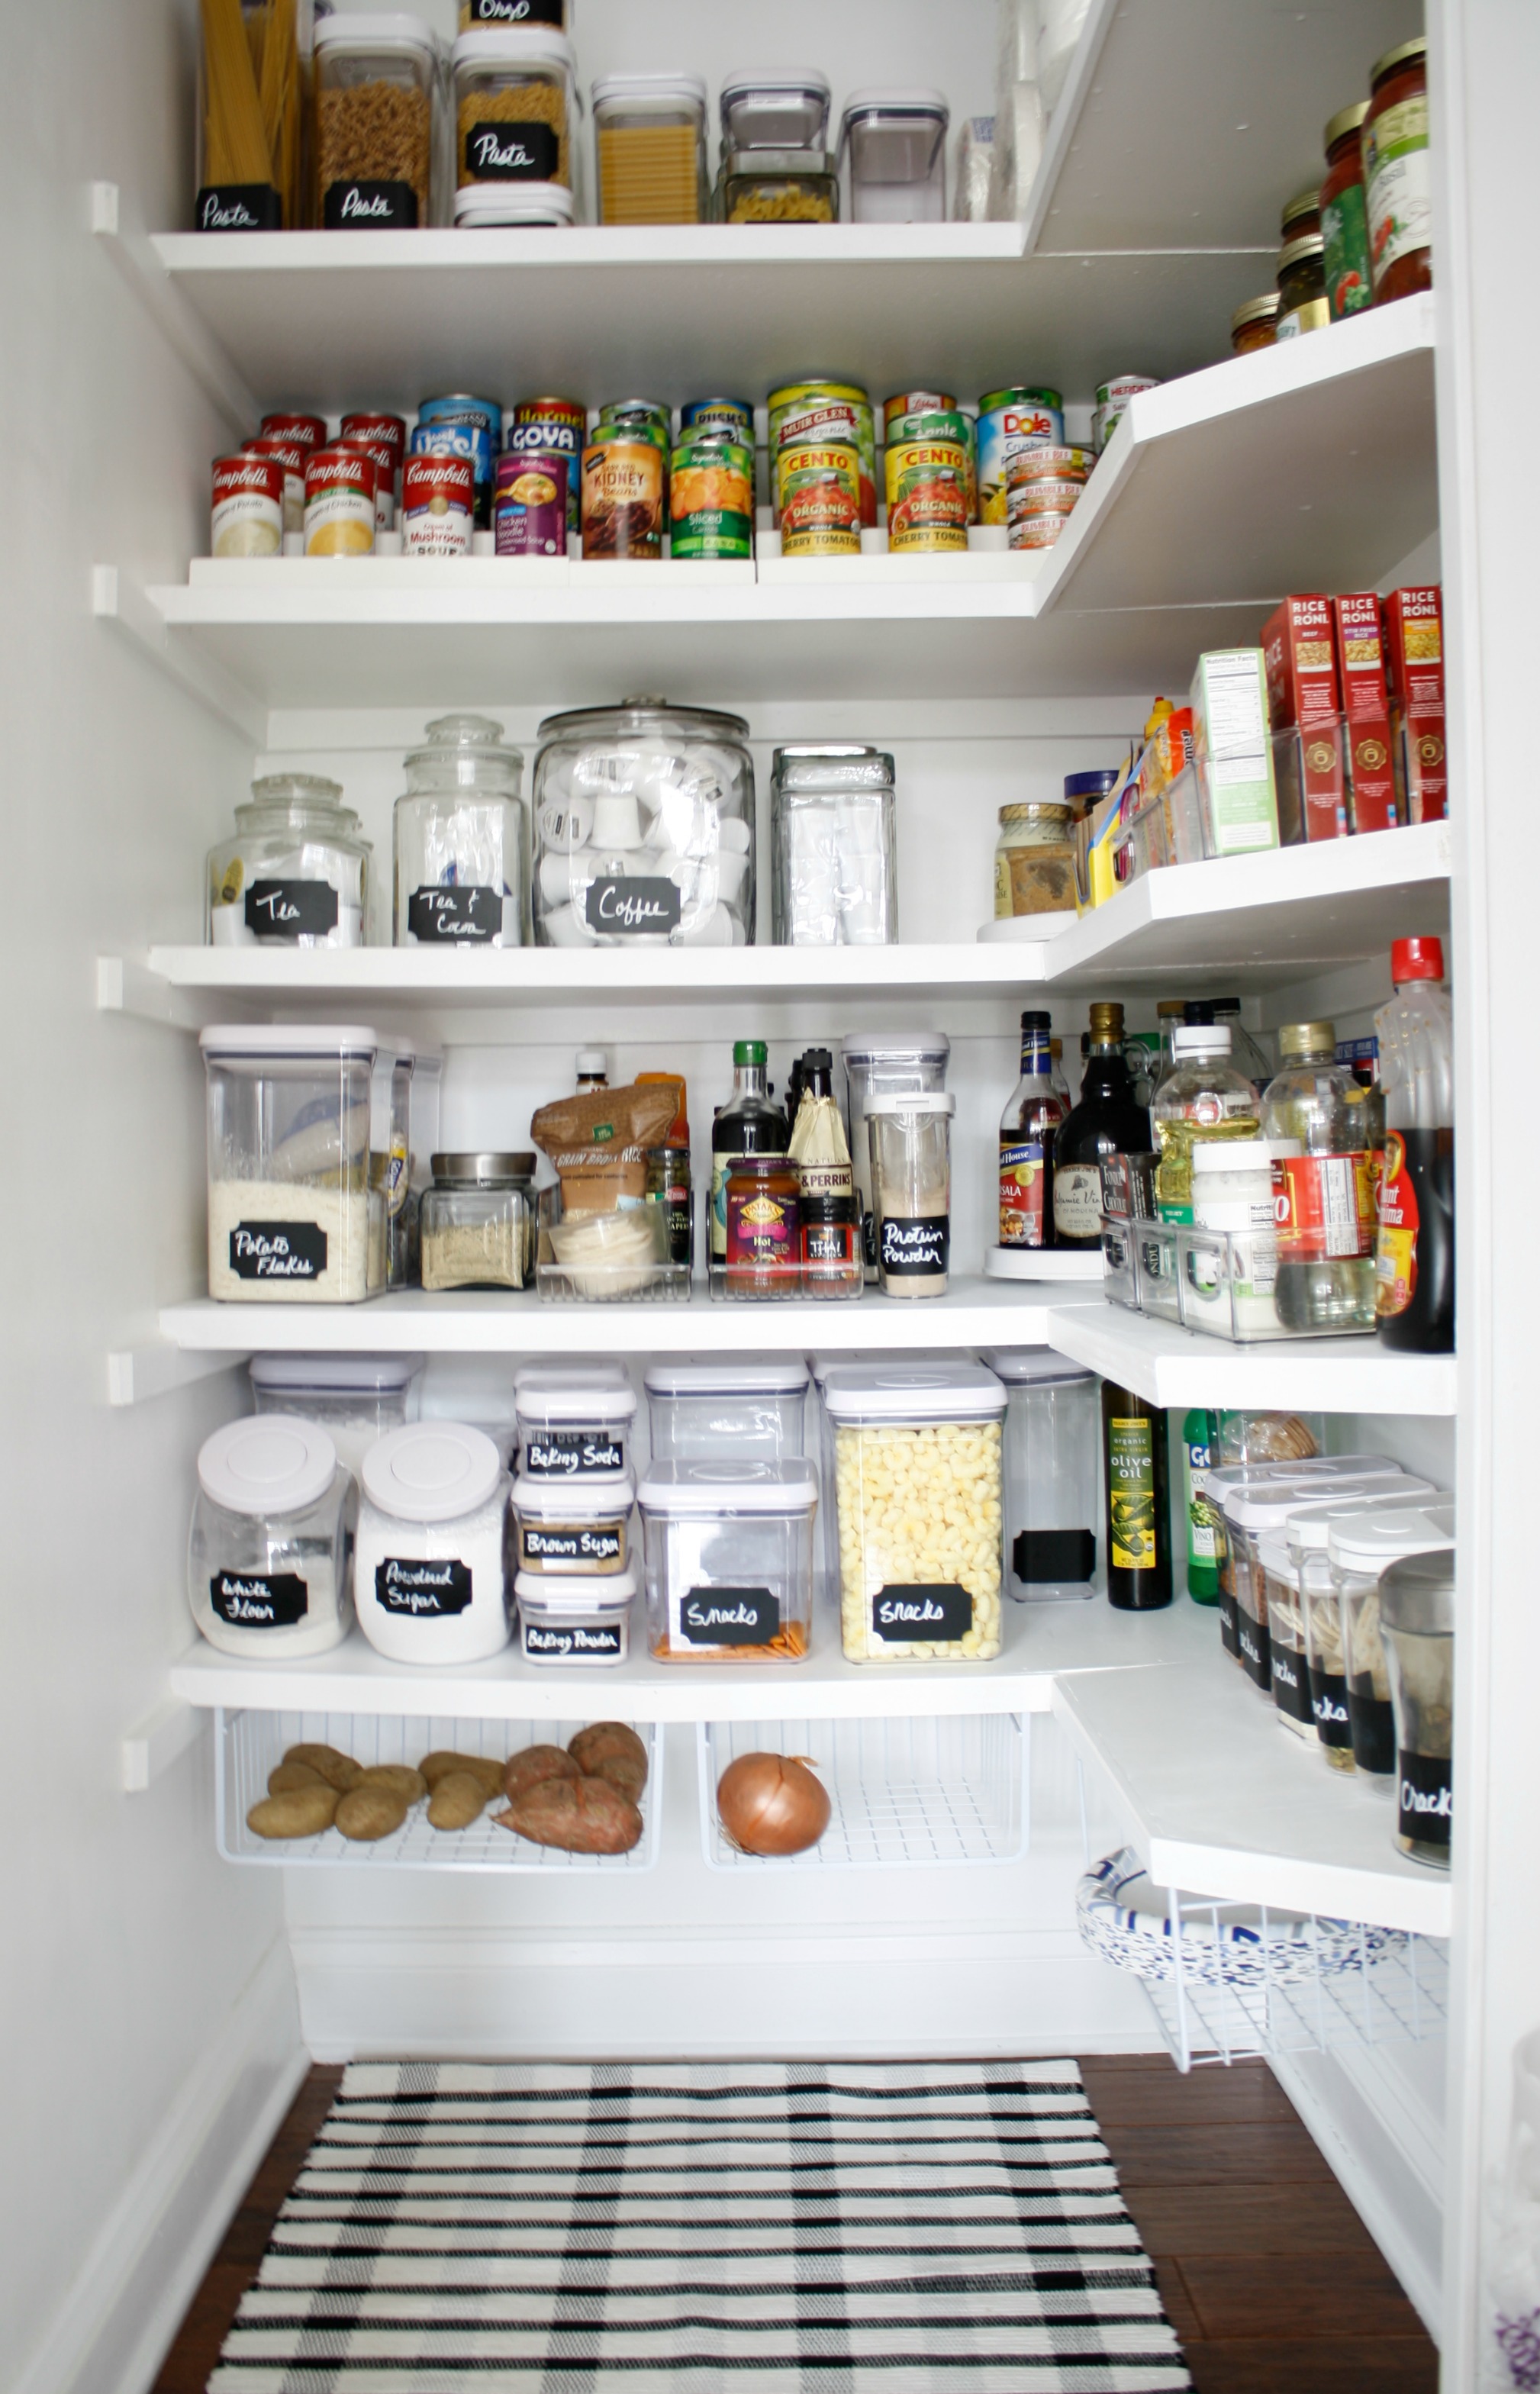
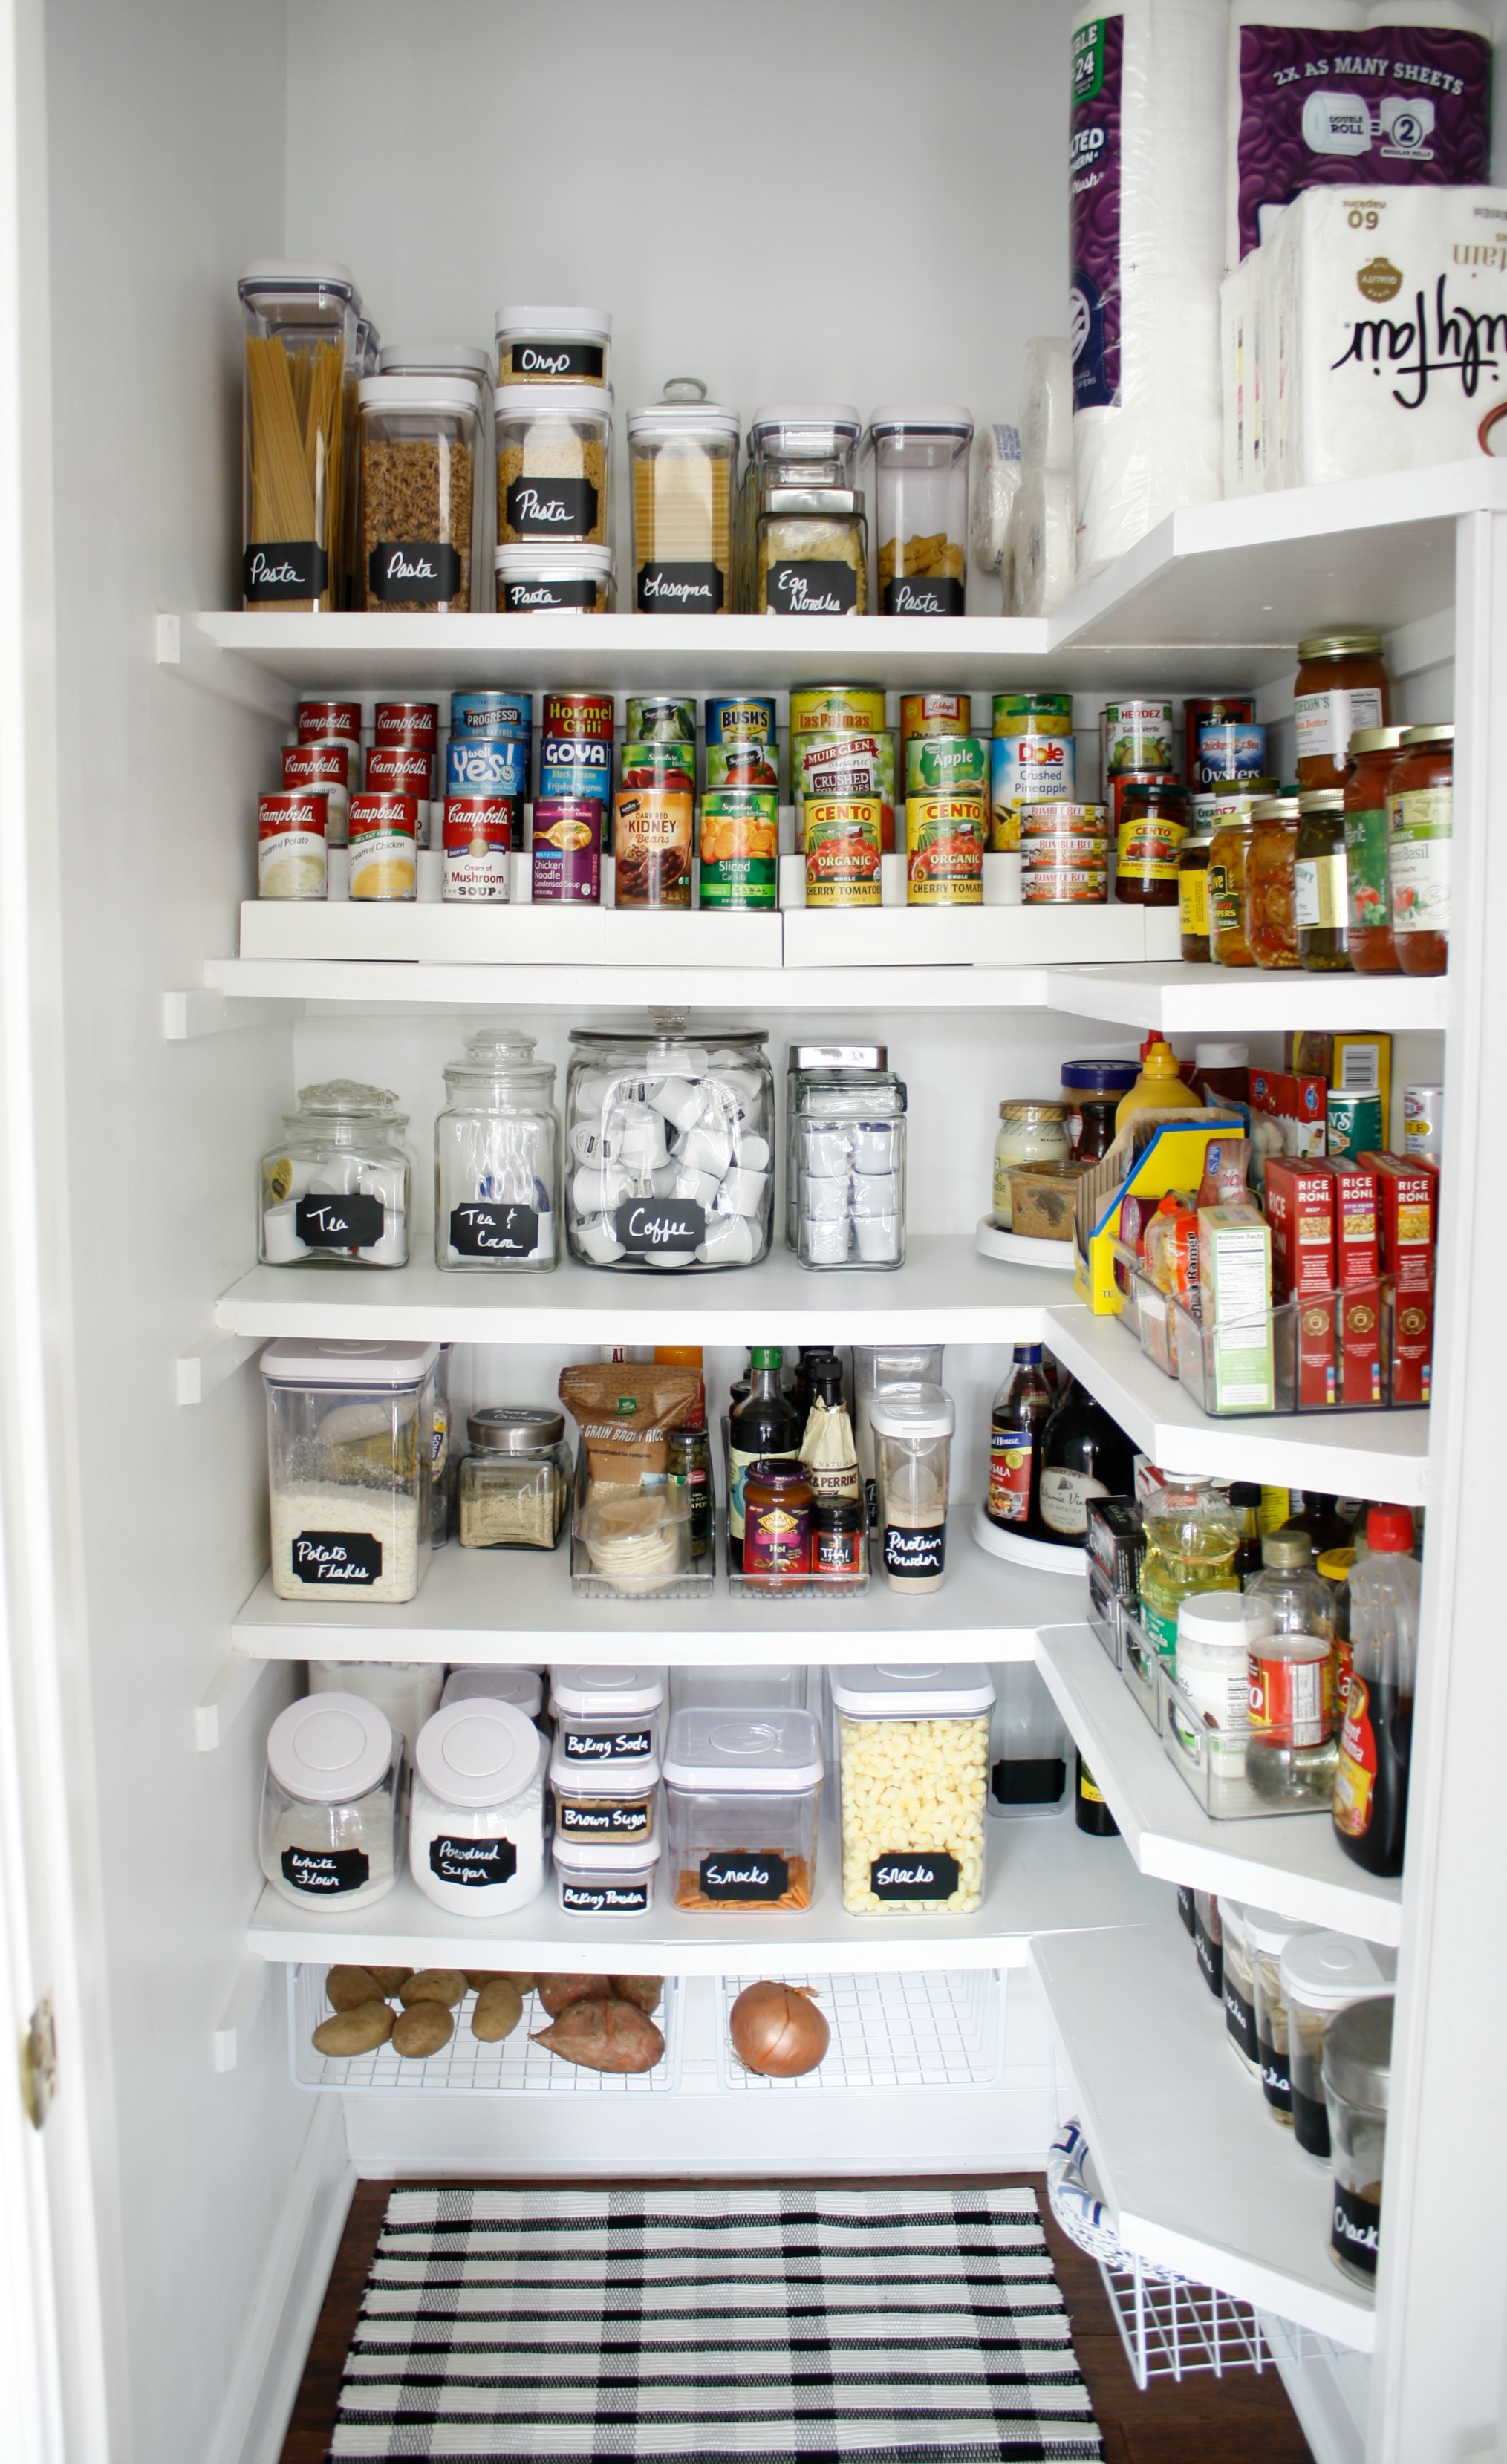
Where has this summer gone?  In less than a week, we are going to be seeing back to school ads and the bus stop schedule. I’m not ready!  It seems like only last week I shared my pantry organization.  It’s hard to believe that was back in January. Well, today I am sharing how I dressed up my newly organized pantry with a vintage door.  Not going to lie, I love it!

Back in January when I organized my pantry, I knew that I wanted a vintage half lite door.  Trying to find the right door was a bit more difficult than I expected. After months of looking, I finally found one in rough shape, a little too wide and about 4 inches too short.  Not to mention the smell!

Vintage half lite door

I absolutely love this door.  It was definitely a labor of love getting her to where she needed to be. It took a lot of stripping and sanding and painting but she was worth it, oh so worth it!

Vintage Pantry Door

I actually didn’t mind the stripping process.  Once I got the hang of it, I found it to be quite relaxing. I used orange CitriStrip that I had on hand.  I painted on a thick coat of the CitriStrip then covered it with plastic wrap and let it sit for 24 hours.  After 24 hours, I was able to scrape off the 4 different layers of paint. Then I flipped the door over and repeated the process.

before shot of my vintage door

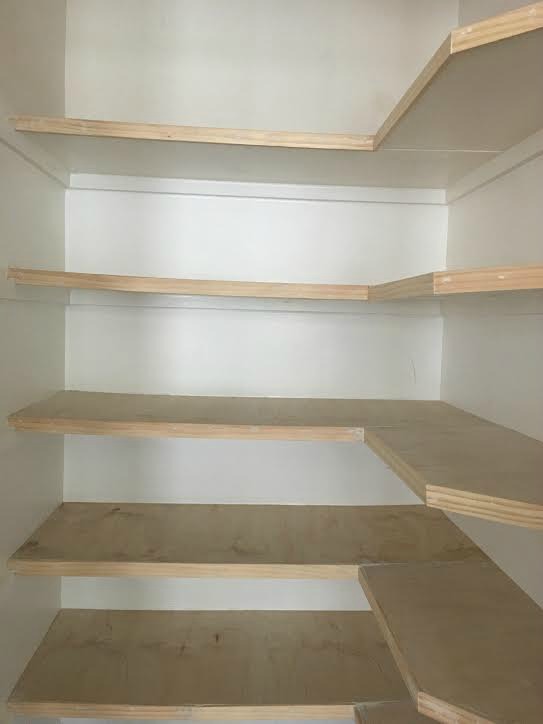
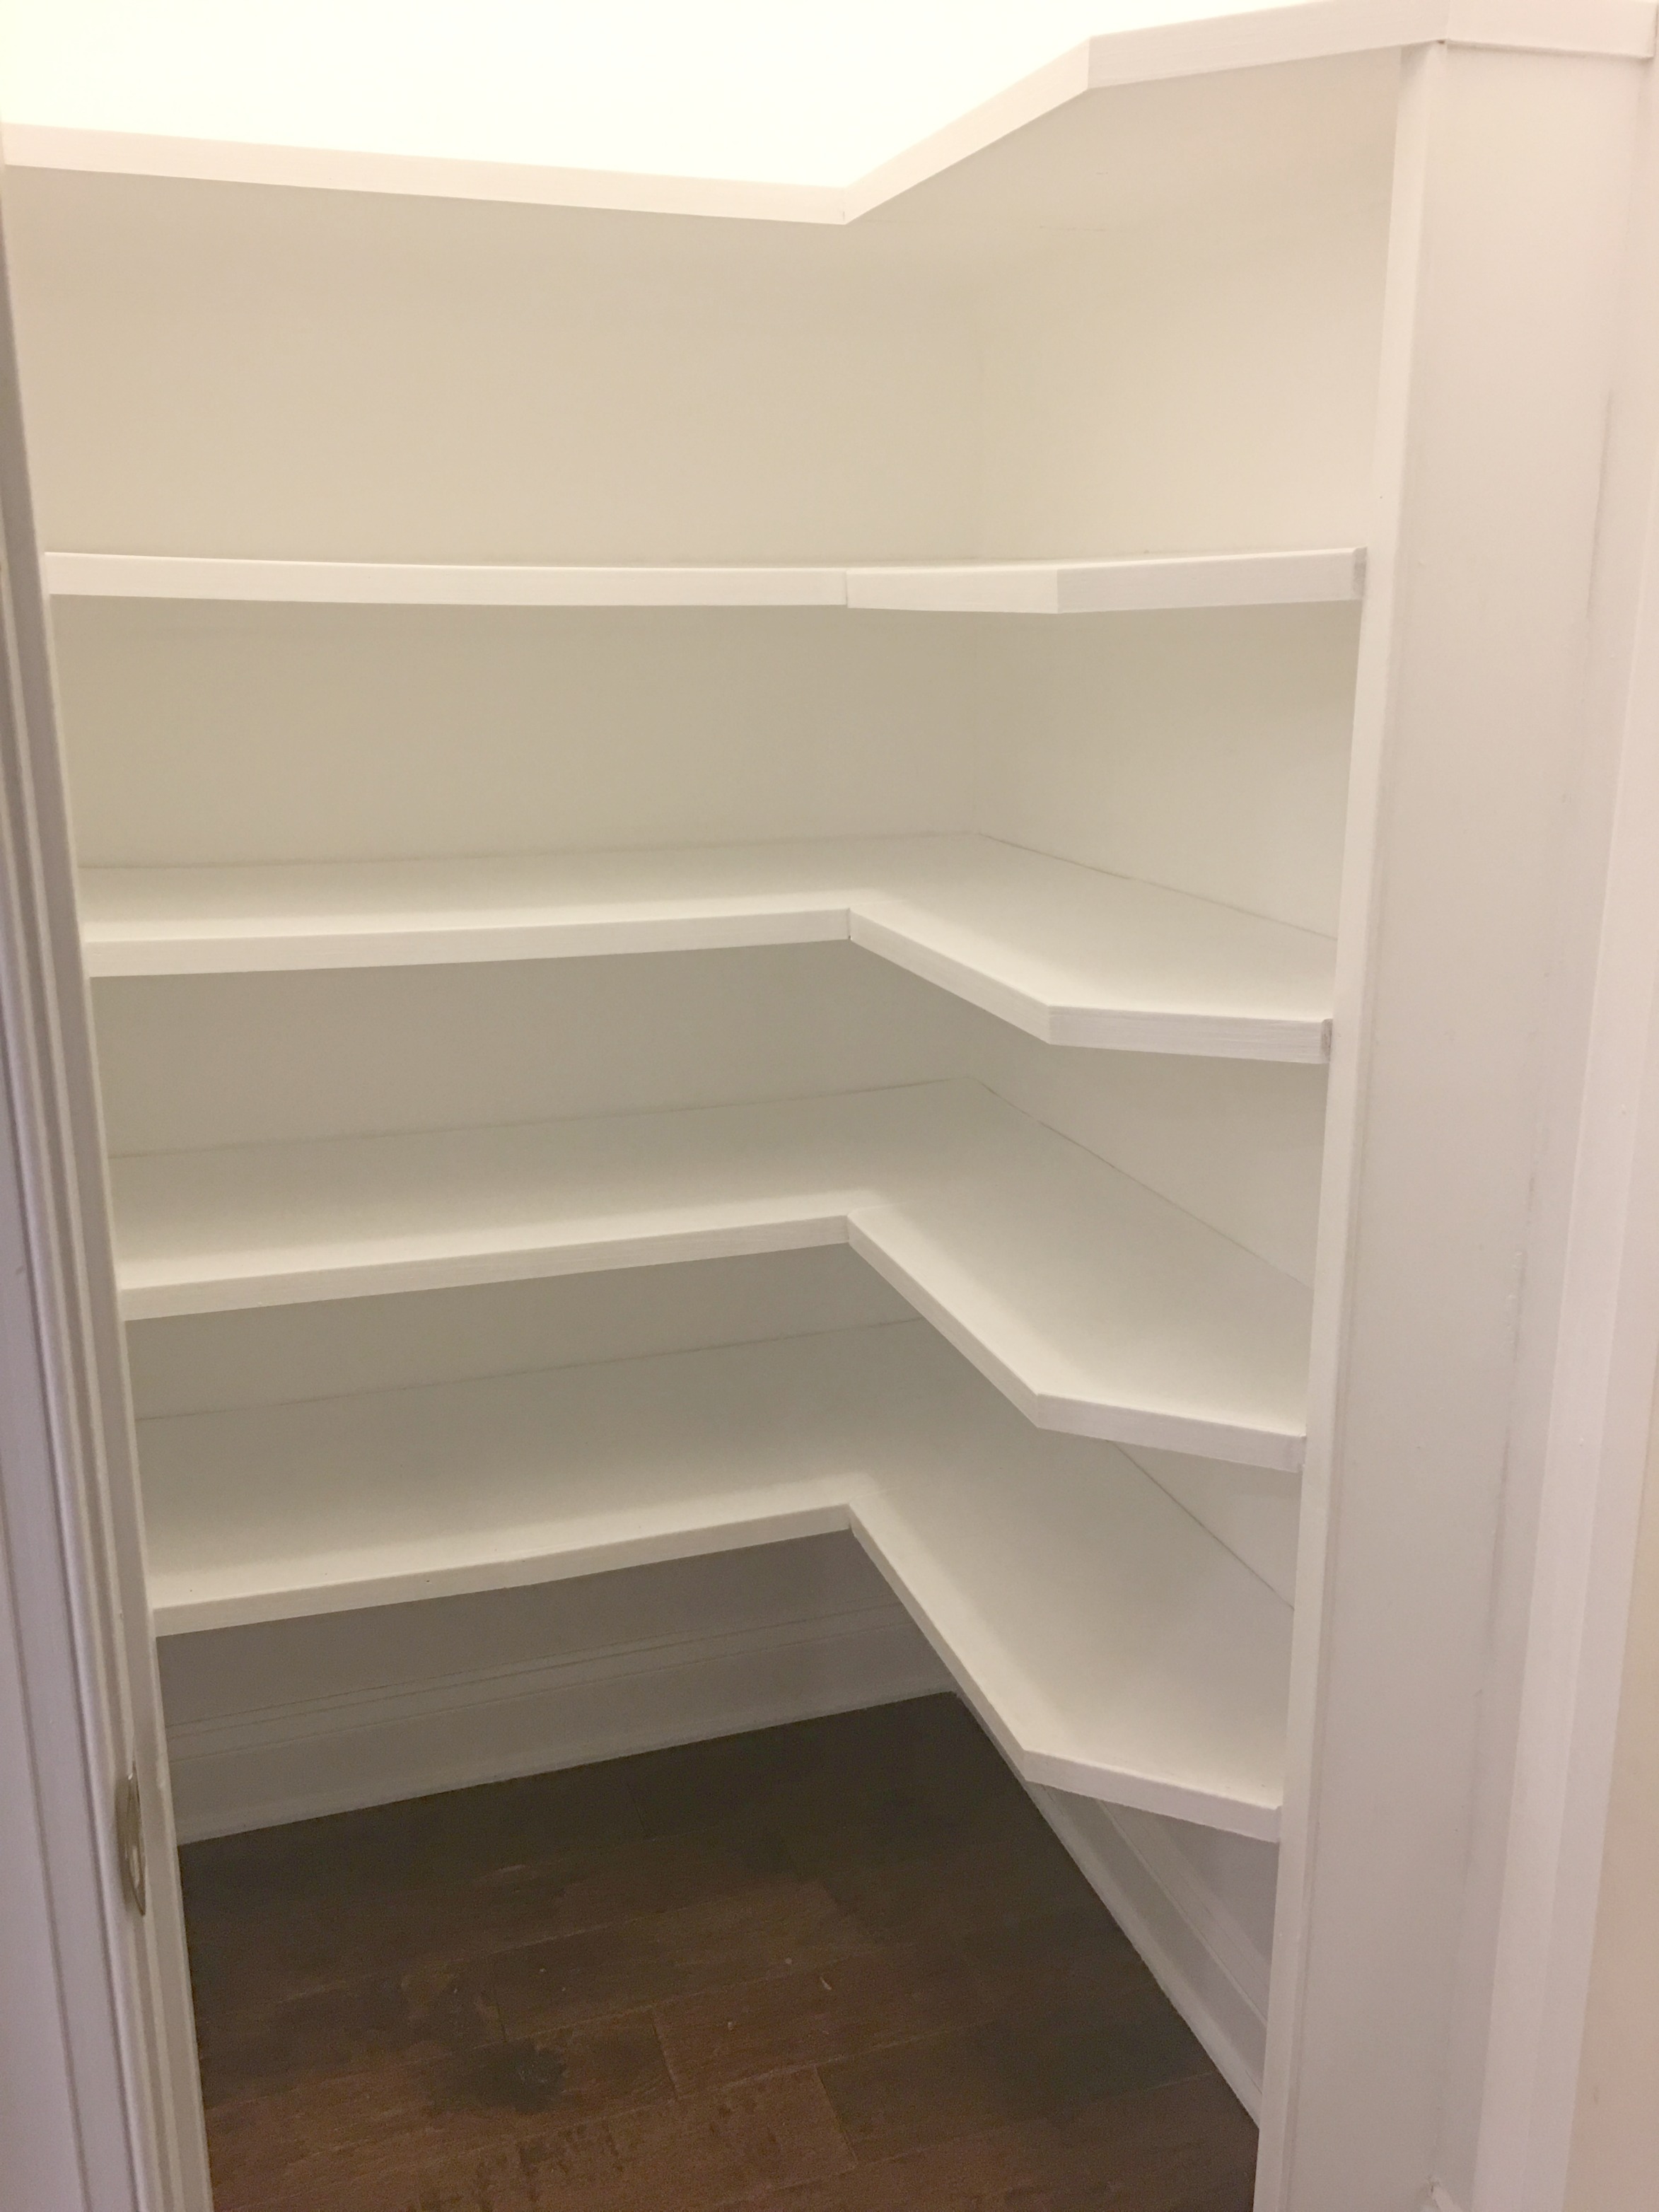
My husband trimmed the door down an inch and a half on each side and we had to add four inches to the top.  We added to the top of the door so the bottom still lined up with the door trim.  We planed down a piece of wood to match the thickness of the door.  We drilled three holes in the 4 inch piece of wood and the top of the door.  We attached the extra piece of wood to the door with a dowel and wood glue.  Surprisingly, it was easier than I had anticipated and the fit is seamless.

Vintage Door with added height to fit existing door frame

I originally wanted to keep the door with the raw wood but I knew I wouldn’t be able to match the new wood to the old door. At this point, I was getting so excited to finish it off and had to pace myself on the painting.  I typically rush the painting process so I can finish a project but this time I left myself plenty of time to let the paint dry between the coats.

Vintage half lite door

I had to order a new door knob because the original knob and lock set was missing several pieces. Luckily, I was able to find an exact match here. I adore the ceramic knobs.

vintage door knob

We have managed to keep the pantry organized since January and the glass now keeps me motivated to keep up the neatness! I love the finished look and now I’m on the hunt for a bubble glass door for my cleaning closet.

Vintage Pantry Door

I hope you all are enjoying your summer.  FYI, I am watching Christmas in July on Hallmark as I type this.  It is a true obsession and I do not use that word lightly!

To my dad, good luck tomorrow. I love you and will see you week after next! XOXOXO

Until Next Time,

SR_signature

Filed Under: Before and After, Fabulous Finds, Home Tour, Projects and DIY, Thrift Shop Tagged With: DIY, door, pantry, Shopping, thrift, Vintage

My Version of Tidying Up the Pantry

January 27, 2019 By stylishrevamp 13 Comments

I think everyone has hopped on the Marie Kondo bandwagon.  I watched one episode on Netflix and I have to say it stressed me out.  I can live with mess  for only so long before I lose it.  That was the case with our pantry.  I wanted to tackle it before Thanksgiving and time just got away from me.  I decided to wait on the revamp until after the Holidays and it drove me crazy looking at the mess every day.  It got to the point where we were buying things because we couldn’t find the ones we already had in the pantry.

Pantry before the Major overhaul

This is the hot mess we lived with in November and December. Chaos like this drives me crazy.  I am the type of person that has to have my house in order when I go to bed.  No dishes in or on the sink when I go to bed at night, pillows fluffed on the couch and throws folded and placed where they need to be.  It just helps me function better, especially when I start my day off with a clean kitchen.  So this mess was difficult to deal with to say the least.  After Thanksgiving, I knew I wouldn’t have time to complete it and I wanted to decorate and enjoy my Christmas home but this mess was always lurking in the back of my mind.

So, January was a fresh start.  Once the Holiday decor was boxed and put away, we emptied out the pantry and got to work. I have to admit, this was my least favorite project ever.  I felt like it was never-ending.  So much stuff to sort through and quite frankly it was just mind numbing.  I liked the actual revamping of the shelves and I didn’t mind painting the entire pantry but going through the food and organizing it was pure misery.

My version of tidying up the pantry

Pantry organization

I have to admit the outcome was so worth the two weeks of misery I went through getting this space organized. I’ll take you back through the process and show you what it looked like.

The pantry cleared out

This is what the panty looked like once we removed all the food.  I then got busy removing all the old contact paper that originally lined the shelves.  Once that was done, I scrubbed everything down with hot soapy water.

Then we made a trip to Home Depot.  We picked up some Lauan Plywood (it is the very thin plywood that everyone is making faux shiplap from and something I am trying to talk my husband into doing in our sunroom. I’ll keep you posted on that situation). We had them cut the plywood down to the right size in the store and my husband made the angled cuts once we were home.  We also bought some 1 x 2’s to trim out the shelves.

Shelves resurfaced with Lauan Plywood

Once that was done, we puttied the nail holes and sanded everything.  Then I got busy painting.  I painted the ceiling, shelves, walls and the trim a nice bright white.Painted and trimmed out Pantry Shelves

Resurfacing and trimming out the shelves made a huge improvement.  Finishing out everything with bright white paint brightened up the space a great deal. The earlier paint was an off white with yellowish undertones not to mention any touch ups done throughout the years was done in different paint. So not only was it disorganized but we had about 4 different color paints jobs going on in there.

Now the fun(ish) part, the organizing in pretty containers. I have collected glass jars from Goodwill for years. I also asked for pantry organization items for Christmas and I have shopped at Bed Bath and Beyond too.

Getting rid of most of the cardboard packaging in the pantry was the biggest space saver of all.  I never thought I would have enough plastic and glass containers to organize my pantry or that I would be able to fit everything back on the shelves but I did and I still have extra space.

Pantry Organization

Organizing the Pantry with Bed Bath and Beyond expandable a shelf

Adding the shelf risers for canned goods is a great space saver and it makes everything assessable and easy to see.  Placing together similar loose items in tray keeps everything organized as well.

Organizing Pantry with Baskets from Home Depot

I wanted to keep everything off of the floor.  Adding these wire basket from Home Depot was the perfect solution to keeping things off the floor and organized.  I will link everything at the end of the post. These baskets are a favorite! My brother-in-law made me this hand loomed rug and I adore it!

Organizing the Pantry with OXO Pop Tops

Some of the glass jars that I picked up at Goodwill throughout the years do not have an airtight seal.  For the containers that are not air tight, I use them for all my coffee and tea k cups or packaged food.  I also added two lazy susans in the corners.  I may still add one to each shelf.  We are also still think of adding another shelf up high for all of our paper products but for now, I think everything fits and we are fine as is.

Revamping our pantry

Here are a few of my take aways from this project followed by links to products in our pantry revamp.

  • remove items from cardboard packaging
  • place similar loose items together in a clear tray
  • add wire basket for potatoes and onions
  • use risers for canned goods
  • use lazy susan in corners for easy access

 Links for items used in this post are below:

Oxo Pop Top Containers 

Clear trays

Lazy Susan

Expand A Shelf

Hanging Wire Baskets  (i used the white shelves and mine came in a four pack)

Chalk Labels


I love how organized the pantry is and I don’t mind putting groceries away now.  Having said that, this project was a tough one for me but I am glad it is over and I am hoping it NEVER gets that messy again.  Thanks for joining me on this adventure. For any questions on this or any other post, I can be reached at krkolson@gmail.com or you can leave me a message in the comment section.


Until Next Time,

SR_signature


Filed Under: Before and After, Home Tour, Projects and DIY Tagged With: bed bath and beyond, Home Depot, lables, organization, Paint, pantry, shelving, trim

Fixer Upper Style Master Bedroom Reveal

October 12, 2017 By stylishrevamp Leave a Comment

I am so excited to finally reveal our newly updated Master Bedroom.  This has been months in the making!  I shared bits and pieces of the progress a few months back here and here but today I am sharing a quick video…my first ever!

One of our goals for 2017, which I shared here, was to add hardwood floors upstairs. Well, we finally did it.  The floors were installed in early September and last week the final paint touch ups were completed.  I am so happy we made the move from carpeting upstairs to wood floors.   I liked having the carpet when the boys were little and we didn’t have a puppy running around  but I absolutely love the wood floors!  Enjoy my first video and we will chat about the details after!

Fixer-Upper Style Master Bedroom Reveal


I am loving the transformation.  The hardwood floors make all the difference in the world!  We matched them with the downstairs  flooring which is a 5 inch hand scraped hickory. The hickory is a very warm tone which keep the wood from appearing too cold.

Master bedroom reveal and a fixer upper style shelf

Here’s a quick rundown of everything we did.

  • added hardwood
  • built a shelf using a 2×10 stained to match vintage chest at foot of the bed.  Shelf is attached using Simpson Strong Ties from Home Depot which I sprayed black
  • new gun-metal bed found at a local consignment shop
  • painted dresser, night stands, mirrors and lamps with Amy Howard One Step Paint
  • added an area rug from IKEA
  • hung wall sconces from Wayfair

I got the idea of the shelf above the bed from an episode of… you guessed it …The Fixer Upper.  It was the on season 4 episode 16.  As soon as I saw it I knew I wanted to do my version of it above our bed.  Such an easy projects with a big impact.  I did something similar in the sitting room.

Master Bedroom Reveal

Master bedroom reveal with Hardwood flooring and Fixer Upper Style

The area rug is from IKEA.  This is actually two area rug that I placed together.  I used the recommended rug pad from IKEA which feels a bit tacky/sticky and it keeps the two rugs together and stays in place.

Sitting Room with Fixer Upper Shiplap and new Hardwood flooring

I shared the sitting room before but I wanted you to see the difference the hard wood makes in here.  EEK, I LOVE IT! The chairs are the same ones I bought when I was pregnant with my first boys.  I had them reupholstered.  They are in fantastic shape and are super comfy.  I added the same IKEA rug in here to help keep the two room cohesive. I also added the ottoman from IKEA ektorp series. You can see a small stand on the fireplace hearth…a GoodWill find.  This is kind of  totally my space!

My slipcovered chairs and painted Amy Howard lamp

(reupholstered chairs with pillow and throw from TJ Maxx…and Charlie)

GoodWill credenza and DIY Shelving

I love this credenza I bought from Goodwill for $40.  I gave it a quick coat of paint and added my DIY shelves above it.  Almost everything on the shelves are treasures I found at Goodwill.

I hope you enjoyed my Master Bedroom Reveal and my first ever video.

Until Next Time,

SR_signature

Filed Under: Before and After, Fabulous Finds, Home Tour, Projects and DIY Tagged With: Fixer Upper, Goodwill, Master Bedroom, Paint Hardwoold floors

Revamping my Closet with the IKEA Pax Wardrobe

October 1, 2017 By stylishrevamp 39 Comments

Yessss, I’m back! I took a little blogging break over the summer and enjoyed lazy days by the pool and some fun and adventurous travels as well. But now I am ready to share an exciting new makeover.  We had several big projects in the works and the first one I am going to share is my closet revamp using the IKEA Pax Wardrobe.  Yep another IKEA hack!

Buikt-In IKEA Pax Hack

Here it is…I love it.  I find myself just walking in the closet multiple times a day just to enjoy the sight of it.  I still cannot believe the transformation!

IKEA Pax Wardrobe

I love everything about it.  To me it is fabulous, organized and just gorgeous! Now that you’ve seen the beauty…here is the beast we started with.

closet before the IKEA Pax revamp

The first thing we did was rip out the shelving unit and the shoe rack so the hardwood would go wall to wall (another post is coming soon about the new hardwoods) Then I began the process of clearing out the closet.  As much work as it was, I loved going through everything and getting rid of what I no longer wanted or needed. Well, I didn’t love it as I was doing it but it felt great to purge, especially when I was finished. I made several trips to GoodWill.

before shot of my closet

Closet makeover with IKEA Pax

Here’s a run down of what we did.  We went to IKEA to look at the Pax Wardrobe and get a feel for what we wanted to do.  I am not going to lie, it was a bit overwhelming.  We ended up going back the next day and worked with a sales representative that was able to design our layout on the computer with all the accessories. You can also do this on your own at home. Once we were satisfied with the overall layout and design, she printed off the entire packet which included a layout and all the pieces we needed to buy. That made it so much easier to pick up all the boxes we needed.  Here are a few pictures of the computer renderings of the new closet design.

IKEA PAX Wardrobe Planner

IKEA PAX WARDROBE PLANNER

Pax Planner for my new closet

IKEA Pax Wardrobe planner Top View

IKEA Pax Wardrobe

O.K. I am going to be honest here.  This is about the point I fizzled out.  We had been under construction with the wood floors for about a week but leading up to that I had been clearing out all of our closets and linen closets to prep for the flooring and I was done! To make matters worse, I had given up sugar and I was basically zapped, finished and of very little help!  My hubs gets all the credit for the finished product! I didn’t leaving him completely hanging, I helped out a wee bit when needed!

He wanted to trim the wardrobes out with baseboard and decorative moulding between each wardrobe unit.  He used the same concept that he used on the IKEA Billy Bookcase which you can read about here.  I love the look of the wardrobes with the trim and moulding. It finishes the look off completely. Eek, I am so happy with my new closet!

Built-in Ikea Pax Wardrobe

IKEA PAX Corner Cabinet

IKEA Pax with Pull-out pant hanger

There are so many options and accessories with the Pax Wardrobe. We chose both glass front and solid drawers, pants pull out hanger,  valet hanger, wire baskets, pull-out tray,  pull-out clothes rail, and a pull- out rack for scarves and belts.  I am absolutely thrilled with the outcome of this makeover and my hubs gets all the credit on this one!

In the next few days, I will post about the new floors and my bedroom makeover as well!

Until Next Time,

SR_signature

We Party Here:

Saturday Sparks Button 3  sunday_button  featurenlinky-party-graphic


Filed Under: Before and After, Home Tour, Projects and DIY Tagged With: closets, IKEA, organizing, Pax Wardrobe

A Quick Review of Amy Howard At Home Paint

July 1, 2017 By stylishrevamp 3 Comments

A few months back, my husband went out-of-town on a quick golf trip.  I knew my time was limited and I had to hustle to complete the master bedroom revamp before he returned from his trip.  The quickest way to revamp any space is with paint. So today I am sharing a quick review on Amy Howard At Home Paint.  Hint, hint, I love it!

A quick review of Amy Howard at home paint

When my husband left for his golf trip, I knew I had exactly 4 days to paint 6 pieces of furniture, put together a new to us bed, build and install a shelf and put the room back together. I thought the easiest way to get this done was to use chalk paint but the store that sells Annie Sloan chalk paint near me was not open and I knew time was of the essence here.  Sometimes I will make my own chalk paint so I headed to Ace Hardware to pick out some paint colors when I stumbled upon the Amy Howard At Home One Step Paint.  At first I thought, should I even attempt something new when I had very little time to pull this together, what if it was difficult to use? Oh, but they had the perfect color, exactly what I was looking for a perfect grey called Atelier and of course the basic black. I picked up the sample size pots of these two colors. I thought if it’s hard to work with, I can use it for painting accessory pieces and just make my own tried and true chalk paint.

The first piece I started with was my nightstand.  I wanted to paint it black.  I set the small jar of paint upside down (the sales associate told me to do this) in my sink while I cleaned my nightstand. I was painting all of this furniture in my bedroom because there was no way I could move all of the furniture downstairs into the garage and back up by myself.  Surprisingly, I did not even notice any odor to the paint.  Once the furniture was clean and completely dry, I started painting and was shocked! It was super smooth and creamy and absolutely the easiest paint to work with…ever!  From start to finish it took less than 30 minutes to do the entire piece. It really is just that easy.  One step does not necessarily mean one coat, however that was the case with the black paint.

Nightstand painted with Amy Howard Paint basic black

A Quick Review of Amy Howard At Home Paint

The coverage was amazing. I did notice that the black required only one coat whereas the Atelier required two and I wiped some of the paint off so I could see the original stain peeking through. Once I realized how easy the Amy Howard at Home Paint was to use, I was ecstatic! I knew I would be able to paint all of the furniture and pull my vision together in time to surprise my husband.  Do you like how I said surprise him? Yes, well I knew if he were here he would probably freak that I was painting the bedroom furniture.  I have never liked the stain on the furniture. It looked too orange to me but when we bought it I was days away from giving birth to our firstborn and it was the only furniture that could be delivered on time before the baby arrived and I was nesting and just needed it done. So yes, it was a surprise to him but sometimes it’s easier to not let him see the messy in between a project!

After the nightstand was done in such a short period of time, I celebrated with a cup of coffee and planned my next piece of furniture to paint. I moved on to the Secretary Desk and chair.  I knew the desk was going to be a bit more time-consuming due to all the detailed pieces.

Amy Howard painted desk

I painted the desk in the Atelier and the chair in the basic black. I even had time to recover the seat cushion. I decided to leave the interior of the desk alone.  The paint tone down the stain color and I like the juxtaposition of the grey paint against the stain.

I also painted an armoire with the basic black and a few mirrors.  I did all of this with the small sample pot of paint and I still have some paint leftover for future projects.

Mirror painted with Amy Howard basic black paint

Revamping Your Space with Amy Howard Paint

I think my favorite piece I painted was my dresser. I was back and forth on the color choice and ultimately chose the Atelier.  I am so happy with this choice.  I decided to leave the mirror with the original stain and I am glad I did.

Review of Amy Howard Paint

I buffed some of the paint off so the stain is popping through. This piece was the last one I painted and once it was done, I started waxing all the pieces with the Amy Howard Wax.  Again it was a very easy product to work with as well.  If you haven’t tried this paint, you really should.  I was able to paint all these pieces ( armoire,  dresser, two mirrors, chair and a desk) with two small sample jars of paint and I still have paint left over in each jar.

Here’s a picture of the chaos I create when I am working…Painting my Goodwill Find and this…

Setting up a paint studio in my bedroom

I am happy to say that I was able to complete the entire room in three and a half days! I think this was in large part to ease of the  Amy Howard One Step Paint!

A quick review of Amy Howard at home paint

FYI, my husband was happy with the transformation, yes, happy and surprised! I know I am not the only one that creates chaos when their spouse is out-of-town, share your adventures in the comments!

Until Next Time,

SR_signature

Filed Under: Before and After, Home Tour, Projects and DIY Tagged With: Amy Howard Paint, Chalk Paint, Master Bedroom

How to Reinvent Your Space on a Budget

June 22, 2017 By stylishrevamp 2 Comments

I feel like this post has been a long time in coming.  I started to reinvent my master bedroom sitting room back in April and I am finally ready to share it with you today. It started off when I added shiplap to the fireplace which you can see here. Today I am going to share the rest of it with you and show you how to reinvent and revamp your space on a budget.

How to Reinvent Your Space on a Budget

I feel like our master bedroom and sitting room were the last two rooms to get a revamp.  Actually, they never did really have anything done to them other than paint changes a few times. We are planning on adding hardwood in the fall.  I am so ready to ditch the carpeting.  Who knew that a little 12 pound pup could wreak so much havoc on my carpet? The boys don’t help matters either. Even though the rooms are not 100 percent complete because we haven’t done the hardwood yet it still feels like a completely reinvented space with just a few changes! I will share the master bedroom portion in a later post.  Today it’s all about the sitting room which is where I spend my time watching all the shows that my husband or boys would never, ever watch.  Yep, I am a reality tv closet watcher!

DIY shelves and a Goodwill Makerover

I love this reinvented space. The tv stand/credenza was a Goodwill find.  It cost $40 and it is solid.  Each drawer is over 15 pounds.  Yes, I weighed them because that thing was a beast to move upstairs. Once we got it upstairs we added casters so I could move it around with a bit more ease.

Originally, I had this piece in my sitting room…

antique armoire

There is nothing wrong with the piece, it was lovely but it just did not fit the space.  It was too short and the depth was too deep.  I wanted something to fill the space and draw the eye up.  That’s where the shelves came in and I have to say that I love them! I adore them. Here, take another look at them!

How to Reinvent Your Space on a Budget

Adding shelves above my Goodwill stand.

So let’s start at the beginning. I found the stand at Goodwill for $40 which was a steal.  I know this will sound bizarre but I cannot wait to decorate this at Christmas time.  Yep, I said it!

So this is what it looked like when I spotted it at Goodwill…and it was love at first sight!

Goodwill credenza Before the revamp

This piece is huge. It is 76 inches in length and I am obsessed with it! I gave it a light sanding, primed, and painted it with a flat white paint that I had on hand to brighten up and bring light into the navy blue sitting area.

Decorating my $40 Goodwill Find.

Do the candlesticks and tobacco baskets look familiar?  Yep, they were originally in the sunroom downstairs.  My husband wanted a larger tv so the decorative accessories had to go…for now anyway. I have plans to dress up the extremely large tv that now dominates the sunroom that he has taken over! I changed the color on the smallest candlestick and went with a charcoal color instead of the pale blue which you can see here.

Adding Shelves to Draw the Eye Up

Next we added the shelves.  This is such an easy and inexpensive DIY.  All you need is Simpson Strong Ties (I found mine at Home Depot) and wood of your choice.  On this project we used pine 1″ x 6″ x 8 ft lengths.  I wanted the 2 inch thick pine but Home Depot didn’t have what I was looking for in stock and once I get started on a project, I don’t want to wait, so we improvised and trimmed the boards out to give it more bulk.

DIY Book Shelves

I sprayed all the Simpson Strong ties with black paint. While they were drying, I marked the studs on the wall with painters tape and decided the best placement for each shelf.  Once the ties were dry, I screw each tie to a stud.  I placed one on top and one below the shelf.  Then I slid each shelf into place, and screwed the Simpson Strong ties into the shelf.  It’s a very easy process and the impact to me is huge.  It totally reinvented the space. I will share more on my shelf styling over the weekend.

Adding shelves above my Goodwill stand.

I hope you enjoyed my newly reinvented space done on a budget! I am completely enamored with it and it did not break the bank!

Until Next Time,

SR_signature

Filed Under: Before and After, Home Tour, Projects and DIY Tagged With: Book shleves, DIY, Goodwill, Paint

How to get the Fixer Upper Look by Adding Shiplap

March 14, 2017 By stylishrevamp 1 Comment

Hey everyone.

We are enjoying a Snow Day here and I am loving it!  I feel like we all needed a lazy day of sleeping in and relaxing!

How to Get the Fixer Upper Look with Shiplap

A few months ago, I shared some of my project goals for 2017 and today I am so happy to share one with you that I can now check off my list.   I drew inspiration from Bless’er House, I am obsessed with her Winter Mantel which includes shiplap.  Also, if you have been around here for a while, you know that I love all things Fixer Upper. So this is my version of the two.

Adding Fixer Upper Style with shiplap.

How to get the Fixer Upper Look by Adding Shiplap

I am obsessing over this transformation.  This is in my sitting room off of the master bedroom where I watch all of my guilty pleasures on t.v.  It is a small space but by adding the shiplap, it draws the eye up and makes the space feel large yet still cozy and comfy!


I have been dreaming of this project for months and couldn’t wait to get started. I measured and drew up the plans back in January and this past week, we (me and my boys) were able to pick up the wood that I needed at Home Depot.  This project ended up being quite simple (with the help of my boys).  The hardest part was finding wood that was not warped and bowed.  I still ended up going back to Home Depot two more times for that exact reason and I decided to change the width of the side boards after my oldest suggested it.  You can find the wood we used here and here.

Shiplap front and back sides of the wood.

The wood, which is pine, comes in different lengths and widths.  I choose the 8 inch wide by 6 feet in length.  My middle son cut the wood down to 54 inches in the length.  I ended up having the gentleman from Home Depot cut my 2 side pieces down to 74 inches for me.  After heading back and forth several times, it was getting late so it was just easier to have him cut it for me. If you look at the picture the wood has a groove making the shiplap look like 4 inch slats.  To me, it felt too busy so we flipped the wood over and used the solid back side that created an 8 inch slat.

prep work on shiplap pine boards

primed and painted shiplap

Since our weather has been so unpredictable lately, I laid a tarp down on our kitchen counter and primed and painted the boards in our kitchen. These are the things I get into when my husband is on his golf trip. Sometimes, I think it is less stressful for him NOT to see what I am doing with these projects until they are finished!

While the wood was drying, I marked the studs with painters tape so the shiplap had something to attach to. The rest moved very quickly.  My middle, BK, used my ryobi brad nailer to attach the wood slats to the walls where I couldn’t reach.  Once the first piece went up and was level, the rest was completed within 15 minutes.  Once the shiplap was up, I used liquid nail to attach the side pieces because there were no studs to attach them to. I also used the brad nailer but wanted to use the liquid nails as well to make sure it was attached securely. Lastly, I caulked everything, used wood putty on the nail holes, and added one last coat of paint.

Here is a before (sorry for the Christmas photo, I keep forgetting the before shots). I always use this room but have never loved it and never got around to doing anything with it.

Christmas tree in the master bedroom.

Here is my completed Fixer Upper Look!

Shiplap fireplace with faux greenery in glass jars

The shiplap came from Home Depot.

The primer was  Zinsser B-I-N from Home Depot.

The white paint we had on hand.

The glass jars came from HomeGoods.

The greenery came from Michaels.

The mirror I painted black and we had both on hand.

The little round stand came from Goodwill (I am thinking of painting the top white, no rush and I’m still undecided).


Adding Fixer Upper Style with Shiplap

I know I have said this before but now I think this is my favorite little spot and tonight I am going to be sitting here by the fire watching Fixer Upper!  Thanks for stopping by and enjoy the rest of your week!

Until Next Time,

SR_signature


Filed Under: Before and After, Uncategorized Tagged With: Fixer Upper Style, Home Depot, shiplap

A Quick Follow Up on my Easy Driftwood Sign

October 17, 2016 By stylishrevamp Leave a Comment

A quick follow up on my easy Driftwood Sign

A few weeks ago I shared with you an easy DIY paint job on my house sign which you can read about here.  Today I wanted to share with you a quick follow up on that driftwood sign.  My oldest was home over the weekend and we made a quick trip to the Island and he hung my sign up for me!

This is our Island Home with the driftwood sign above the garage door.

Can you see the sign above the garage door? I didn’t realize how much I missed it above the door until we put it back on Saturday. It finishes off the look!  Notice that nice car in the driveway…Yep, not mine or anyone in my family for that matter.  Looks nice in front of the house though!

A Quick Follow Up on My Easy Driftwood Sign

Here’s a closer look at the sign.

Island Home Driftwood Sign


Remember this is what it looked like before I repainted it.

Repainting a driftwood sign using a sharpie paint pen

and now this…

We got the Point Island Living

I will let you know how long it holds up to the weather!

Here’s one final look at one of the most peaceful places…ever!  Can you see why I love this place?

This is our Island Home with the driftwood sign above the garage door.

Until Next Time,

SR_signature


Filed Under: Before and After, Home Tour Tagged With: Driftwood, paint. Island Home, Sign

How to Paint a Driftwood Sign the Easy Way

October 4, 2016 By stylishrevamp 1 Comment

How to Paint a Driftwood Sign the Easy Way

When we bought our home on the Island, it already had a name or at least a little driftwood sign above the door letting people know that We Got The Point and that’s how people usually know where we are located on the Island. The previous owners named the home and everyone wanted us to leave the sign so several years later We still Got the Point. Our home is on a point of land that juts out to the water which is how the previous owners came up with the sign…so we are just going to go with it.

Repainting a driftwood sign using a sharpie paint pen


Since our home is out on the point, it gets  a lot of wind and we get damage from the salt water.  The driftwood Point sign was in need of a little revamp. I was a bit worried about painting it since I do not have the steadiest of hands when it comes to small detail work but I found a little something that made it super easy!

How to Paint a Driftwood Sign the Easy Way

I made a trip to Home Depot (for something totally unrelated to this project) and I always stop by the paint section.  That is where I found this…

Sharpie Oil Based Paint Pen

The Sharpie Paint Pen was super easy to use.  I used it just as I would an actual Sharpie marker.  I was worried that it might run or drip but it really worked no differently than a regular marker.

First, I painted the entire sign with white paint that I had on hand and let it dry completely. Once that was done, I traced the letters with the Sharpie Paint Pen. This helps create a border that I can work within.

Painting with the Sharpie Paint Pen

The original lettering was grey but I chose to go with black.  Sadly, I have not been back to the Island Home to install it but you can see it finished now and later I will share it once I hang it back on the house.


Painted Driftwood Sign

Yep, I love it!  Even if I did not choose to label our home with this slogan!

I already have in mind the sign I want to make for Christmas with the Sharpie Paint Pen!

Until Next Time,

SR_signature

Filed Under: Before and After, DIY Crafts Tagged With: DIY, Driftwood, paint pen, Sign

How to Make a Change Using Paint

September 25, 2016 By stylishrevamp 1 Comment

Happy Sunday!

Today I am sharing how to make a change with paint. This is a quick and inexpensive way to make a change that can either make a huge impact or a subtle change. I wanted a subtle change.

How to make a change using paint

In our foyer, we have two mismatched tables that flank the door. I have been looking for a while to replace them but I haven’t found anything that I just had to have.  The pieces that I did fall in love with were too big for the space. This is one of those items that I talked about in my Ultimate Guide to Thrift Shopping.

How to Make a Change with Paint

A few weeks ago, I finally decided that instead of buying more furniture I would just paint my existing tables. I normally love the mismatched look but these foyer tables needed a revamp.  I wanted a more cohesive look and I knew I could get the look I wanted with paint.

Revamping my furniture with CeCe Caldwell's Paint is a super easy way to quickly change the look of a piece.

I picked up a can of CeCe Caldwell’s paint, on clearance, at a local shop that is no longer going to be selling paint… so score one for me.  I wanted a shade of gray that was darker than my walls and this was the only can of gray they had.  Luckily for me, it works.

The CeCe Caldwell paint is similar to Annie Sloan chalk paint.  Although, it was a bit thicker than the Annie Sloan paint.  Other than that the application was the same. Every time I paint, the can reads one to two coats, that is never the case for me.  Both table needed three coats and if I am being completely honest they really could have used a 4th coat but I was done.  When I am finished, I am finished!

Again, this was a subtle change and all I really wanted was a more cohesive and updated look. My husband didn’t even notice the painted tables until I pointed it out to him.

Before and after using CeCe Caldwell's Paint

The entrance table before being painted with CeCe Caldwell's paint.

This is the second table in the entryway.  It is similar in style but painted black with a bit more detailing.

Updating the table with Cece Caldwell paint in Pittsburgh Gray.

I also added some gold rub and buff to add a bit more dimension to the detailing.  It also helps tie in all the gold that I have in my foyer.

Adding gold rub and buff to add dimension.

Once all the painting was complete and the gold rub and buff was dry, I had to seal the paint and add protection.  I like to use Americana Decor wax.  You can pick it up at Home Depot.  It is much easier for me to use.  I paint it on with a foam brush and let it dry.  Once it’s dry, I buff it with a lint free cloth.  Easy Peasy!

Creating Cohesion with Paint

Although the two pieces are a bit different,  I like how the paint ties them together without being too matchy matchy.  It doesn’t look like I went out and bought two pieces of identical furniture, yet they still go together.

Adding cohesion with paint

I am enjoying these small changes made with paint.  When you are looking for a change, get out a can of paint.

Until Next Time,

SR_signature

Filed Under: Before and After, DIY Crafts, Home Tour Tagged With: CeCe Caldwell, foyer, Paint

  • 1
  • 2
  • 3
  • …
  • 6
  • Next Page »

Meet the Team

Hi, I'm Kathy! Mom to 3 boys, lover of thrift shopping and all things vintage.

Follow along with me as I revamp our home using thrifted finds!

Subscribe via Email


Visit Stylish Revamp's profile on Pinterest.

Our Favorite Posts

  • IKEA BILLY Bookcase Hack
    IKEA BILLY Bookcase Hack
  • DIY Headboard
    DIY Headboard
  • Revamping my Closet with the IKEA Pax Wardrobe
    Revamping my Closet with the IKEA Pax Wardrobe
  • My Version of Tidying Up the Pantry
    My Version of Tidying Up the Pantry
  • How to Make A DIY Driftwood Wreath
    How to Make A DIY Driftwood Wreath

Categories

  • Before and After
  • DIY Crafts
  • Fabulous Finds
  • Friday Favorites
  • Goodwill Goods
  • Home Tour
  • Projects and DIY
  • Thrift Shop
  • Thrift Shop Thursday
  • Uncategorized

Topics

Basket Chairs Chalk Paint Christmas Christmas Decor Christmas Tour Consignment Shop Consignment Shopping Desk DIY Driftwood Fall Flea Market gold Goodwill Halloween Holiday HomeGoods Home Office Home Tour IKEA Kitchen ladder Master Bedroom Michaels Milk Cans Nautical Paint paint pen Pillows pumpkins Shopping Sign spray paint thrift Thrifting thrift shop Thrift Shopping thrift shop thursday Tour Vintage White dishes wine rack Wood Wreath

Archives

Follow us on Pinterest!

Visit Stylish Revamp's profile on Pinterest.

Follow us on Twitter!

Tweets by @StylishRevamp

Follow us on Instagram

Screen Shot 2018-09-16 at 8.50.53 PM

Like us on Facebook!

Like us on Facebook!

Copyright © 2025 · Chic Pro Theme On Genesis Framework · WordPress · Log in