Stylish Revamp

Redecorating on a Budget

  • Home
  • About
  • Home Tour
  • Projects
  • Disclosure

IKEA BILLY Bookcase Hack

May 6, 2015 By stylishrevamp 28 Comments

I am so excited to share our IKEA BILLY bookcase hack.  I fell in love with the bookcases The Makerista shared. They were gorgeous!  I showed it to my husband and he agreed that they would look great in my soon to be office (although, I am pretty sure he wasn’t even aware at the time that I was transforming the formal living room into my office.) It still cracks me up that we even have a formal living room, we have three boys and a dog, there is nothing formal about this family!  Anyway, back to the bookcases,  my guy pretty much followed the directions The Makerista shared in her post, making a few minor adjustments to fit our space.

IKEA BILLY Bookcase Hack 1

I absolutely LOVE these bookcases.  I am still adjusting the styling on the shelves, adding and taking away things everyday which is fun for me.  You will see I am back and forth with the mirror on the center shelf.  I am already thinking about how I will style it during the Christmas Season. Yes, I am that girl!

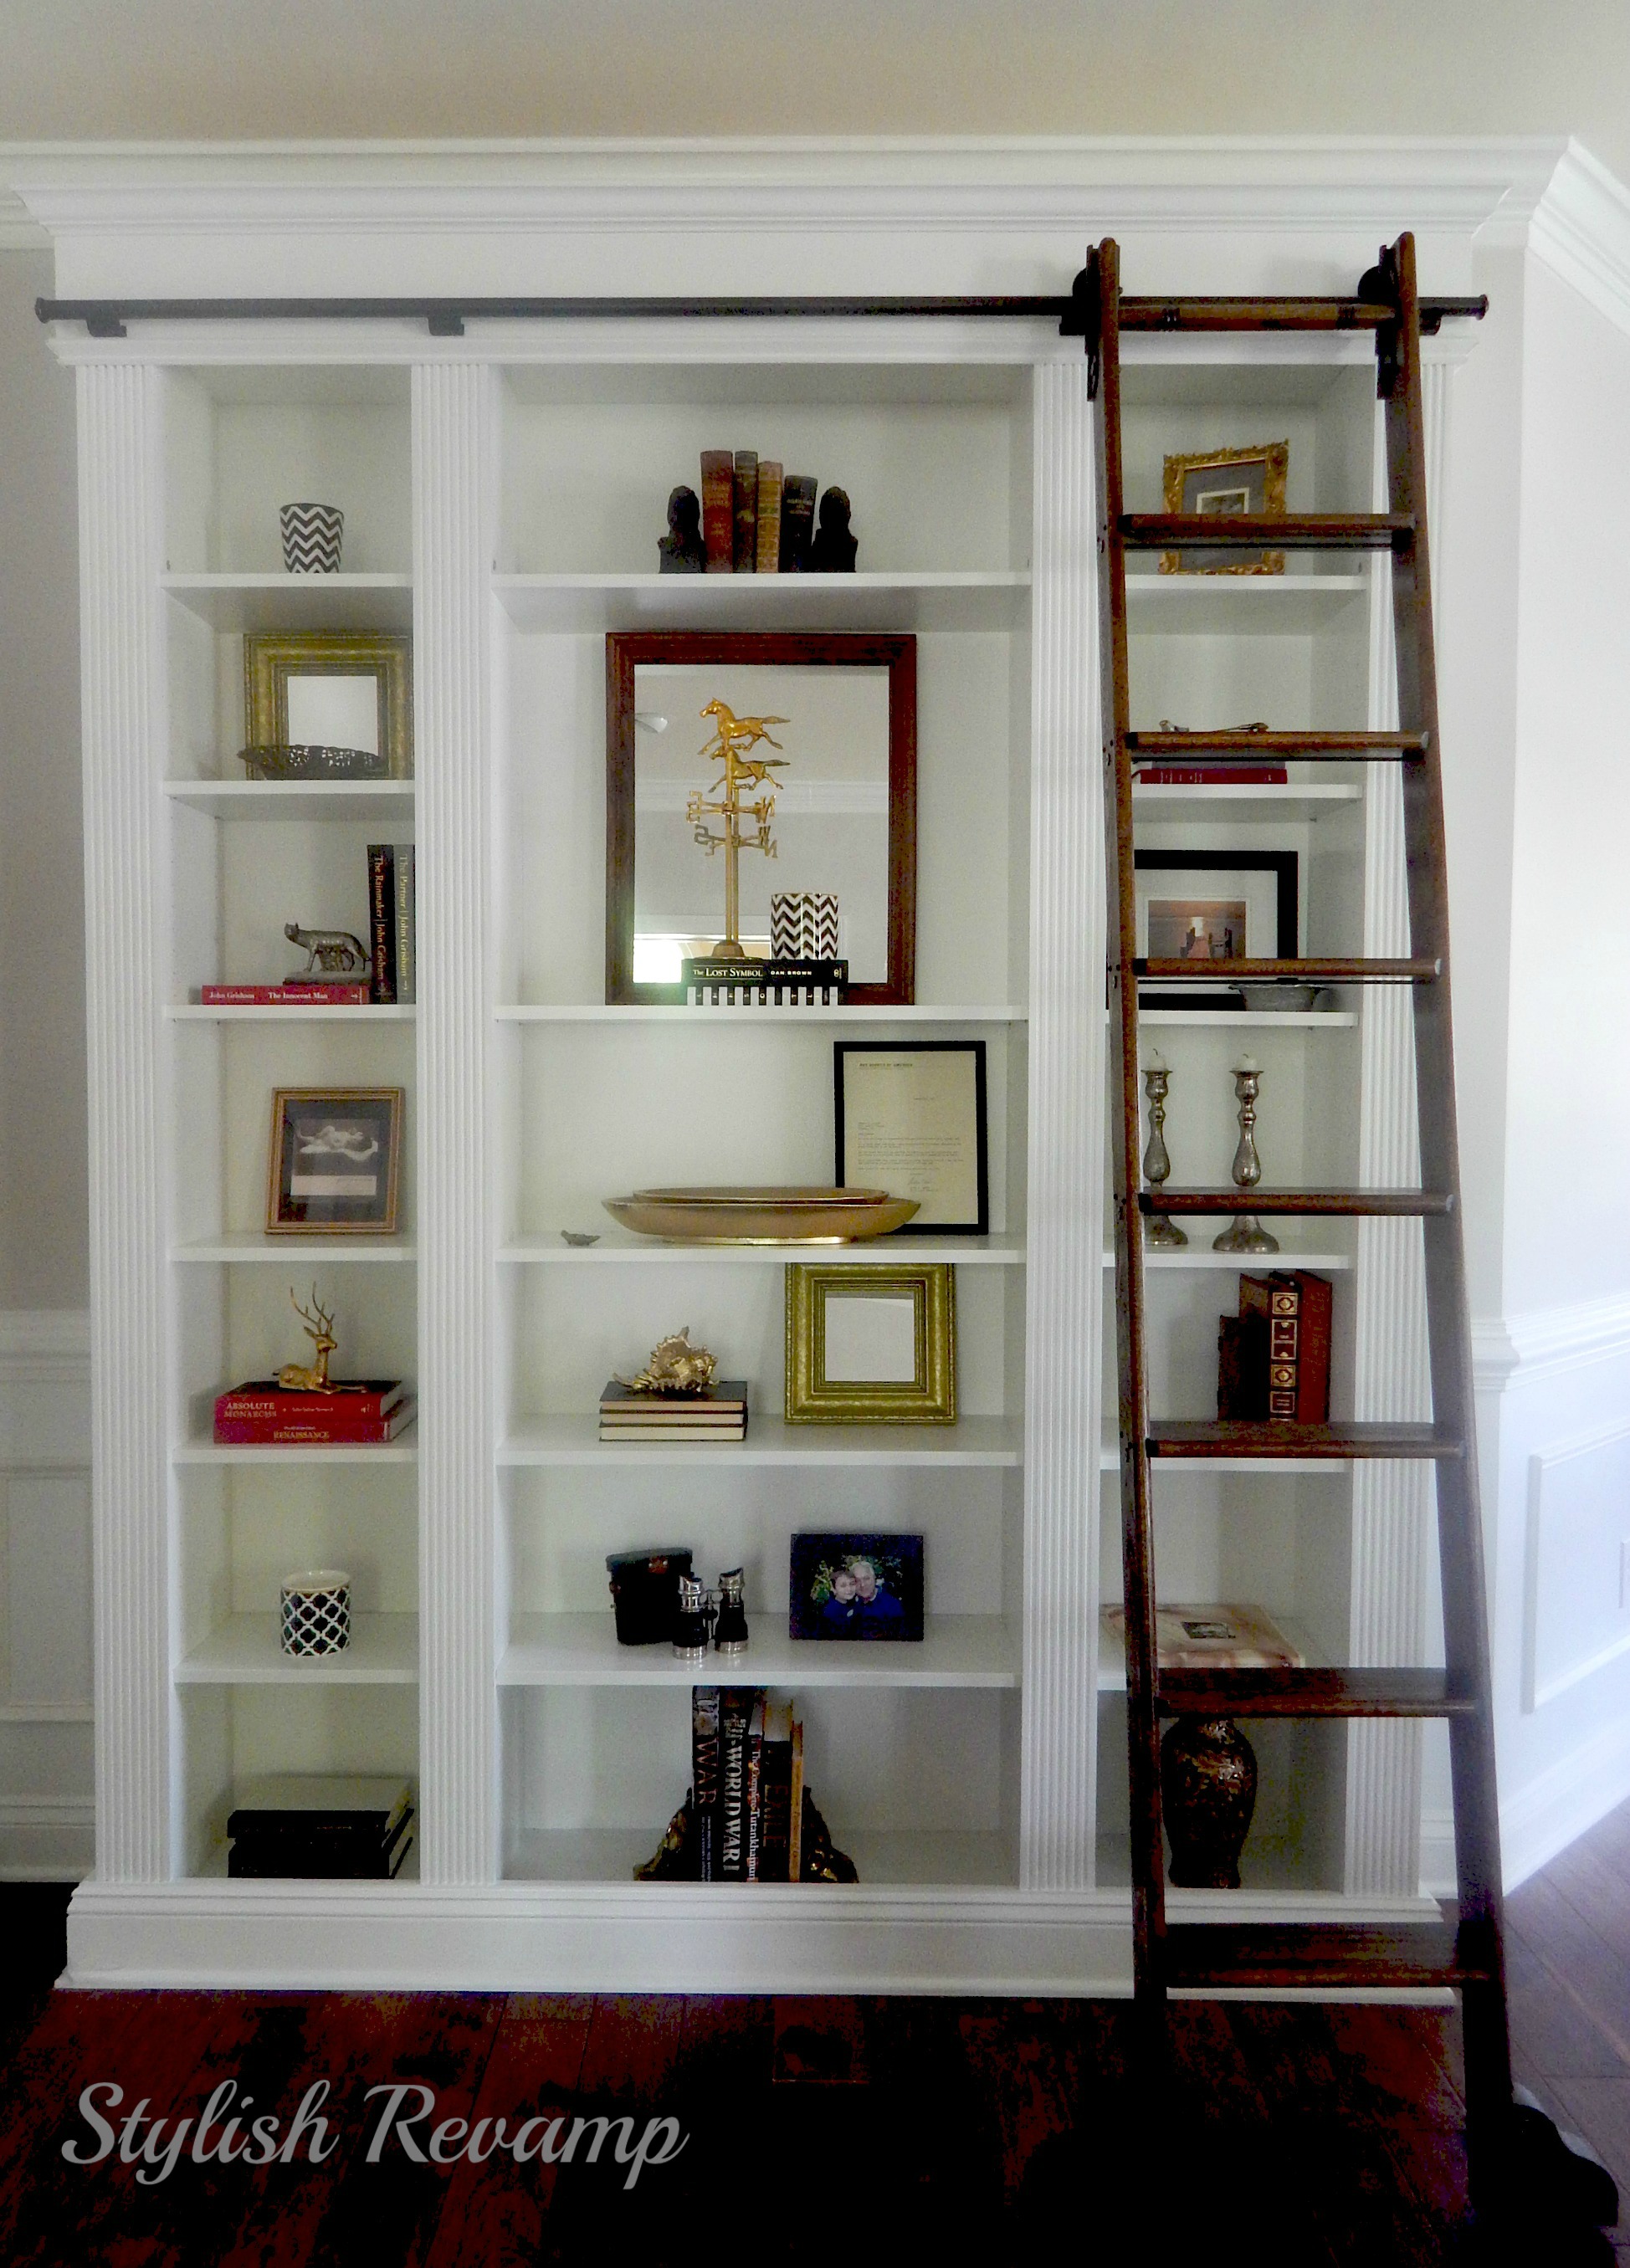
Check out the rolling library ladder.  I have always wanted one of these but didn’t realize how expensive they were.  I found this one on ebay and we got a great deal.   The stain on the ladder is perfect with our new flooring and like I said it was the best price I have seen on any rolling ladder.  Gman is enjoying it too!

Rolling library ladder

Ikea Billy Bookcase Hack

There is really not one thing I would change about this bookcase.  Usually when we are done with a project, my husband will say, “I should have done this or I wish I would have done that” for me this is perfection.  He did such a great job.  He has really been a great sport about doing all these projects for me. As you know, it starts with one project that leads into the next and so on.

This is what we started with…I can’t believe it went from this…

Bookcase Prep work

to this…

IKEA BILLY Bookcase Hack 1

To see our inspiration for this project, please check out The Makerista.  She has some fabulous ideas.

Until next time,

SR_signature

social-icon-facebook copy  100x100_icon-twitter copy  interact_pinterest_icon_100 copy  instagram-icon copy

We Party Here:

Link-Party-112  fd5d7-saturdaysparksbutton3  button  LinkParty  workitwednesday_zpscfc92ec3  frenchframegfairy005bw-1-1-2    Button-Small_zpsa34dbfe5

Share this:

  • Click to share on Pinterest (Opens in new window)
  • Click to share on Facebook (Opens in new window)
  • Click to share on Twitter (Opens in new window)

Related

Filed Under: Before and After Tagged With: Bookcases, IKEA, Library Ladder

Sharing

Facebooktwittermail

Comments

  1. Gwen, The Makerista says

    May 6, 2015 at 1:16 am

    Looks beautiful! Great job, and glad we could inspire you. 🙂

    Reply
    • Kathy & Garrett says

      May 6, 2015 at 3:11 am

      Thank You, I so enjoy your blog!

      Reply
  2. Mel @ The Creative Fox Den says

    May 6, 2015 at 11:30 am

    This looks amazing, great job!

    Reply
    • Kathy & Garrett says

      May 6, 2015 at 11:46 am

      Thank You for your sweet comment!

      Reply
  3. Tracy says

    November 3, 2015 at 4:42 pm

    Hello! I just wanted to finally write and tell you that I am obsessed with your bookcases! Ever since I was a teenager and first saw a rolling ladder in a furniture store with my Mom, I have always vowed to one day put one in my house! Well, I just scored a gorgeous one off of Craigslist and I am picking it up this weekend! Your post inspired me to re-visit that dream as I have limited wall space. Your bookcases are so perfectly perfect that I just wanted to let you know! Thank you for the post and for showing me that I can get this look in a limited space! Its not Henry Higgins library but it is going to be fabulous! Well done and thank you!

    Reply
    • stylishrevamp says

      November 5, 2015 at 12:10 am

      Thank you so much! I am so glad you liked our post and that we have inspired you.

      p.s. I just showed my husband your message and you really made his day!!! I found a picture of the bookcase I wanted and he created it for me. I think the ladder is my favorite part, I have always wanted one too. Good luck with your bookcase. I can’t wait to see the finished result!

      Reply
  4. Jennifer says

    December 27, 2015 at 5:40 am

    Hi! Gorgeous bookshelves! How did you adhere the trip in between the bookshelves?

    Reply
    • stylishrevamp says

      December 28, 2015 at 3:07 am

      Thank You! We added spacers between the bookcase then used a nail gun to attach the trim to the end of each bookcase.

      Reply
  5. Carol L Berman says

    January 3, 2017 at 1:54 pm

    I know you did this a while ago–but I’m curious to know–did you nail to the wood strips on the wall? Did you use that to account for the depth of the floor moulding without removing it? And did you plug up the space between the bookcases and the back wall? I love this…just thinking about if I’m ambitious enough.

    Reply
    • stylishrevamp says

      January 5, 2017 at 3:39 pm

      Hi Carol. Sorry for taking a bit to get back to you. I am in the process of taking down all of my Christmas decorations. I will try to answer all of you questions to help clarify a few things. We did screw three boards to the wall, attaching them to the studs. We then used L Brackets to attach the book cases to the wood strips on the wall. We added spacers between the book cases (blocks of wood), then attached the decorative trim between the three book cases. We did leave the wall trim in place. The bottom of the book case is designed to fit around the trim. We added the same trim around the book case and tied it into the existing trim. On the sides of the book case we added a piece of MDF already painted the exact same color as the book case (we found it at Home Depot) It was the exact dimension, length and width, that we needed which made the book case flush to the wall. If you zoom in on the picture during the build process you can better see the L Brackets and the side wood trim we used. I hope this helps. If you do decide to do this send me a picture. I love our book case do I say go for it! Good Luck!!

      Reply
  6. Angela says

    January 20, 2017 at 3:18 am

    I have two of these ladders I picked up 5 years ago for $30 on craigslist. Had great plans for them but our new home has low ceilings and can’t bring myself to cut them down. Apparently the original stamping from putnam makes them valuable. But as of now collecting dust. 🙁 love your bookshelves

    Reply
    • stylishrevamp says

      January 20, 2017 at 7:03 am

      Wow, what a great find for you! So sorry you cannot use them yet! I wouldn’t want to cut them down either. Maybe there is a home renovation in your future where ceilings are raised ? Good luck and thanks for stopping by

      Reply
    • Mika says

      December 8, 2019 at 9:43 am

      Hi, I know I am 3 years late to this post, but if your ladders are still collecting dust, I’d love to buy one depending on where you’re located in the US?

      Reply
  7. Pathrina Watson says

    August 10, 2017 at 1:53 am

    Can I ask where you got the ladder and hardware from? im having terrible trouble locating anything like this in australia

    Reply
    • stylishrevamp says

      August 10, 2017 at 7:04 pm

      We found it on Ebay and the hardware was included. Good luck with your search!

      Reply
  8. Joanne says

    March 14, 2018 at 12:12 am

    I just saw your IKEA bookcase and it’s absolutely gorgeous! I am wanting to do the same thing and yours is the best! Love the clean lines and how beautiful the white contrasts so well with your gorgeous floor!

    Reply
    • stylishrevamp says

      March 14, 2018 at 7:39 am

      Joanne, thank you so much. It is still one of my favorite DIY’s today. We are still loving the floors and are happy we went with the darker stain. Thanks for stopping by to see us!

      Reply

Trackbacks

  1. Think and Make Thursday Party 32 - Dwell Beautiful says:
    May 21, 2015 at 3:42 pm

    […] {Ikea Billy Bookcase Hack from Stylish Revamp} […]

    Reply
  2. What I am Loving at the Consignment Shop - Stylish Revamp says:
    February 29, 2016 at 10:13 pm

    […] adore the details on this little piece.  The side trim matches the trim on our revamped IKEA Billy Bookcase that is already in my home office.  I need to sand down my new corner cabinet and […]

    Reply
  3. My Scores at the Thrift Store - Stylish Revamp says:
    July 18, 2016 at 6:30 pm

    […] I am sharing another cloche.  When I first saw it, I thought it would look good on the book case in my home office.  It was another thing that I walked by and thought, if it is still there when I […]

    Reply
  4. Designing with the IKEA Book Case - Stylish Revamp says:
    September 28, 2016 at 3:28 pm

    […] Last year I shared my IKEA Billy Book Case hack, which you can read about here. […]

    Reply
  5. [Inspiration, Lecture] #3 Ikea Hack : La bibliothèque BILLY – Les Bricoles de Mel says:
    January 5, 2017 at 12:22 pm

    […] Stylish Revamp Southernrevivals TUTO […]

    Reply
  6. Revamping my Closet with the IKEA Pax Wardrobe - Stylish Revamp says:
    October 1, 2017 at 11:09 am

    […] and decorative moulding between each wardrobe unit.  He used the same concept that he used on the IKEA Billy Bookcase which you can read about here.  I love the look of the wardrobes with the trim and moulding. It […]

    Reply
  7. Ikea Billy Bookcase Hack | Desktop Decorating says:
    October 28, 2017 at 2:02 am

    […] ikea billy bookcase hack – Source […]

    Reply
  8. Ikea Billy Bookshelf Hack | Desktop Decorating says:
    October 28, 2017 at 9:27 pm

    […] ikea billy bookshelf hack – Source […]

    Reply
  9. Ikea Hacks - Inspired Space - The Builder's Wife says:
    November 12, 2017 at 2:00 pm

    […] Stylish Revamp […]

    Reply
  10. Brian’s Library: Turning Ikea Shelves into Built-ins – VILLAS AT MONTCLAIR says:
    October 15, 2018 at 1:37 am

    […] fill my massive wall. Inspiration: http://www.themakerista.com/lauras-living-room-ikea-billy/ http://www.stylishrevamp.com/2015/05/06/ikea-billy-bookcase-hack/ […]

    Reply
  11. 20 Budget Friendly IKEA Billy Bookcase Hacks - Simply Stacie says:
    February 2, 2022 at 4:25 pm

    […] Ikea Billy Bookcase Hack from stylishrevamp.com […]

    Reply

Leave a Reply Cancel reply

Your email address will not be published. Required fields are marked *

This site uses Akismet to reduce spam. Learn how your comment data is processed.

Meet the Team

Hi, I'm Kathy! Mom to 3 boys, lover of thrift shopping and all things vintage.

Follow along with me as I revamp our home using thrifted finds!

Subscribe via Email


Visit Stylish Revamp's profile on Pinterest.

Our Favorite Posts

  • IKEA BILLY Bookcase Hack
    IKEA BILLY Bookcase Hack
  • My Version of Tidying Up the Pantry
    My Version of Tidying Up the Pantry
  • Revamping my Closet with the IKEA Pax Wardrobe
    Revamping my Closet with the IKEA Pax Wardrobe
  • How to Make A DIY Driftwood Wreath
    How to Make A DIY Driftwood Wreath
  • Driftwood Christmas Tree
    Driftwood Christmas Tree

Categories

  • Before and After
  • DIY Crafts
  • Fabulous Finds
  • Friday Favorites
  • Goodwill Goods
  • Home Tour
  • Projects and DIY
  • Thrift Shop
  • Thrift Shop Thursday
  • Uncategorized

Topics

Basket Chairs Chalk Paint Christmas Christmas Decor Christmas Tour Consignment Shop Consignment Shopping Desk DIY Driftwood Fall Flea Market gold Goodwill Halloween Holiday HomeGoods Home Office Home Tour IKEA Kitchen ladder Master Bedroom Michaels Milk Cans Nautical Paint paint pen Pillows pumpkins Shopping Sign spray paint thrift Thrifting thrift shop Thrift Shopping thrift shop thursday Tour Vintage White dishes wine rack Wood Wreath

Archives

Follow us on Pinterest!

Visit Stylish Revamp's profile on Pinterest.

Follow us on Twitter!

Tweets by @StylishRevamp

Follow us on Instagram

Screen Shot 2018-09-16 at 8.50.53 PM

Like us on Facebook!

Like us on Facebook!

Copyright © 2023 · Chic Pro Theme On Genesis Framework · WordPress · Log in