
Merry Christmas!
Today I am going to share our outdoor Christmas tour. I hope you enjoy!


Well, that is our home decked out for the Holidays.
Merry Christmas!
We wish you a happy, healthy Holiday filled with family and friends!
From
Kathy and Gman

Redecorating on a Budget
Merry Christmas!
Today I am going to share our outdoor Christmas tour. I hope you enjoy!
Well, that is our home decked out for the Holidays.
Merry Christmas!
We wish you a happy, healthy Holiday filled with family and friends!
From
Kathy and Gman
It has been a busy, crazy, whirlwind few weeks. My oldest was home from college. My other two boys were on break as well. We traveled to Philadelphia for Thanksgiving. I ate too much of everything. Returned home and my dearest friend traveled until 1:00 a.m. to get here. Then we continued to stay up for the next three nights talk, talk, talking. I had to laugh because my hubby asked, what do you do? How can you talk that much? What are you talking about? There was not a moment of silence, I can tell you that! There is not a problem in the world that a little girl time cannot conquer. So dear friend…just know that all of us here are thinking of you and we love you!!!
So since I have been so busy and I have added extra gym time on to my schedule to undo the damage of Thanksgiving and the damage I know is heading my way with the Holiday baking coming up, my blogging has fallen behind. My manager has been lecturing me so I thought I would share a quick easy DIY Mini Christmas Wreath Project before said manager gets off the afternoon school bus and starts in on me again about productivity!

I love projects that only take a few minutes but add something special to your decor. Last night I picked up a mini grape-vine wreath and one large greenery pick from Michaels. I snipped off pieces of the greenery and inserted them into the wreath. I added a bit of hot glue to help them adhere. I added a sprig of red berries for added Christmas cheer. I attached the wreath with a red and white string to my vintage white frame that I shared here. Easy Peasy! I am hoping to have all of my Christmas decorating finished by this weekend. So far I have four trees up, you can see our kitchen Christmas tree reflection in the mirror. I will be sharing more of our Christmas Decor next week if all goes as planned.
This year my husband who is normally the one to do the outside light decided to hand it over to the boys. Let’s just say, I will probably not be sharing the outside tour this year. When I was talk, talk, talking to my friend, I looked out the window as my oldest was hurling the Christmas Lights over the tree like a football. NOT PRETTY! I was going to redo the lights myself but it has been raining nonstop! Hopefully, it will dry up soon because those lights are driving me crazy. I don’t know how he wired them but they blew a fuse last night so to be on the safe side I am leaving them unplugged.

I am off to finish up my Christmas decorating. Tomorrow I am sharing some of my Vintage Christmas Decoration on Thrift Shop Thursday. Hope you are have a great day!
Until Next Time,

Today I am sharing a very simple and quick project. I made a rag wreath for my newly revamped sunroom.
 .
.
I have seen several different rag wreaths all over Pinterest and thought I would give it a try. For my DIY Rag Wreath, I used an old sheet. I ripped it into several 1″by 4″ strips. I attached the fabric to an old embroidery hoop simply by tying a knot in the fabric around the loop.

This really was an easy project. I was in the middle of doing laundry and packing for our trip back home to my nephews wedding. By packing, I mean, I packed all of my things then had to get the boys suits organized so nothing was left behind like dress shoes or dress socks or dress pants. My husband walked into the kitchen and just looked at me, I knew he was thinking don’t you have enough to do so we can get out of here? Why add another project on top of everything else? But he didn’t say anything, I am assuming he thought it best not to since we had a four hour car trip ahead of us.
I was able to hang the wreath and get these three guys to the wedding looking this handsome!


I just had to share!
Until Next Time,
I am sharing an easy DIY wreath. The entire project took about 15 minutes and it has added a pop of color to my white kitchen. At Christmas time, I had a red berry wreath above the cooktop but I only wanted the pop of red during the Christmas Season. If I were a bit more organized, I would have made an Easter wreath, maybe next year.

I stopped by Michaels today and picked up my supplies with my 40% off coupon!

I trimmed up the greenery, then wrapped it around the grapevine wreath, overlapping as I went. Super easy. I have been adding touches of green in both my kitchen and dining room. I really like the pop of green against the white. It just looks so refreshing to me. The shock of green, up against the cabinet in the kitchen and against the white dishes in the dining room, really stands out to me. Can you tell it’s my latest obsession?

I just love when a project is simple and comes together like I pictured in my head. So, what is your favorite color to use to add a pop of color to a neutral room?
Until next time…

We party here:


This past week has been a mad dash to get all of my Christmas decorating done. Today I am sharing my front door wreath. I got this idea from a magazine last year. So easy and super cute!

Come back this weekend. I will be doing my Christmas home tour.
We are linking up to:

Happy Saturday! It is finally beginning to feel like Fall. The weather is gorgeous today. My youngest and I went to a flea market, yard sales and a few consignment shops. I will post my finds later on today. Right now, I am going to show you my fall wreath. I found this idea at StoneGable. I loved her Raffia Wreath so I made my own version of it.
My Supply list includes:
Straw Wreath
Floral Pins
Raffia
Hot Glue Gun
Dried Wheat

I followed the same instructions from StoneGable. Most importantly, Leave the Plastic Wrap On The Wreath! All you have to do is gather a few strands of the raffia into a bow shape and pinch it in the center and secure it to the wreath with the floral pin. Continue this process while alternating the raffia horizontally and vertically on the wreath. I would adjust mine as I went along to hide the floral pins. After I had placed several raffia bows on the wreath, I would cut the loops open. On some of the bows, I would leave a few of the loops intact. Once you have completed placing the raffia bows around the entire wreath, you can trim up the excess raffia. You will have strands kind of all over the place. Once I trimmed it up, I added some dried wheat. This wreath is a more natural looking wreath. I like how it is not all neat and orderly!

We are linking up to:
A few days ago I finally decided to use the driftwood that the boys and I have been collecting from the rip rap at our Island Home. I got the idea from The Wood Grain Cottage which you can find here. I absolutely love the idea of a driftwood wreath so today I am going to share with you how to make a DIY Driftwood wreath of your own.

My supply list includes:
Foam wreath form
Burlap
Hot glue gun and glue sticks
Driftwood (twigs from your yard if you do not have access to driftwood)
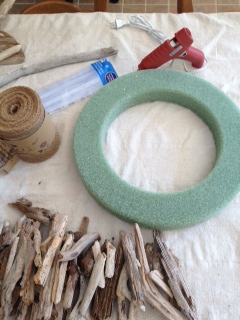
First, I wrapped the foam wreath form in burlap an attached it with hot glue. This was super simple.

Once the form was completely cover with the burlap I started adding pieces of the driftwood

…and more driftwood
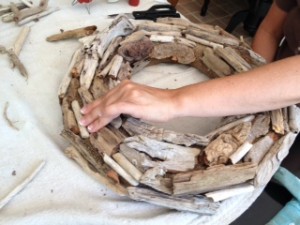
Until I came up with this:

Let it completely dry before hanging. This was a super easy project although a bit messy. I am thrilled with how it turned out. Thanks Shayna from The Wood Grain Cottage for this great idea.
I took the finished wreath down to the Island Home where we found all of the driftwood to begin with and added it to my kitchen. I have to say that it fits in perfectly. What do you think?

We are linking up to:

