Stylish Revamp

Redecorating on a Budget

  • Home
  • About
  • Home Tour
  • Projects
  • Disclosure

Cozy Christmas Home Tour

December 21, 2017 By stylishrevamp Leave a Comment

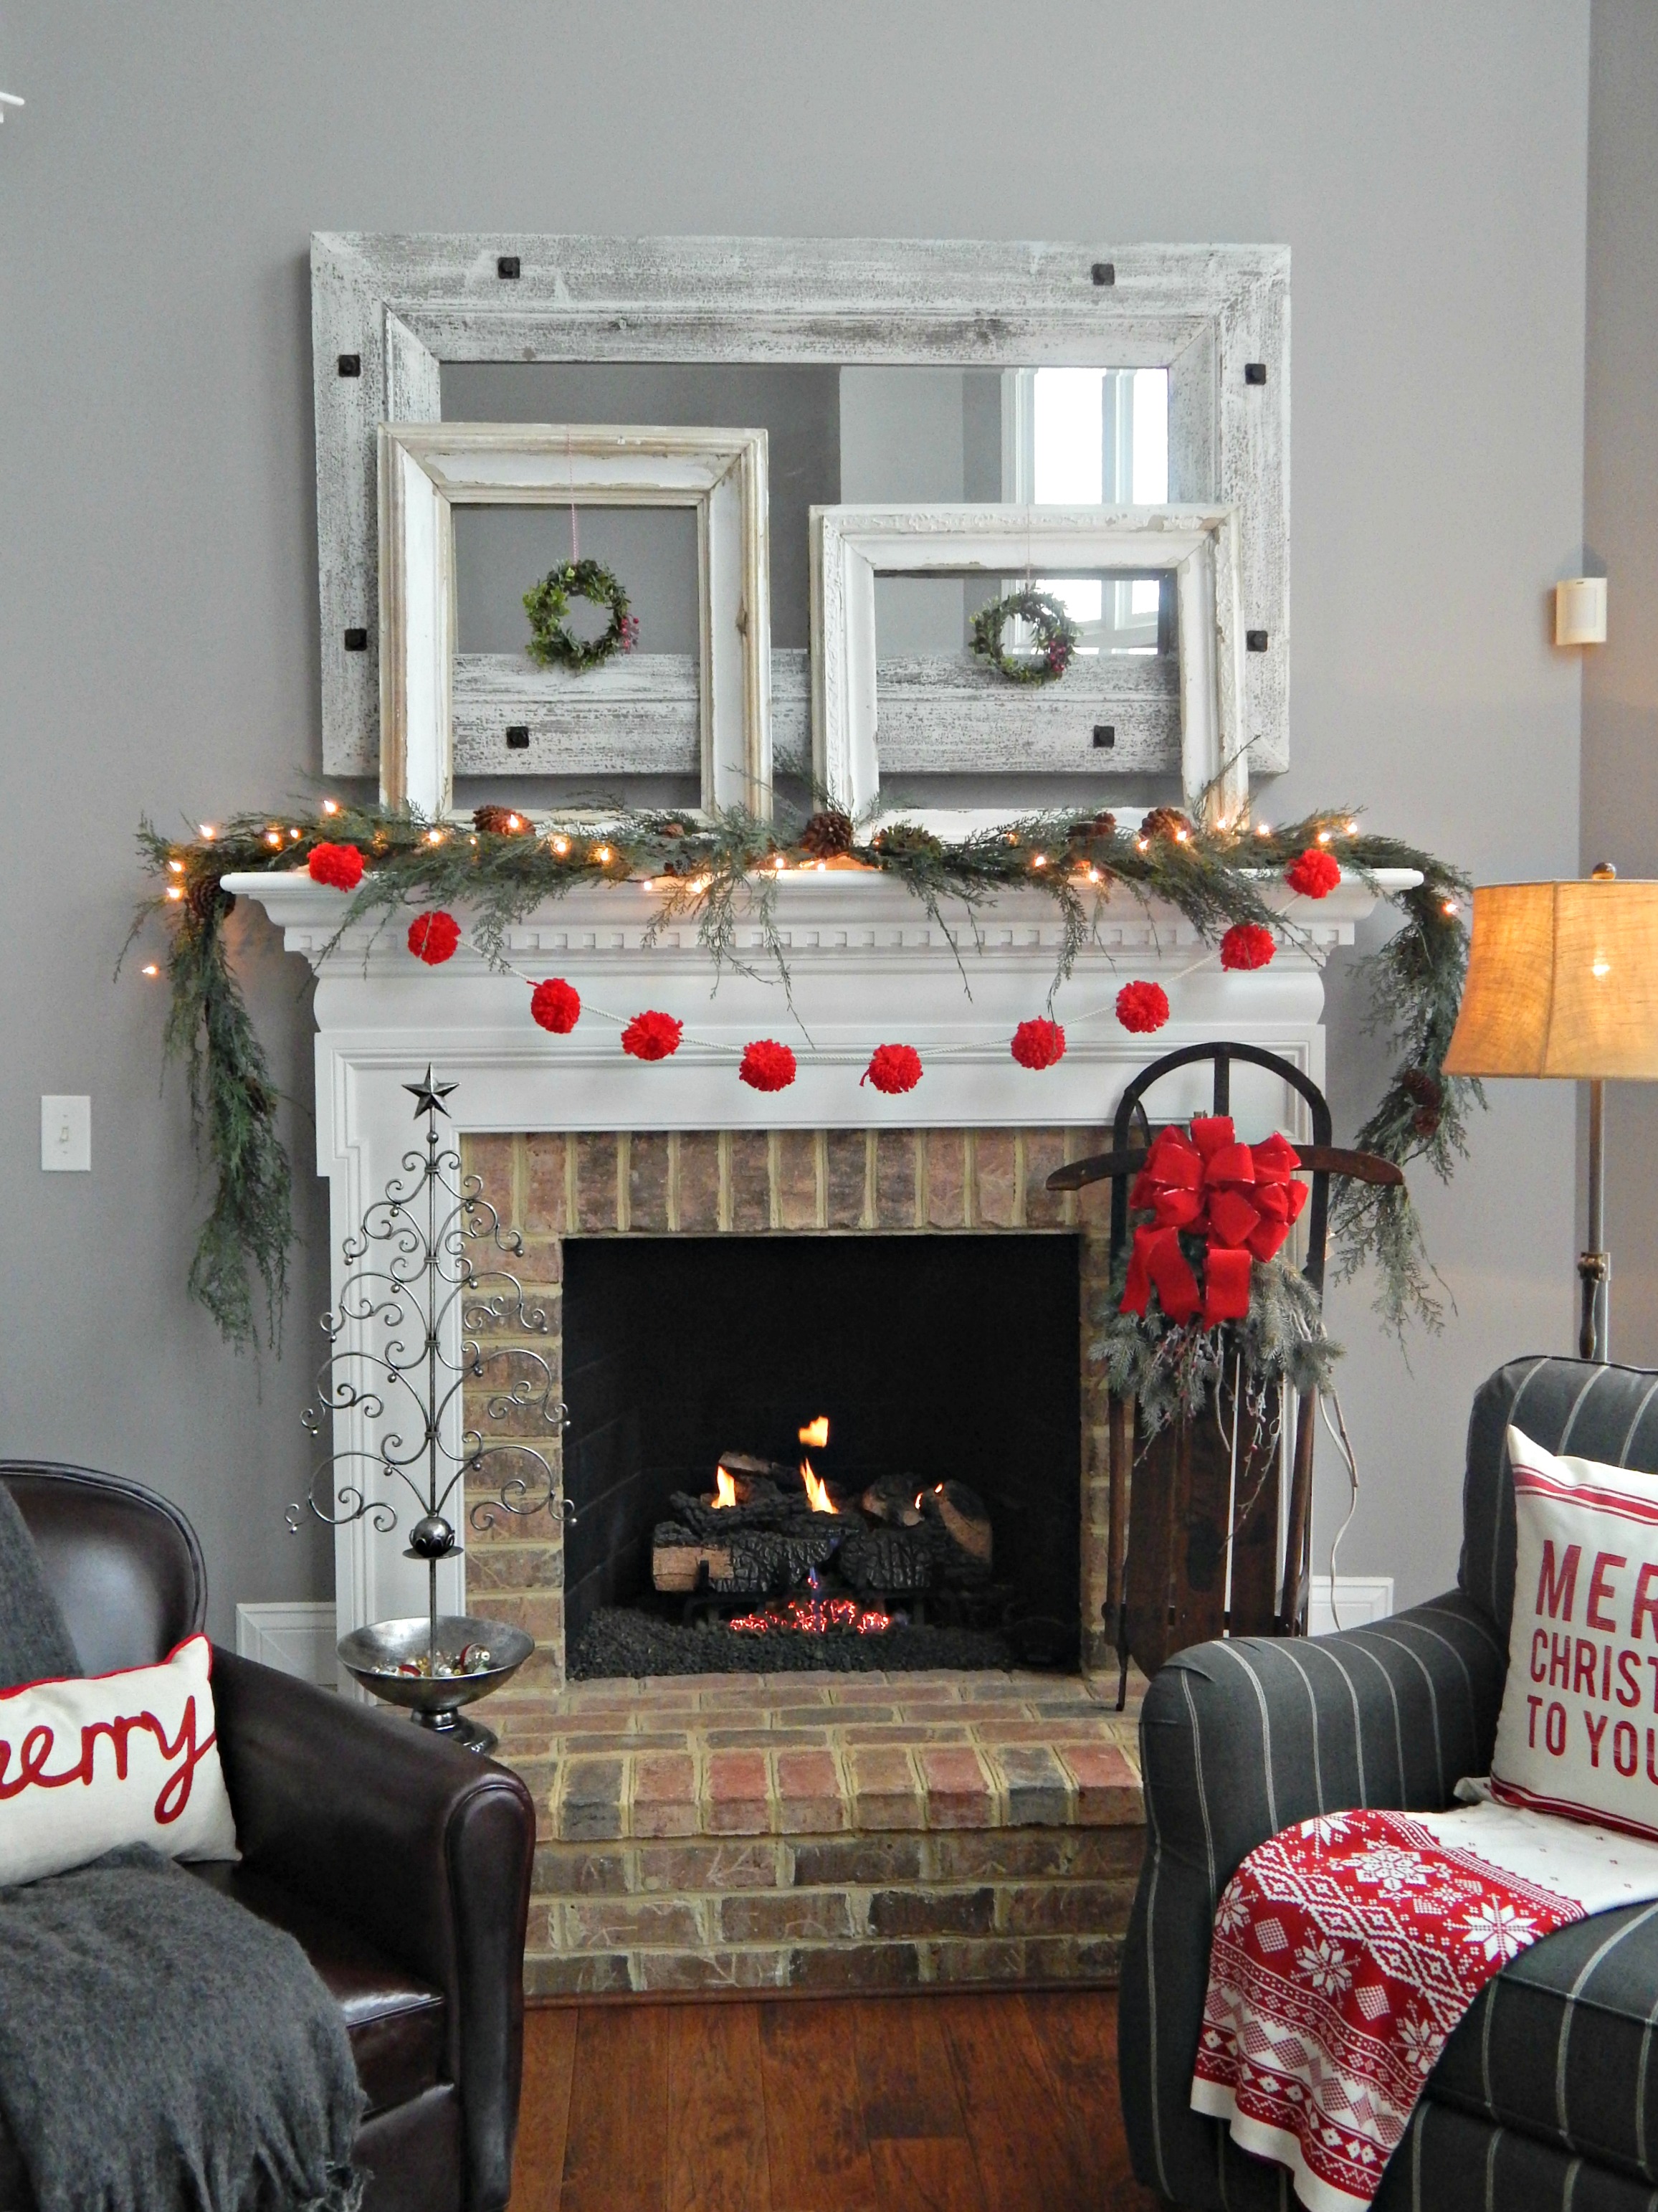
Hi everyone! I am back to share another peek into our Christmas Home.  Other than the kitchen, the rooms I am sharing are where I spend most of my time.  Today, you will see our sunroom and our sitting room off of the master bedroom. The sitting room is the coziest room in the house. Even though it is small, I love having a Christmas tree in here.   So let’s get started in the sitting room.

Cozy Christmas Home Tour

sitting room off the master bedroom dressed for Christmas

Christmas in the sitting room.

My mantle dressed for Christmas using a vintage feeder and DIY letters.

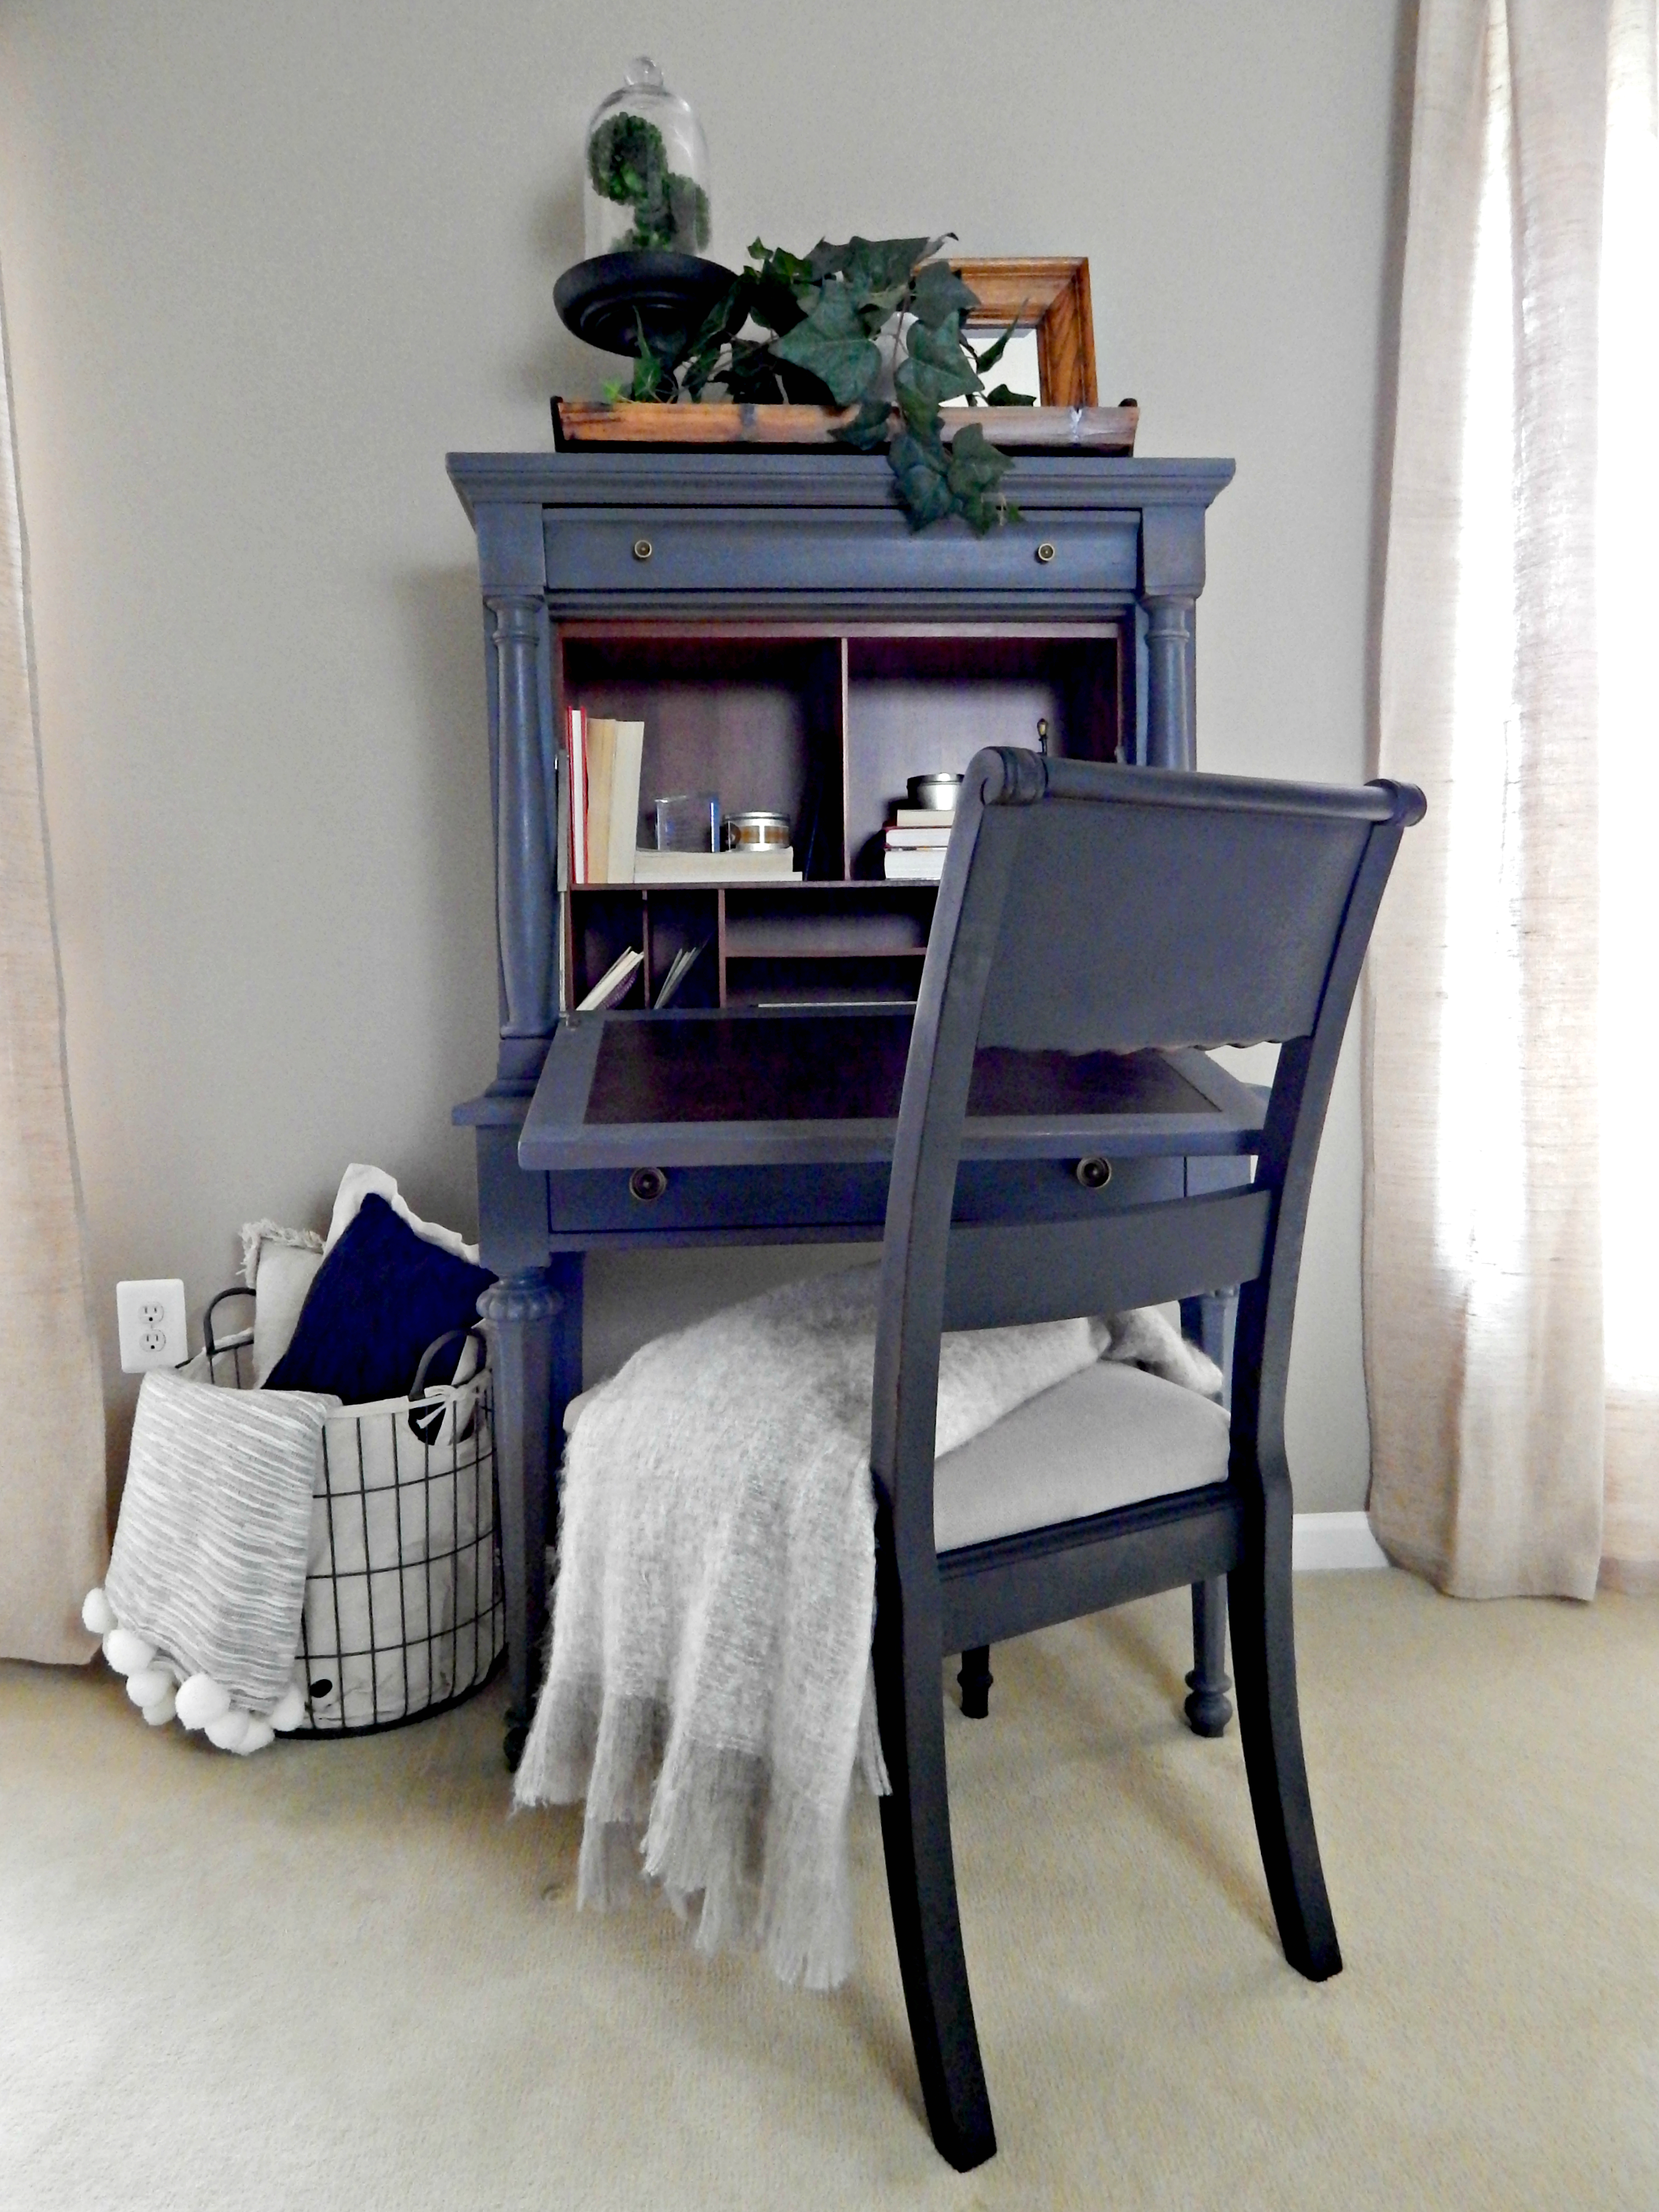
I love the vintage feeder. I added some greenery and the red letters to add a pop of color.

DIY wood Christmas sign

DIY wood Christmas sign

I love this sign above the bed! You can see how I made it here and here.  The process is the same.

I didn’t get around to sharing the faux fireplace my husband built for our youngest but I wanted to show you how cute it is decked out for Christmas.  I will post the design and build in a separate post.

Faux fireplace in our son's room

(look at the wooden figure dabbing)

Cozy Christmas Home Tour

Next, I will show you the sunroom.  This is where we hang out the most but Santa leaves the gifts under the tree in the Family room which you can see here.

Flocked Christmas Tree from Walmart

I ordered this tree from Walmart.  It is heavily flocked and kind of sparse looking which I adore. I forgot to mention but the tree in the sitting room is also from Walmart.  Both of them were CHEAP!

Mini Christmas tree with a vintage table cloth for a tree skirt

A few years back my husband came home with a little table top tree and we have continued with that tradition.  I think it is so cute.  The tree skirt is actually a vintage table-cloth that I picked up in Florida several years ago.  It reminds me of one my mom used to have. I think decorating for Christmas brings back so many happy memories and that’s why I enjoy it so much.

You can see a glimpse into my office and the foyer in the picture above.  My goal for tomorrow is to do a final Christmas Tour which will include my office and the foyer.  I finished my baking again today since someone pretty much wiped out everything I have baked up until this point and I have already decided I am on a break from the gym until January so I should be able to do a final post.  I say should just in case I get sucked into the Hallmark Channel again.

Until Next Time,

SR_signature

Filed Under: Home Tour, Projects and DIY, Thrift Shop Tagged With: Christmas, Christmas Decor, Home Tour, Vintage

Christmas Home Tour part 2

December 19, 2017 By stylishrevamp Leave a Comment

Yes, this was supposed to go up on Sunday but I am truly obsessed with the Hallmark Channel at the moment.  I cannot get enough of it hence the late post and now the need to double up on the rest of my room tours.  So today will be both the kitchen and the dining room Christmas tours.  On a positive note, most of my wrapping is done as well as my baking!

O.k. let’s get started in the kitchen.  Most of my kitchen has remained the same with just a few new items to share.

My white kitchen decked out for Christmas with pops of red.

Christmas Tree with Tree Collar

The banner hanging in the window is new this year.  I picked it up at our local barn show.  It is reminiscent of a vintage banner that’s why I love it.

I love my husband's vintage red truck decked out for the holidays.

My husband’s red truck is an oldie but a favorite, especially with the wreath on the bumper and a Christmas tree in the back of the truck.

Goodwill finds and a little something vintage

This little ceramic camper is new for this years decor.  I picked it up at Goodwill last year after Christmas.  I adore this piece and it will always remind me of the sweet woman that bought it for me. I was strolling around Goodwill after Christmas last year and they had several pretty Santa mugs and these little campers.  So I was scooping them up and putting them in my cart and when the sweetest woman came up to me and we starting chatting about what I was going to do with them.  I told her I would keep a few for myself and the rest I would fill with candy,  it would make a great hostess or teacher gift. So she started loading her cart up and thanked me for the idea. When I went to pay, the kind woman had already paid for my purchases and had already left.

The Santa beside the camper is a vintage napkin holder that I have had for a while. I picked it up at our local antique shop.

Christmas Kitchen with Pops of Red

Christmas Home Tour

Ok, now onto the dining room.  We will have our Christmas Eve dinner in here as well as our Christmas Day Brunch.

A dining room dressed for Christmas.

I absolutely love all the pops of red this year in our Christmas decor.

A dough bowl filled with greenery and shiny gold Christmas ornaments for a simple centerpiece.

I will set the dining room table on the 23rd for our Christmas Eve dinner.  I will do an instagram story of the table once it’s complete. I picked up some new napkins on etsy that are super cute. I will probably use my vintage Christmas Ironstone for Brunch and my holly china on Christmas Eve.

Have yourself a Merry little Christmas DIY sign in the dining room.

I made this sign last year.  You can read about it here.

Tomorrow, if I don’t get sucked into the Hallmark Channel again, I will do a post on a few more rooms.  Hopefully, I will be caught up before Christmas Eve.  Thanks for stopping by…

Until Next Time,

SR_signature


Filed Under: Fabulous Finds, Home Tour, Projects and DIY Tagged With: Christmas, Dining Room, Goodwill, Kitchen, Vintage

Welcome to Our Home – Christmas 2017 Home Tour

December 10, 2017 By stylishrevamp Leave a Comment

Welcome to our 2017 Christmas Home Tour.  Today I am sharing our family room that is all decked out for the holidays.  This room completely transforms at Christmastime.  It just feels much more cozy.  So much so that  I was snuggled up under my Christmas throw watching Christmas Hallmark movies and napping all day long in here!  It was such a good day! This is truly such a magical time of the year and I enjoy every single thing about it.

This post is picture heavy and word lite.  So sit back and enjoy our 2017 Christmas Family Room Home Tour.

Christmas Home Tour 2017

2017 Christmas Mantel

I added pops of red to our Christmas decor this year.  I am loving the addition of the red pom-pom garland on the mantle,  I picked this up at HomeGoods a few weeks ago.

Family Room Christmas Tour 2017

Christmas Home Tour 2017

I added little pops of red through out each room with throws, pillows and bows. I like the festive touch it adds to each space.

Decorating with Christmas Throws and Pillows

Grey Family Room with Pops of Christmas Red

Christmas Home Tour 2017

It’s Beginning to Look a lot Like Christmas!

It's beginning to look a lot like Christmas

It's Beginning to look a lot like Christmas copy

View into the Kitchen from the Family Room

Here is a view into the kitchen.  I will be sharing our Christmas Kitchen later in the week so be sure to come back and check it out.

Until Next Time,

SR_signature

Filed Under: Home Tour Tagged With: Christmas, Home Tour, Mantle, Red

How to Create a Cozy Fall Home Using Pops of Orange

October 22, 2017 By stylishrevamp Leave a Comment

Today I am sharing my simple Fall Home Tour.  I say simple because I added only a few pops of orange to create a cozy fall home.  Last year I wanted to jump on the bandwagon and paint all of my Fall/Halloween decorations white and I am so happy that I didn’t do that.  I was thinking that my orange pumpkins were dated and they might be but the memories they hold outweigh the white pumpkin trend/phase any day… to me any ways!

So Welcome to my Fall Home Tour 2017 with pops of orange!

Fall Home Tour 2017

I think we will start in the Family Room.  I added orange pillows which really pop off of my grey sofa and leather chair.  I also added an orange and cream check throw.  A few pumpkins and a leafy garland and that’s it. Easy Peasy!

Family Room with pops of orange

Decorating for Fall with my favorite faux pumpkin

This is my all time favorite Fall decoration.  I remember the day we bought it.  The older two boys were about 2 and 3 years old and each year I would let them choose a new decorations and they chose this pumpkin.  At night when it is lit, it is so pretty.

Fall Home Tour in the Kitchen

In the kitchen, I sprinkled some mini pumpkins in my potted plants to carry the orange theme through.

Olive tree with a mini pumpkin garden

On the cooktop mantel, I used my youngest son’s toilet paper pumpkin he made back in preschool.  It’s another thing I pull out each year.  I also added a stuffed pumpkin to the wreath.

Fall Kitchen

If you look closely, you can see my cookbook is turned to a pumpkin page.  It is one of Nigella Lawson’s cookbooks. I love her books.  It’s like reading a good story.

Pumpkin Fairy nestled in a wreath

I tucked a pumpkins fairy into a wreath and added more mini pumpkins to my candlesticks.  Back in the day, I used to decorate a tree with orange lights and added all these mini pumpkins.  The tree is long gone and I almost donated the mini pumpkins to Goodwill but decided to scatter them around.  It was such a last minute and random idea but I love it!

Fall Kitchen Island at nighttime

(Here is a view of my kitchen Island at night.  Look in the back ground and you can see my favorite pumpkin lit up)

In the Dining Room, I added some gourds to my dough bowl and scattered more mini pumpkins around.

Decorating the Dining Room for Fall with Gourds

Mini Pumpkins in a painted terra cotta pot

Another mini pumpkin in my office…

Mini Pumpkin in my office

and some older and sentimental decorations…

Halloween witch and Five little pumpkins sitting on a fence

(Another preschool favorite…five little pumpkins sitting on a fence.)  It brings back such great memories.

So sometimes it’s nice  not be on trend.  I am glad I followed my instincts and kept all of my old Fall/Halloween decorations orange and stepped away for the white paint can!

Hope you enjoyed the tour.

Until Next Time,

SR_signature

Filed Under: Home Tour Tagged With: Decorating, Fall, Halloween, Home Tour, orange, pumpkin

Fixer Upper Style Master Bedroom Reveal

October 12, 2017 By stylishrevamp Leave a Comment

I am so excited to finally reveal our newly updated Master Bedroom.  This has been months in the making!  I shared bits and pieces of the progress a few months back here and here but today I am sharing a quick video…my first ever!

One of our goals for 2017, which I shared here, was to add hardwood floors upstairs. Well, we finally did it.  The floors were installed in early September and last week the final paint touch ups were completed.  I am so happy we made the move from carpeting upstairs to wood floors.   I liked having the carpet when the boys were little and we didn’t have a puppy running around  but I absolutely love the wood floors!  Enjoy my first video and we will chat about the details after!

Fixer-Upper Style Master Bedroom Reveal


I am loving the transformation.  The hardwood floors make all the difference in the world!  We matched them with the downstairs  flooring which is a 5 inch hand scraped hickory. The hickory is a very warm tone which keep the wood from appearing too cold.

Master bedroom reveal and a fixer upper style shelf

Here’s a quick rundown of everything we did.

  • added hardwood
  • built a shelf using a 2×10 stained to match vintage chest at foot of the bed.  Shelf is attached using Simpson Strong Ties from Home Depot which I sprayed black
  • new gun-metal bed found at a local consignment shop
  • painted dresser, night stands, mirrors and lamps with Amy Howard One Step Paint
  • added an area rug from IKEA
  • hung wall sconces from Wayfair

I got the idea of the shelf above the bed from an episode of… you guessed it …The Fixer Upper.  It was the on season 4 episode 16.  As soon as I saw it I knew I wanted to do my version of it above our bed.  Such an easy projects with a big impact.  I did something similar in the sitting room.

Master Bedroom Reveal

Master bedroom reveal with Hardwood flooring and Fixer Upper Style

The area rug is from IKEA.  This is actually two area rug that I placed together.  I used the recommended rug pad from IKEA which feels a bit tacky/sticky and it keeps the two rugs together and stays in place.

Sitting Room with Fixer Upper Shiplap and new Hardwood flooring

I shared the sitting room before but I wanted you to see the difference the hard wood makes in here.  EEK, I LOVE IT! The chairs are the same ones I bought when I was pregnant with my first boys.  I had them reupholstered.  They are in fantastic shape and are super comfy.  I added the same IKEA rug in here to help keep the two room cohesive. I also added the ottoman from IKEA ektorp series. You can see a small stand on the fireplace hearth…a GoodWill find.  This is kind of  totally my space!

My slipcovered chairs and painted Amy Howard lamp

(reupholstered chairs with pillow and throw from TJ Maxx…and Charlie)

GoodWill credenza and DIY Shelving

I love this credenza I bought from Goodwill for $40.  I gave it a quick coat of paint and added my DIY shelves above it.  Almost everything on the shelves are treasures I found at Goodwill.

I hope you enjoyed my Master Bedroom Reveal and my first ever video.

Until Next Time,

SR_signature

Filed Under: Before and After, Fabulous Finds, Home Tour, Projects and DIY Tagged With: Fixer Upper, Goodwill, Master Bedroom, Paint Hardwoold floors

Revamping my Closet with the IKEA Pax Wardrobe

October 1, 2017 By stylishrevamp 37 Comments

Yessss, I’m back! I took a little blogging break over the summer and enjoyed lazy days by the pool and some fun and adventurous travels as well. But now I am ready to share an exciting new makeover.  We had several big projects in the works and the first one I am going to share is my closet revamp using the IKEA Pax Wardrobe.  Yep another IKEA hack!

Buikt-In IKEA Pax Hack

Here it is…I love it.  I find myself just walking in the closet multiple times a day just to enjoy the sight of it.  I still cannot believe the transformation!

IKEA Pax Wardrobe

I love everything about it.  To me it is fabulous, organized and just gorgeous! Now that you’ve seen the beauty…here is the beast we started with.

closet before the IKEA Pax revamp

The first thing we did was rip out the shelving unit and the shoe rack so the hardwood would go wall to wall (another post is coming soon about the new hardwoods) Then I began the process of clearing out the closet.  As much work as it was, I loved going through everything and getting rid of what I no longer wanted or needed. Well, I didn’t love it as I was doing it but it felt great to purge, especially when I was finished. I made several trips to GoodWill.

before shot of my closet

Closet makeover with IKEA Pax

Here’s a run down of what we did.  We went to IKEA to look at the Pax Wardrobe and get a feel for what we wanted to do.  I am not going to lie, it was a bit overwhelming.  We ended up going back the next day and worked with a sales representative that was able to design our layout on the computer with all the accessories. You can also do this on your own at home. Once we were satisfied with the overall layout and design, she printed off the entire packet which included a layout and all the pieces we needed to buy. That made it so much easier to pick up all the boxes we needed.  Here are a few pictures of the computer renderings of the new closet design.

IKEA PAX Wardrobe Planner

IKEA PAX WARDROBE PLANNER

Pax Planner for my new closet

IKEA Pax Wardrobe planner Top View

IKEA Pax Wardrobe

O.K. I am going to be honest here.  This is about the point I fizzled out.  We had been under construction with the wood floors for about a week but leading up to that I had been clearing out all of our closets and linen closets to prep for the flooring and I was done! To make matters worse, I had given up sugar and I was basically zapped, finished and of very little help!  My hubs gets all the credit for the finished product! I didn’t leaving him completely hanging, I helped out a wee bit when needed!

He wanted to trim the wardrobes out with baseboard and decorative moulding between each wardrobe unit.  He used the same concept that he used on the IKEA Billy Bookcase which you can read about here.  I love the look of the wardrobes with the trim and moulding. It finishes the look off completely. Eek, I am so happy with my new closet!

Built-in Ikea Pax Wardrobe

IKEA PAX Corner Cabinet

IKEA Pax with Pull-out pant hanger

There are so many options and accessories with the Pax Wardrobe. We chose both glass front and solid drawers, pants pull out hanger,  valet hanger, wire baskets, pull-out tray,  pull-out clothes rail, and a pull- out rack for scarves and belts.  I am absolutely thrilled with the outcome of this makeover and my hubs gets all the credit on this one!

In the next few days, I will post about the new floors and my bedroom makeover as well!

Until Next Time,

SR_signature

We Party Here:

Saturday Sparks Button 3  sunday_button  featurenlinky-party-graphic


Filed Under: Before and After, Home Tour, Projects and DIY Tagged With: closets, IKEA, organizing, Pax Wardrobe

A Quick Review of Amy Howard At Home Paint

July 1, 2017 By stylishrevamp 3 Comments

A few months back, my husband went out-of-town on a quick golf trip.  I knew my time was limited and I had to hustle to complete the master bedroom revamp before he returned from his trip.  The quickest way to revamp any space is with paint. So today I am sharing a quick review on Amy Howard At Home Paint.  Hint, hint, I love it!

A quick review of Amy Howard at home paint

When my husband left for his golf trip, I knew I had exactly 4 days to paint 6 pieces of furniture, put together a new to us bed, build and install a shelf and put the room back together. I thought the easiest way to get this done was to use chalk paint but the store that sells Annie Sloan chalk paint near me was not open and I knew time was of the essence here.  Sometimes I will make my own chalk paint so I headed to Ace Hardware to pick out some paint colors when I stumbled upon the Amy Howard At Home One Step Paint.  At first I thought, should I even attempt something new when I had very little time to pull this together, what if it was difficult to use? Oh, but they had the perfect color, exactly what I was looking for a perfect grey called Atelier and of course the basic black. I picked up the sample size pots of these two colors. I thought if it’s hard to work with, I can use it for painting accessory pieces and just make my own tried and true chalk paint.

The first piece I started with was my nightstand.  I wanted to paint it black.  I set the small jar of paint upside down (the sales associate told me to do this) in my sink while I cleaned my nightstand. I was painting all of this furniture in my bedroom because there was no way I could move all of the furniture downstairs into the garage and back up by myself.  Surprisingly, I did not even notice any odor to the paint.  Once the furniture was clean and completely dry, I started painting and was shocked! It was super smooth and creamy and absolutely the easiest paint to work with…ever!  From start to finish it took less than 30 minutes to do the entire piece. It really is just that easy.  One step does not necessarily mean one coat, however that was the case with the black paint.

Nightstand painted with Amy Howard Paint basic black

A Quick Review of Amy Howard At Home Paint

The coverage was amazing. I did notice that the black required only one coat whereas the Atelier required two and I wiped some of the paint off so I could see the original stain peeking through. Once I realized how easy the Amy Howard at Home Paint was to use, I was ecstatic! I knew I would be able to paint all of the furniture and pull my vision together in time to surprise my husband.  Do you like how I said surprise him? Yes, well I knew if he were here he would probably freak that I was painting the bedroom furniture.  I have never liked the stain on the furniture. It looked too orange to me but when we bought it I was days away from giving birth to our firstborn and it was the only furniture that could be delivered on time before the baby arrived and I was nesting and just needed it done. So yes, it was a surprise to him but sometimes it’s easier to not let him see the messy in between a project!

After the nightstand was done in such a short period of time, I celebrated with a cup of coffee and planned my next piece of furniture to paint. I moved on to the Secretary Desk and chair.  I knew the desk was going to be a bit more time-consuming due to all the detailed pieces.

Amy Howard painted desk

I painted the desk in the Atelier and the chair in the basic black. I even had time to recover the seat cushion. I decided to leave the interior of the desk alone.  The paint tone down the stain color and I like the juxtaposition of the grey paint against the stain.

I also painted an armoire with the basic black and a few mirrors.  I did all of this with the small sample pot of paint and I still have some paint leftover for future projects.

Mirror painted with Amy Howard basic black paint

Revamping Your Space with Amy Howard Paint

I think my favorite piece I painted was my dresser. I was back and forth on the color choice and ultimately chose the Atelier.  I am so happy with this choice.  I decided to leave the mirror with the original stain and I am glad I did.

Review of Amy Howard Paint

I buffed some of the paint off so the stain is popping through. This piece was the last one I painted and once it was done, I started waxing all the pieces with the Amy Howard Wax.  Again it was a very easy product to work with as well.  If you haven’t tried this paint, you really should.  I was able to paint all these pieces ( armoire,  dresser, two mirrors, chair and a desk) with two small sample jars of paint and I still have paint left over in each jar.

Here’s a picture of the chaos I create when I am working…Painting my Goodwill Find and this…

Setting up a paint studio in my bedroom

I am happy to say that I was able to complete the entire room in three and a half days! I think this was in large part to ease of the  Amy Howard One Step Paint!

A quick review of Amy Howard at home paint

FYI, my husband was happy with the transformation, yes, happy and surprised! I know I am not the only one that creates chaos when their spouse is out-of-town, share your adventures in the comments!

Until Next Time,

SR_signature

Filed Under: Before and After, Home Tour, Projects and DIY Tagged With: Amy Howard Paint, Chalk Paint, Master Bedroom

How to Reinvent Your Space on a Budget

June 22, 2017 By stylishrevamp 2 Comments

I feel like this post has been a long time in coming.  I started to reinvent my master bedroom sitting room back in April and I am finally ready to share it with you today. It started off when I added shiplap to the fireplace which you can see here. Today I am going to share the rest of it with you and show you how to reinvent and revamp your space on a budget.

How to Reinvent Your Space on a Budget

I feel like our master bedroom and sitting room were the last two rooms to get a revamp.  Actually, they never did really have anything done to them other than paint changes a few times. We are planning on adding hardwood in the fall.  I am so ready to ditch the carpeting.  Who knew that a little 12 pound pup could wreak so much havoc on my carpet? The boys don’t help matters either. Even though the rooms are not 100 percent complete because we haven’t done the hardwood yet it still feels like a completely reinvented space with just a few changes! I will share the master bedroom portion in a later post.  Today it’s all about the sitting room which is where I spend my time watching all the shows that my husband or boys would never, ever watch.  Yep, I am a reality tv closet watcher!

DIY shelves and a Goodwill Makerover

I love this reinvented space. The tv stand/credenza was a Goodwill find.  It cost $40 and it is solid.  Each drawer is over 15 pounds.  Yes, I weighed them because that thing was a beast to move upstairs. Once we got it upstairs we added casters so I could move it around with a bit more ease.

Originally, I had this piece in my sitting room…

antique armoire

There is nothing wrong with the piece, it was lovely but it just did not fit the space.  It was too short and the depth was too deep.  I wanted something to fill the space and draw the eye up.  That’s where the shelves came in and I have to say that I love them! I adore them. Here, take another look at them!

How to Reinvent Your Space on a Budget

Adding shelves above my Goodwill stand.

So let’s start at the beginning. I found the stand at Goodwill for $40 which was a steal.  I know this will sound bizarre but I cannot wait to decorate this at Christmas time.  Yep, I said it!

So this is what it looked like when I spotted it at Goodwill…and it was love at first sight!

Goodwill credenza Before the revamp

This piece is huge. It is 76 inches in length and I am obsessed with it! I gave it a light sanding, primed, and painted it with a flat white paint that I had on hand to brighten up and bring light into the navy blue sitting area.

Decorating my $40 Goodwill Find.

Do the candlesticks and tobacco baskets look familiar?  Yep, they were originally in the sunroom downstairs.  My husband wanted a larger tv so the decorative accessories had to go…for now anyway. I have plans to dress up the extremely large tv that now dominates the sunroom that he has taken over! I changed the color on the smallest candlestick and went with a charcoal color instead of the pale blue which you can see here.

Adding Shelves to Draw the Eye Up

Next we added the shelves.  This is such an easy and inexpensive DIY.  All you need is Simpson Strong Ties (I found mine at Home Depot) and wood of your choice.  On this project we used pine 1″ x 6″ x 8 ft lengths.  I wanted the 2 inch thick pine but Home Depot didn’t have what I was looking for in stock and once I get started on a project, I don’t want to wait, so we improvised and trimmed the boards out to give it more bulk.

DIY Book Shelves

I sprayed all the Simpson Strong ties with black paint. While they were drying, I marked the studs on the wall with painters tape and decided the best placement for each shelf.  Once the ties were dry, I screw each tie to a stud.  I placed one on top and one below the shelf.  Then I slid each shelf into place, and screwed the Simpson Strong ties into the shelf.  It’s a very easy process and the impact to me is huge.  It totally reinvented the space. I will share more on my shelf styling over the weekend.

Adding shelves above my Goodwill stand.

I hope you enjoyed my newly reinvented space done on a budget! I am completely enamored with it and it did not break the bank!

Until Next Time,

SR_signature

Filed Under: Before and After, Home Tour, Projects and DIY Tagged With: Book shleves, DIY, Goodwill, Paint

Night Time Christmas Home Tour

December 21, 2016 By stylishrevamp 2 Comments

This is my first time sharing a night-time Christmas home tour.  I am learning how to use my (Gman’s) camera. I love, love, love how our home looks at night.  I like to stay up late, when the house is quiet and peaceful, and enjoy the twinkling lights with a cocktail or two!

I will start with the family room.  I mentioned this before but this is where we open presents Christmas morning.

We have several trees through out the house but this one is our only live tree.

Night time Christmas tour of the Family room.

Family Room fireplace dressed for Christmas.

Night Time Christmas Home Tour

The view into our Family room from the upstairs.

The next room I am going to share is the sunroom. The sunroom is where we spend most of our time during the day.  It is cozy and comfortable.

 Christmas night time home tour.

My Charlie Brown Christmas tree with a vintage table runner used as a tree skirt.

My feather tree with vintage reindeer.

The following room is one of my favorites, my home office…love this room!

Night time Christmas tour of my home office.

Yep, love this room!

The last stop on the tour is the sitting room off of the master bedroom.  This is where I wrap the gifts (sitting on the floor) and watch all my favorite shows that I don’s always admit to watching! Let’s just say besides HGTV, Bravo and E are my favorite channels! Although at Christmas time, I am watching a lot of Christmas movies!

Christmas tree in the master bedroom.

I hope you and your family have a wonderful Holiday season filled with love, laughter, happiness and health!

Until Next Time,

SR_signature

Filed Under: Home Tour, Uncategorized Tagged With: Christmas, Christmas Decor, Home Tour, Night Tour

Christmas Home Tour Part 2

December 20, 2016 By stylishrevamp Leave a Comment

I cannot believe there are only 5 days left until Christmas. I wish that the time between Thanksgiving and Christmas would  slow down a bit.  I enjoy relaxing at home when the house is all decorated and it is cold outside but it flies by in the blink of an eye.

Last week I shared our Christmas Kitchen and today I wanted to share the rest of our home for Part 2 of our Christmas Tour.  Tomorrow evening I plan to share the Night Time Home Tour.  I think twinkling lights make everything look prettier.

This post is loaded with pictures and skimpy on words! I hope you enjoy this peak into our home.

Our Family Room Christmas tree.

(Family Room- this is where we celebrate Christmas morning once Santa has left!)

Family Room mantel dressed for Christmas

Vintage sled with Christmas greenery

I used my Goodwill find (the silver Champagne bucket) to hold my poinsettia

My Goodwill Christmas Card Holder

Christmas Home Tour Part 2


The Foyer is next…

Foyer decked out for the Holidays

My Goodwill find with a few Christmas touches.

Two Vintage Santas that I found at a consignment shop

Home Office…

My Ikea Billy Bookcase dressed for the Holidays with touches of gold.

Vintage Santa Claus

Vintage Carolers

(Vintage Carolers although they look like Altar Boys but I have always referred to these pieces as carolers)

I will share a bit more of my Home office during the Night Time Christmas tour but next up, I wanted to share with you our dining room chandelier!

Revamping an old chandelier with ornaments from the Dollar Store

Yep, we still have our builder grade chandelier in the dining room.  Sixteen years later and we still have not replaced it!  During the Holidays, I like to add these Dollar Store gold ornaments to the chandelier.  It’s a quick an easy way to add a bit of glam.  Maybe next year we will have found the perfect chandelier…or not!

DIY Driftwood Christmas Tree

A few years ago, I made my version of a Driftwood Christmas.  You can find the details here.

I hope you enjoyed this quick little tour…stop by tomorrow evening for our First Annual Night Home Tour.

Until Next Time,

SR_signature

Filed Under: Home Tour Tagged With: Christmas, Christmas Decor, Home Tour

  • « Previous Page
  • 1
  • 2
  • 3
  • 4
  • …
  • 6
  • Next Page »

Meet the Team

Hi, I'm Kathy! Mom to 3 boys, lover of thrift shopping and all things vintage.

Follow along with me as I revamp our home using thrifted finds!

Subscribe via Email


Visit Stylish Revamp's profile on Pinterest.

Our Favorite Posts

  • IKEA BILLY Bookcase Hack
    IKEA BILLY Bookcase Hack
  • Revamping my Closet with the IKEA Pax Wardrobe
    Revamping my Closet with the IKEA Pax Wardrobe
  • My Version of Tidying Up the Pantry
    My Version of Tidying Up the Pantry
  • Home Office: How to Redesign a Space
    Home Office: How to Redesign a Space
  • Driftwood Christmas Tree
    Driftwood Christmas Tree

Categories

  • Before and After
  • DIY Crafts
  • Fabulous Finds
  • Friday Favorites
  • Goodwill Goods
  • Home Tour
  • Projects and DIY
  • Thrift Shop
  • Thrift Shop Thursday
  • Uncategorized

Topics

Basket Chairs Chalk Paint Christmas Christmas Decor Christmas Tour Consignment Shop Consignment Shopping Desk DIY Driftwood Fall Flea Market gold Goodwill Halloween Holiday HomeGoods Home Office Home Tour IKEA Kitchen ladder Master Bedroom Michaels Milk Cans Nautical Paint paint pen Pillows pumpkins Shopping Sign spray paint thrift Thrifting thrift shop Thrift Shopping thrift shop thursday Tour Vintage White dishes wine rack Wood Wreath

Archives

Follow us on Pinterest!

Visit Stylish Revamp's profile on Pinterest.

Follow us on Twitter!

Tweets by @StylishRevamp

Follow us on Instagram

Screen Shot 2018-09-16 at 8.50.53 PM

Like us on Facebook!

Like us on Facebook!

Copyright © 2023 · Chic Pro Theme On Genesis Framework · WordPress · Log in