Stylish Revamp

Redecorating on a Budget

  • Home
  • About
  • Home Tour
  • Projects
  • Disclosure

Finishing Touches

November 6, 2013 By stylishrevamp 2 Comments

Just a quick update on a few of my projects.  Remember my flea market find?  I finally made a quick trip to the house and was able to install this vintage match holder that I have revamped into a bottle cap holder.

Vintage Canada Dry Bottle Opener and Vintage Match Box Holder

While we were there, I also hung  my GROCERY sign (click here to see how I made it).  I really like the sign and it adds a little something to the kitchen.

DIY Grocery Store Sign

Now here is a sneak peek at something I am going to be working on soon.  I found this piece at one of my favorite spots near the Island.  I have been there several times and never remember to take a picture.  I am going to use this piece in my Island Kitchen as a wine rack.  Here is my before picture. Remember my driftwood wreath which you can also see here.  I will post more photos once I get it painted.  Still trying to decide on a color.  I am thinking of using the same Stainless Steel paint that I used on the vintage match holder but still not sure.
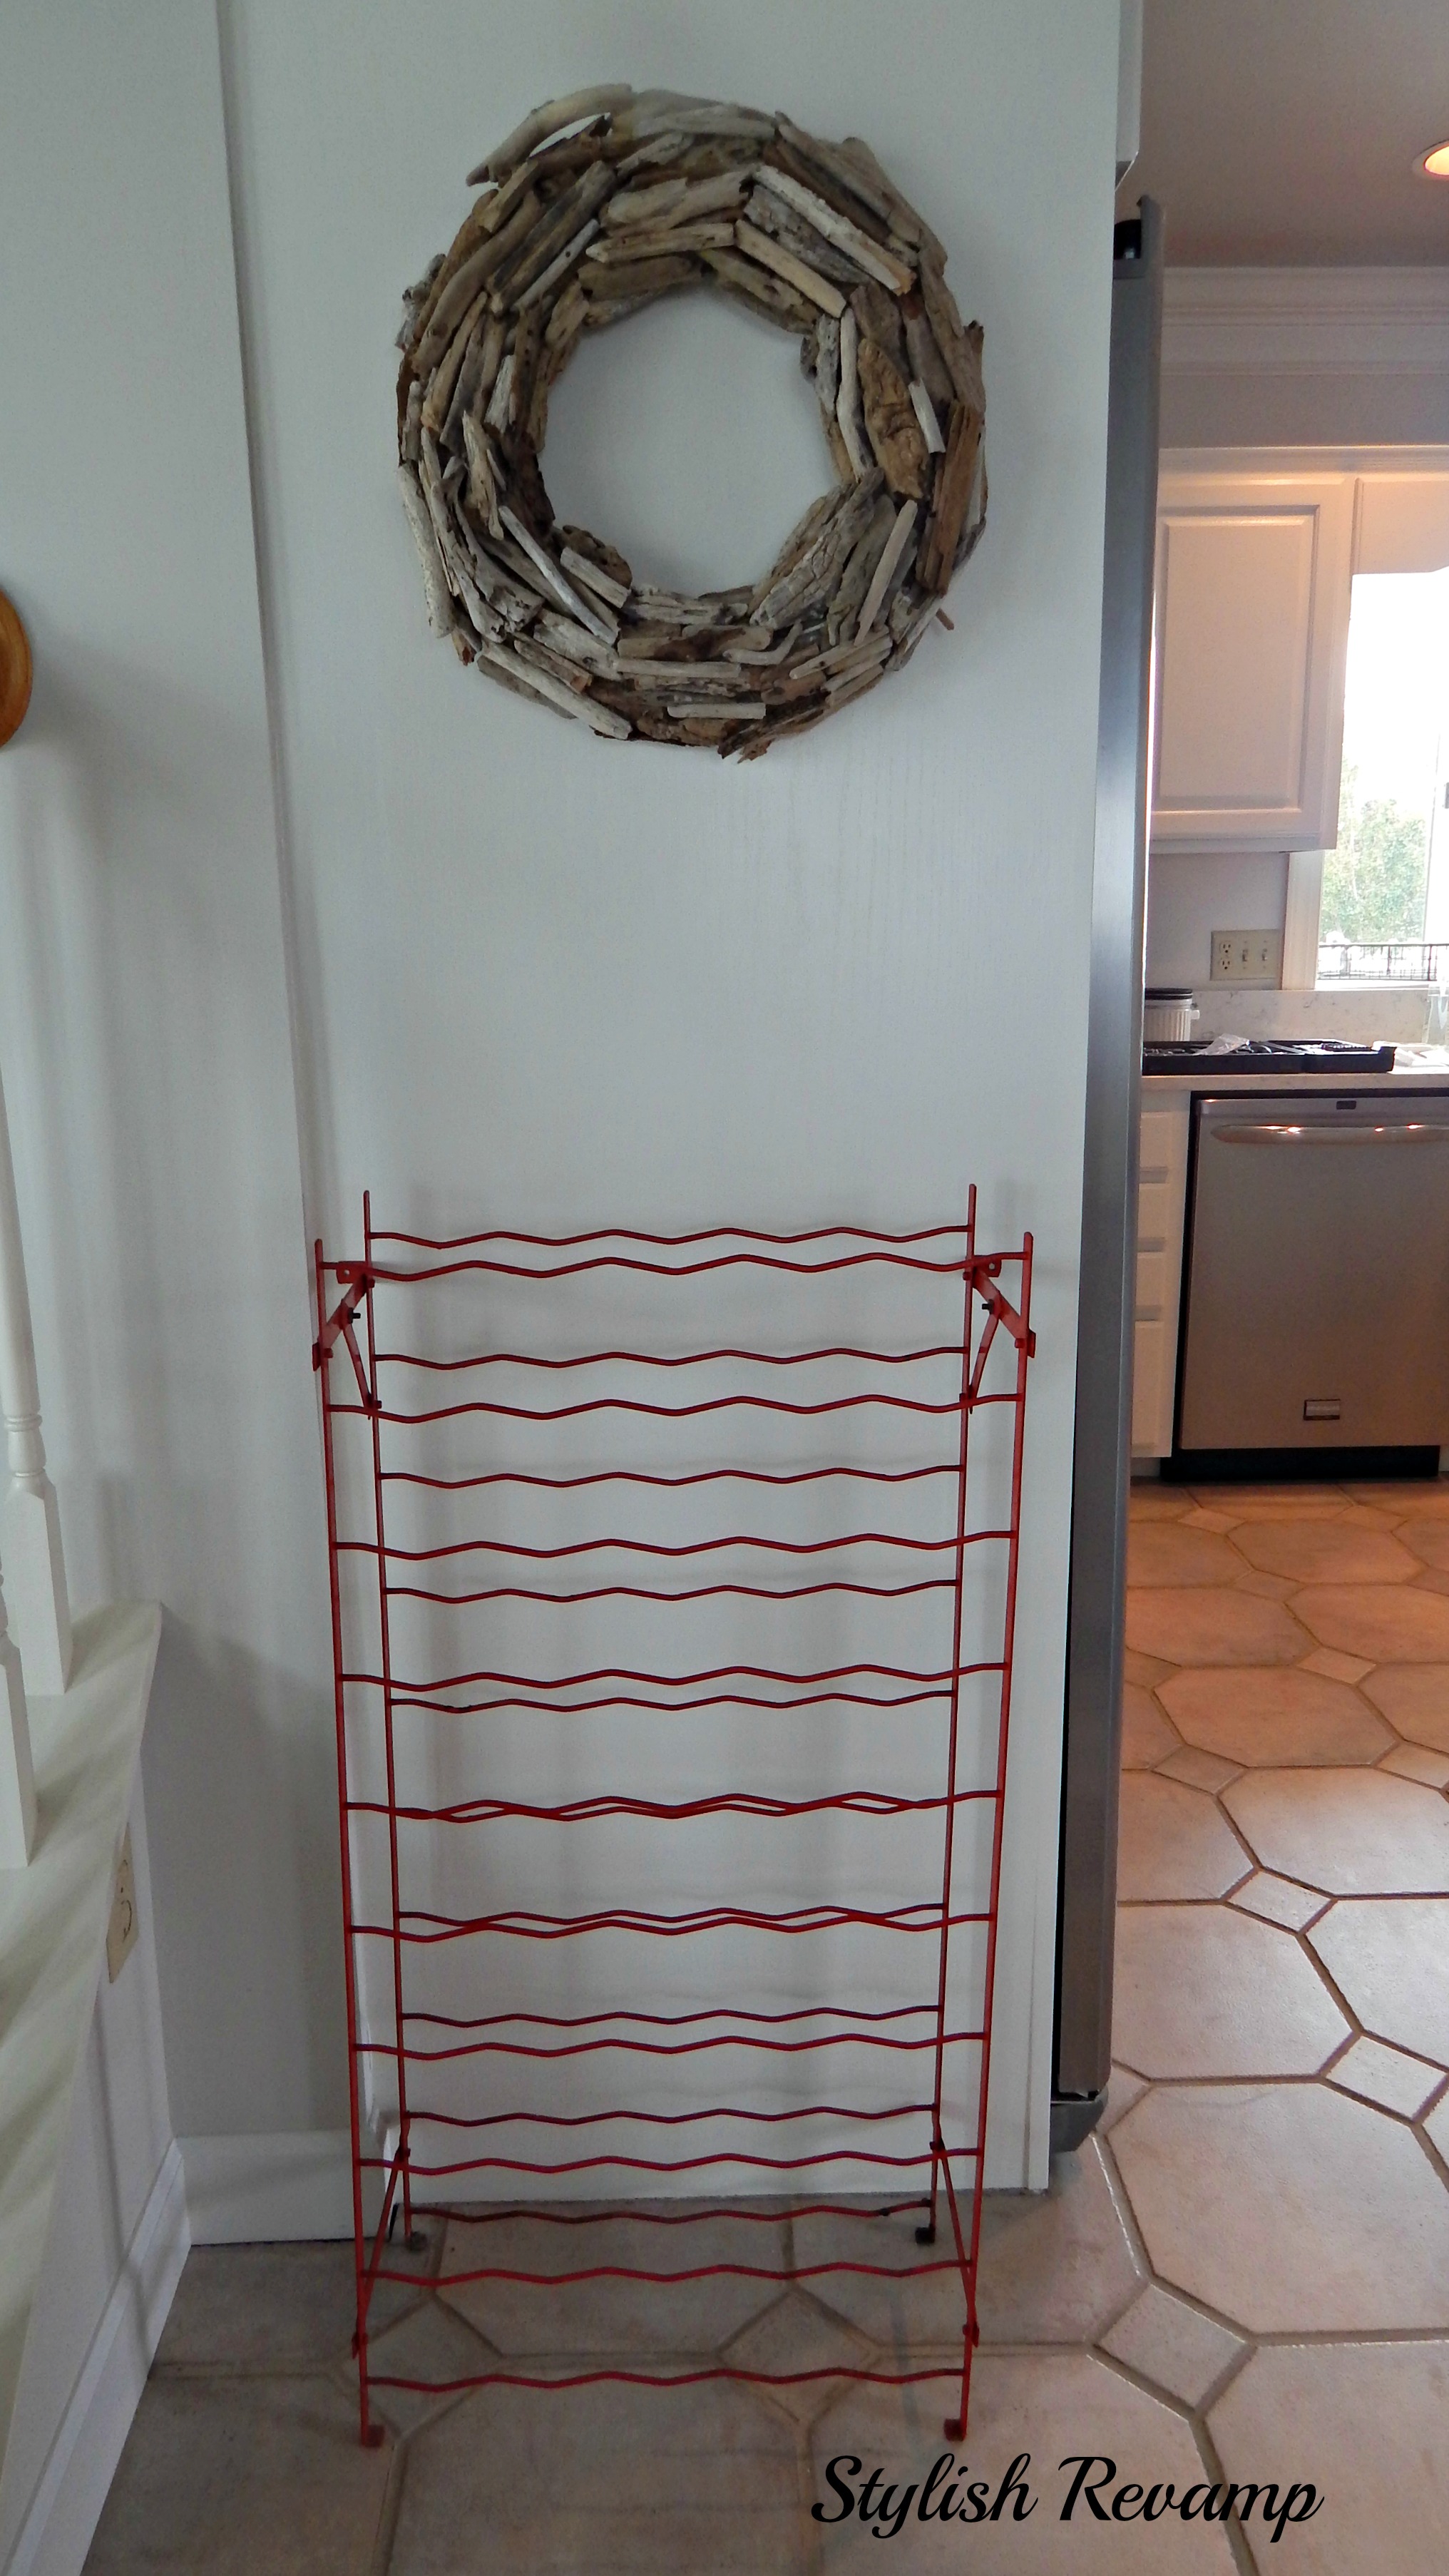
Driftwood Wreath and Vintage Wine Rack

(BEFORE)

Filed Under: DIY Crafts, Fabulous Finds Tagged With: Flea Market, Grocery Sign

Pedestal Table

October 24, 2013 By stylishrevamp 3 Comments

It has been a crazy couple of weeks around here but I am back and trying to finish up some projects that have been stashed in my garage and utility room for too long!

This past summer I picked up a few free pieces and one of them was a table top.  It came from a shop that we used to go into all the time near the Island.  One day we drove up and it was out of business but they left some things outside with a cardboard sign that said FREE!  We picked up a pallet and the tabletop.  The tabletop had paint smeared across it and the laminate was pulling away from the sides.  I didn’t care it was free and I knew we could turn it into something.  My son no longer ask me WHY? or ARE YOU SURE? He just says I will load it up for you…Thanks B.K.

The pallet is still sitting in the utility room but I finally painted painted the tabletop.  Then it sat for a few more weeks until I could find a base.  Two weeks ago we took a trip to the Island to finish up a few last minute things there and made a quick stop at one of my favorite spots and YES I found a table base.  I had found one there before and I was back and forth trying to decide if I really liked it…and I am so glad I waited because I found this…..

Table Base Thrift Store Find

and I knew it would be perfect for the tabletop!

It is kind of hard to tell in the photo but it kind of has a yellow tint to it but I knew that I could paint it so it was no big deal.  The other thing you can’t tell from the photo is that the base it metal which I love.  Here is the end result….

Longitude Latitiude DIY Table

I just set it up in my living room so I could show you how it turned out.  I used Annie Sloan chalk paint in Graphite for the tabletop and rubbed a bit of the Pure White paint over it so it wasn’t so flat.  Once that was dry I stenciled the longitude and latitude of the Island.  On the base I also used the Pure White.  Super easy and I think it turned out great!

Longitude Latitude Stencil

DIY Stenciled Longitude Latitude Table

Come back later and I will show you some of my other finds and the odds and ends that we did at the Island Home before prepping the house for Winter!

We are linking up to:

d17035f5-81a7-412b-86d2-920026553078_zpse68bbd5f  button22  fffbutton  images  GiveMeTheGoodsMondaynewbutton_zps121b9e82  inspiration-exchange-image-1  LindaBtn  whatsshakin1  remodelaholic-party  linkparty  friday follow along badge  TDCbutton  LinkBackButtonSmall_zps6e176a35

Filed Under: Before and After, DIY Crafts, Fabulous Finds Tagged With: Paint, Table Base, Tabletop

Halloween Treat Bags

October 13, 2013 By stylishrevamp 1 Comment

Since my son is dressing up as Harry Potter for Halloween he wanted a treat bag that would go with his costume.  We looked at the bags when we were out but none of them seemed to work.

Then when I was putting the groceries away I got the idea to use one of my grocery bags for his treat bag.

DIY Halloween Harry Potter Bag

I used fabric paint that I had on hand and my son printed off the lettering that he found here.  I cut the letters out and traced them on the bag with a white colored pencil then painted them.

DIY Halloween Harry Potter Bag

It was a very quick and easy project and now my son has his own custom treat bag to go with his Harry Potter costume!

Harry Potter Halloween Treat Bag

Harry Potter Costume

We are linking up to: 

LinkBackButtonSmall_zps6e176a35

Filed Under: DIY Crafts Tagged With: Fabric Paint, Halloween

Chalkboard Banner

October 4, 2013 By stylishrevamp 4 Comments

This week we have been working on some Fall/Halloween projects.  First up is our chalkboard banner for our Fall Mantle. It turned out super cute and I love how you can switch it up so easily.

Also, check out our new font on our photos for the month of October. My tech guy has been waiting and waiting to do this…so a special shout out to Gman…thanks for all our your help!

Fall/Halloween Mantle


 My supply list includes:

  • Wood plaques
  • Chalkboard Paint
  • Ribbon
  • Chalk
  • Clamps
  • Drill

Supplies from Michaels


The first thing I did was clamp the three pieces of wood together so I could drill the holes all at once.  That was the easiest way to make sure the  holes were all evenly spaced. Next, I lightly sprayed the wood with chalkboard paint.  I did three coats.  Once it was dry, I threaded a piece of ribbon through the holes.  Finally, I wrote on the chalkboard.

Halloween Banner

We like how you can change it up with different ribbons or change the message.  You could draw candy corns, leaves or pumpkins in the Fall.  In December, you could switch the ribbon out and do a Christmas countdown. The possibilities are endless.

Fall/Halloween Mantle

We are linking up to:

LinkBackButtonSmall_zps6e176a35

Filed Under: DIY Crafts Tagged With: Chalk, Chalkboard, Ribbon

Grocery Sign

September 15, 2013 By stylishrevamp 5 Comments

I am such a huge fan of Sarah Richardson.  I DVR all her shows.  My all time favorite is Sarah’s Cottage.  I would watch each episode over and over when we bought our Island Home.  I love the Groceries sign she found while out shopping with Tommy.  I finally decided to make my own version of it today.

DIY Grocery Sign

I started off with a scrap piece of wood that I found in the garage.  I had several letter from Michaels that I bought on clearance a while back.  I painted the scrap would Pure White Annie Sloan Chalk Paint.  I painted the letters Annie Sloan’s Graphite.  Once everything was dry I attached them with hot glue.  Easy Project.  This will look so cute in the kitchen at the Island Home.  I may just have to make a quick trip tomorrow because I am missing that peaceful place. This is what I started with:

DIY Wooden Grocery Sign

So this was my inspiration from Sarah Richardson.

Sarah Richardson's Kitchen

Again, this is my version:

DIY Grocery Sign

We are linking up to:

GiveMeTheGoodsMondaynewbutton_zps121b9e82  sunday_button  satbutton  Funky_Junks_Party_Junk_link_party.29-AM

Filed Under: DIY Crafts Tagged With: Letters, Paint, Wood

Fall Raffia Wreath

September 14, 2013 By stylishrevamp 15 Comments

Happy Saturday!  It is finally beginning to feel like Fall.  The weather is gorgeous today.  My youngest and I went to a flea market, yard sales and a few consignment shops.  I will post my finds later on today.  Right now, I am going to show you my fall wreath.  I found this idea at StoneGable.  I loved her Raffia Wreath so I made my own version of it.

My Supply list includes:

Straw Wreath

Floral Pins

Raffia

Hot Glue Gun

Dried Wheat

Raffia Wreath DIY

I followed the same instructions from StoneGable.  Most importantly,  Leave the Plastic Wrap On The Wreath!  All you have to do is gather a few strands of the raffia into a bow shape and pinch it in the center and secure it to the wreath with the floral pin. Continue this process while alternating the raffia horizontally and vertically on the wreath.  I would adjust mine as I went along to hide the floral pins.  After I had placed several raffia bows on the wreath, I would cut the loops open. On some of the bows, I would leave a few of the loops intact.   Once you have completed  placing the raffia bows around the entire wreath, you can trim up the excess raffia.  You will have strands kind of all over the place. Once I trimmed it up,  I added some dried wheat. This wreath is a more natural looking wreath.  I like how it is not all neat and orderly!

DIY Raffia Wreath

We are linking up to:

LinkBackButtonSmall_zps6e176a35

Filed Under: DIY Crafts Tagged With: Raffia, Wreath

DIY Headboard

September 8, 2013 By stylishrevamp 3 Comments

Another quick trip to the Island this weekend and we had some fabulous weather. I love it when it is not too hot and there is a nice breeze coming off the Bay!  It is such a relaxing place to be and I am so thankful we have it!

While we were there, we did a quick DIY project.  We have two beds without headboards and it has been driving me crazy.  So I thought instead of ordering one and trying to figure out when it would be delivered and arrange my schedule so I could be there for the delivery…why not build my very own headboard.  I love the look of Board and Batten but I am not ready to tackle an entire room. Then I thought why don’t we make a headboard using board and batten…This was our  first attempt and I have to say I really love how it turned out.

Board and Batten DIY Headboard

DIY Board and Batten Headboard


Once the boards were in place, I used Valspar Pure White to paint it and the Headboard is now complete.

And this is my view from the bed…Love, Love, Love this place…

Bayfront View

A special shout out to my personal HandyMan…Thank You BK

DIY Headboard Board and Batten

Filed Under: DIY Crafts Tagged With: Board and Batten, Headboard

Kitchen Canisters

September 4, 2013 By stylishrevamp Leave a Comment

I bought these kitchen canisters from a consignment shop about 5 years ago for a few dollars.  When I picked them up, they had  maple wooden tops and I knew that I would paint them.  Well, I did paint them and they were fine but when we decided to redo the kitchen by painting the cabinets, the walls and the ceiling the canisters kind of got paint splatters all over them.  So I decided to give them a quick update.

DSCN3582 I started by repainting the tops again with the left over paint from my son’s headboard which you can find here.

DSCN3596  Next, I used a Sharpie paint pen in white to write on the tops of the lids.

Such a simple and easy project for under $5 and that includes the cost of the canisters,

DSCN3597                      DSCN3599


We are linking up to:

igottacreate_2013_party_button170

Filed Under: DIY Crafts, Fabulous Finds Tagged With: Kitchen

Mini Storage Chest

August 31, 2013 By stylishrevamp 1 Comment

It has been a busy week.  All the boys are back in school and it is our first week without our oldest.  He is away at college and I am missing him!  So it has been a bit difficult to get motivated to work on projects.  I thought I would ease into it with a small redo on an old storage chest.  With my youngest in school, he wasn’t here to remind me to take a before shot of the chest.  Sorry about that!

DIY Hand Painted Mini Chest with Stencil

Hand Painted DIY chest with StencilThis is the finished chest.  I used Annie Sloan Chalk Paint from my left over projects (Old White).  I did two coats then did a light sanding.  Once it was dry I used black acrylic craft paint and stenciled on the letter K.  I also use painters scotch blue tape to tape off the black trim line.  Just a simple project to ease me back into the school routine.  Right now I have it in my foyer in our home  off the Island but I do think I will take it next time we head across the bridge.

We are linking up to:

sunday_button  thatdiyparty125button_zps360f71b1

Filed Under: DIY Crafts Tagged With: Chalk Paint, Stencil

Wooden Decorative Art

August 24, 2013 By stylishrevamp 3 Comments

Well, we did it.  We dropped our oldest off at college and let me tell you it was one of the hardest things I have ever, ever done!  Once we left the college, I saw a billboard that said Big Valley Antique Center next exit.  So that is what we did.  I only had 15 minutes to shop so it was a quick whirl around the shop because they were ready to close.  I found two wooden pieces of art and an old Pepsi crate.  Not bad for  a quick stop and it did help cheer me up a bit!

Wooden Wall Art

I used Annie Sloan Chalk Paint.  For the first coat I used Paris Grey.  Once it was dry I painted over it with Old White.  Then when everything was dry, I used my sanding block to highlight the indentations on the sea horse and conch shell.  I am loving these two pieces and will definitely be taking them to the Island Home.

Wooden Wall Art

We are linking up to:

Funky Junk Interiors

Six Sisters Stuff

CityFarmhouseButtonSmall stacybutton2  LindaBtn  button-final  lifeoftheparty  sunday_button  satbutton  Saturday-Spotlight-Party-Button

Filed Under: Before and After, DIY Crafts Tagged With: Art, Chalk Paint

  • « Previous Page
  • 1
  • …
  • 3
  • 4
  • 5
  • 6
  • Next Page »

Meet the Team

Hi, I'm Kathy! Mom to 3 boys, lover of thrift shopping and all things vintage.

Follow along with me as I revamp our home using thrifted finds!

Subscribe via Email


Visit Stylish Revamp's profile on Pinterest.

Our Favorite Posts

  • Driftwood Christmas Tree
    Driftwood Christmas Tree
  • IKEA BILLY Bookcase Hack
    IKEA BILLY Bookcase Hack
  • Revamping my Closet with the IKEA Pax Wardrobe
    Revamping my Closet with the IKEA Pax Wardrobe
  • Dressing Up my Pantry with a Vintage Door
    Dressing Up my Pantry with a Vintage Door
  • Fall Raffia Wreath
    Fall Raffia Wreath

Categories

  • Before and After
  • DIY Crafts
  • Fabulous Finds
  • Friday Favorites
  • Goodwill Goods
  • Home Tour
  • Projects and DIY
  • Thrift Shop
  • Thrift Shop Thursday
  • Uncategorized

Topics

Basket Chairs Chalk Paint Christmas Christmas Decor Christmas Tour Consignment Shop Consignment Shopping Desk DIY Driftwood Fall Flea Market gold Goodwill Halloween Holiday HomeGoods Home Office Home Tour IKEA Kitchen ladder Master Bedroom Michaels Milk Cans Nautical Paint paint pen Pillows pumpkins Shopping Sign spray paint thrift Thrifting thrift shop Thrift Shopping thrift shop thursday Tour Vintage White dishes wine rack Wood Wreath

Archives

Follow us on Pinterest!

Visit Stylish Revamp's profile on Pinterest.

Follow us on Twitter!

Tweets by @StylishRevamp

Follow us on Instagram

Screen Shot 2018-09-16 at 8.50.53 PM

Like us on Facebook!

Like us on Facebook!

Copyright © 2025 · Chic Pro Theme On Genesis Framework · WordPress · Log in