Stylish Revamp

Redecorating on a Budget

  • Home
  • About
  • Home Tour
  • Projects
  • Disclosure

A Quick Review of Amy Howard At Home Paint

July 1, 2017 By stylishrevamp 3 Comments

A few months back, my husband went out-of-town on a quick golf trip.  I knew my time was limited and I had to hustle to complete the master bedroom revamp before he returned from his trip.  The quickest way to revamp any space is with paint. So today I am sharing a quick review on Amy Howard At Home Paint.  Hint, hint, I love it!

A quick review of Amy Howard at home paint

When my husband left for his golf trip, I knew I had exactly 4 days to paint 6 pieces of furniture, put together a new to us bed, build and install a shelf and put the room back together. I thought the easiest way to get this done was to use chalk paint but the store that sells Annie Sloan chalk paint near me was not open and I knew time was of the essence here.  Sometimes I will make my own chalk paint so I headed to Ace Hardware to pick out some paint colors when I stumbled upon the Amy Howard At Home One Step Paint.  At first I thought, should I even attempt something new when I had very little time to pull this together, what if it was difficult to use? Oh, but they had the perfect color, exactly what I was looking for a perfect grey called Atelier and of course the basic black. I picked up the sample size pots of these two colors. I thought if it’s hard to work with, I can use it for painting accessory pieces and just make my own tried and true chalk paint.

The first piece I started with was my nightstand.  I wanted to paint it black.  I set the small jar of paint upside down (the sales associate told me to do this) in my sink while I cleaned my nightstand. I was painting all of this furniture in my bedroom because there was no way I could move all of the furniture downstairs into the garage and back up by myself.  Surprisingly, I did not even notice any odor to the paint.  Once the furniture was clean and completely dry, I started painting and was shocked! It was super smooth and creamy and absolutely the easiest paint to work with…ever!  From start to finish it took less than 30 minutes to do the entire piece. It really is just that easy.  One step does not necessarily mean one coat, however that was the case with the black paint.

Nightstand painted with Amy Howard Paint basic black

A Quick Review of Amy Howard At Home Paint

The coverage was amazing. I did notice that the black required only one coat whereas the Atelier required two and I wiped some of the paint off so I could see the original stain peeking through. Once I realized how easy the Amy Howard at Home Paint was to use, I was ecstatic! I knew I would be able to paint all of the furniture and pull my vision together in time to surprise my husband.  Do you like how I said surprise him? Yes, well I knew if he were here he would probably freak that I was painting the bedroom furniture.  I have never liked the stain on the furniture. It looked too orange to me but when we bought it I was days away from giving birth to our firstborn and it was the only furniture that could be delivered on time before the baby arrived and I was nesting and just needed it done. So yes, it was a surprise to him but sometimes it’s easier to not let him see the messy in between a project!

After the nightstand was done in such a short period of time, I celebrated with a cup of coffee and planned my next piece of furniture to paint. I moved on to the Secretary Desk and chair.  I knew the desk was going to be a bit more time-consuming due to all the detailed pieces.

Amy Howard painted desk

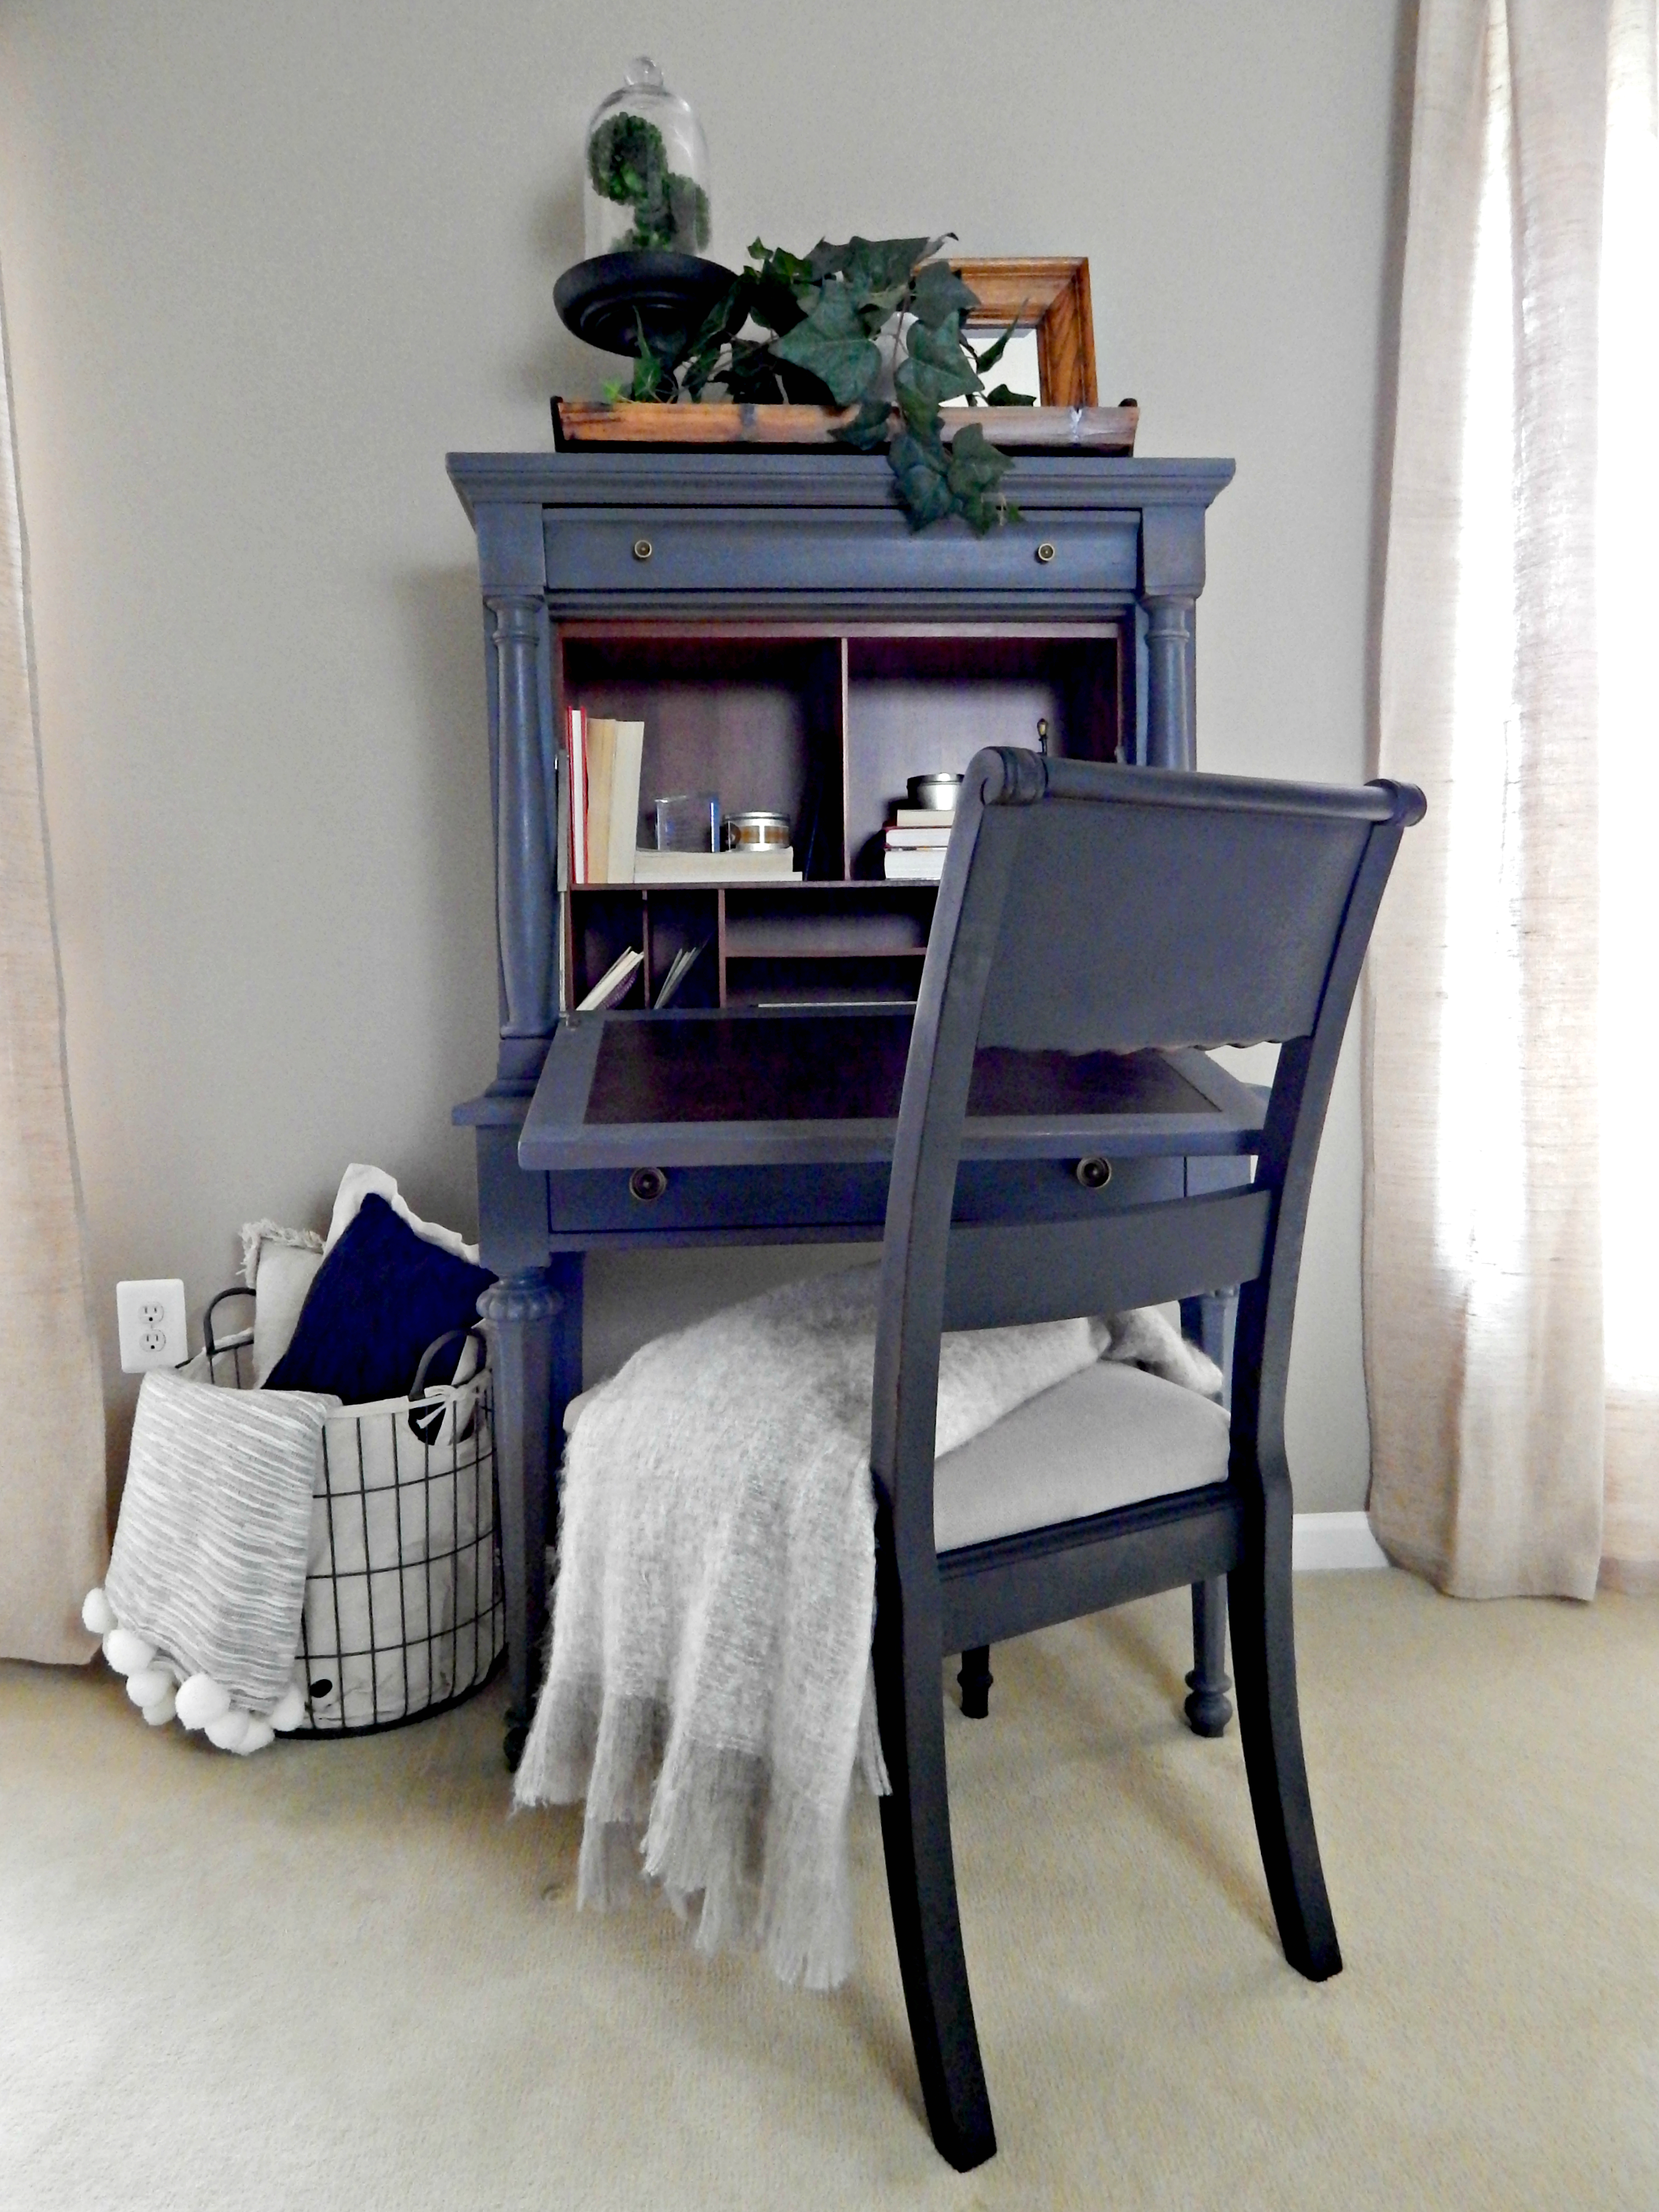
I painted the desk in the Atelier and the chair in the basic black. I even had time to recover the seat cushion. I decided to leave the interior of the desk alone.  The paint tone down the stain color and I like the juxtaposition of the grey paint against the stain.

I also painted an armoire with the basic black and a few mirrors.  I did all of this with the small sample pot of paint and I still have some paint leftover for future projects.

Mirror painted with Amy Howard basic black paint

Revamping Your Space with Amy Howard Paint

I think my favorite piece I painted was my dresser. I was back and forth on the color choice and ultimately chose the Atelier.  I am so happy with this choice.  I decided to leave the mirror with the original stain and I am glad I did.

Review of Amy Howard Paint

I buffed some of the paint off so the stain is popping through. This piece was the last one I painted and once it was done, I started waxing all the pieces with the Amy Howard Wax.  Again it was a very easy product to work with as well.  If you haven’t tried this paint, you really should.  I was able to paint all these pieces ( armoire,  dresser, two mirrors, chair and a desk) with two small sample jars of paint and I still have paint left over in each jar.

Here’s a picture of the chaos I create when I am working…Painting my Goodwill Find and this…

Setting up a paint studio in my bedroom

I am happy to say that I was able to complete the entire room in three and a half days! I think this was in large part to ease of the  Amy Howard One Step Paint!

A quick review of Amy Howard at home paint

FYI, my husband was happy with the transformation, yes, happy and surprised! I know I am not the only one that creates chaos when their spouse is out-of-town, share your adventures in the comments!

Until Next Time,

SR_signature

Filed Under: Before and After, Home Tour, Projects and DIY Tagged With: Amy Howard Paint, Chalk Paint, Master Bedroom

Painting with Rust-Oleum Chalked Spray Paint

April 12, 2016 By stylishrevamp 2 Comments

A few weeks ago on Thrift Shop Thursday #25, I shared a black three tiered stand that I picked up at the consignment shop. I really liked it at the time but it kind of felt heavy to me once it was in the kitchen… if that makes any sense.  Anyway, I was on instagram and I saw a white stand that Golden Boys and Me shared and I knew what I wanted to do.  If you haven’t seen Golden Boys and Me, you really need to check her out.  I love her home, she has lots of great ideas and I adore her sense of style.

Now that my mind was made up, I thought I would swing by the paint section at Home Depot. I am so glad I did!  I found a chalk paint in a spray paint application.  Who knew?  I am sure everyone, but it was a first for me.  I picked up two cans of the Rust-Oleum Chalked Paint.  I chosen the Linen White for this project and an aged gray just to have on hand for future projects. I have to say, I Love this Product!

Rust-Oleum Chalked Paint

The  finished product looks and feels just like the Annie Sloan Chalk Paint.  I would prefer to spray paint over brush paint any day!

Here is the three-tiered stand after I sprayed and distressed it a bit.

Painted tiered stand

Here’s a reminder of the before, again I liked the black but I wanted something a little brighter for our kitchen.

Before and After Painted Tiered Stand

After being sick for a week with the flu, this was a quick and easy project to ease me back into the swing of things! I really like how the white looks in the kitchen. Even my husband and boys said they liked it better white! Usually they do not have an opinion one way or another when it comes to these smaller changes I am constantly making.

Painted white Three tiered stand

If you get the chance you should try this product,  you will not be disappointed!

Until Next Time,

SR_signature

Filed Under: Before and After, DIY Crafts Tagged With: Chalk Paint, rust-oleum, spray paint, tiered stand

My Sunroom Reveal using IKEA EKTORP Furniture

September 12, 2015 By stylishrevamp 2 Comments

My sunroom reveal using  IKEA EKTORP furniture has been a long time in the making.  I have known for quite some time exactly what I wanted, it just took awhile to pull it together. Finally, I am sharing it with you today!

Redecorating using IKEA Ektorp Series

[Read more…]

Filed Under: Before and After, DIY Crafts, Home Tour Tagged With: Chalk Paint, Home Tour, IKEA, spray paint

Chair Revamp

September 10, 2013 By stylishrevamp 9 Comments

When I bought two new chairs for the kitchen table I carried the old ones upstairs and put them in the closet.  They have been in that closet for 8 long months…  Waiting and waiting to be revamped.  I reupholstered the other four that I use in the kitchen at the Island home but for some reason I just didn’t have it in me to complete the final two.  I was dreading pulling out the nailhead trim.  It is so time consuming but I have to say this time around it didn’t take that long at all. Maybe that is because I snuck outside and I wasn’t disturbed by the boys needing one thing or another. Plus it was a gorgeous day. So here is the finished kitchen chair.

Vintage Dining Room Chair Revamp with Drop Cloth and Chalk Paint

I think she turned out just perfect.  This is exactly what I was wanting to do but it just took awhile to get started.

[Read more…]

Filed Under: Before and After Tagged With: Chairs, Chalk Paint, Drop Cloth, Reupholster

Mini Storage Chest

August 31, 2013 By stylishrevamp 1 Comment

It has been a busy week.  All the boys are back in school and it is our first week without our oldest.  He is away at college and I am missing him!  So it has been a bit difficult to get motivated to work on projects.  I thought I would ease into it with a small redo on an old storage chest.  With my youngest in school, he wasn’t here to remind me to take a before shot of the chest.  Sorry about that!

DIY Hand Painted Mini Chest with Stencil

Hand Painted DIY chest with StencilThis is the finished chest.  I used Annie Sloan Chalk Paint from my left over projects (Old White).  I did two coats then did a light sanding.  Once it was dry I used black acrylic craft paint and stenciled on the letter K.  I also use painters scotch blue tape to tape off the black trim line.  Just a simple project to ease me back into the school routine.  Right now I have it in my foyer in our home  off the Island but I do think I will take it next time we head across the bridge.

We are linking up to:

sunday_button  thatdiyparty125button_zps360f71b1

Filed Under: DIY Crafts Tagged With: Chalk Paint, Stencil

Wooden Decorative Art

August 24, 2013 By stylishrevamp 3 Comments

Well, we did it.  We dropped our oldest off at college and let me tell you it was one of the hardest things I have ever, ever done!  Once we left the college, I saw a billboard that said Big Valley Antique Center next exit.  So that is what we did.  I only had 15 minutes to shop so it was a quick whirl around the shop because they were ready to close.  I found two wooden pieces of art and an old Pepsi crate.  Not bad for  a quick stop and it did help cheer me up a bit!

Wooden Wall Art

I used Annie Sloan Chalk Paint.  For the first coat I used Paris Grey.  Once it was dry I painted over it with Old White.  Then when everything was dry, I used my sanding block to highlight the indentations on the sea horse and conch shell.  I am loving these two pieces and will definitely be taking them to the Island Home.

Wooden Wall Art

We are linking up to:

Funky Junk Interiors

Six Sisters Stuff

CityFarmhouseButtonSmall stacybutton2  LindaBtn  button-final  lifeoftheparty  sunday_button  satbutton  Saturday-Spotlight-Party-Button

Filed Under: Before and After, DIY Crafts Tagged With: Art, Chalk Paint

Painted Compass Table

August 13, 2013 By stylishrevamp 8 Comments

I finally started and completed the free side table that I got on the Island.  It sat in my garage for a few weeks because  I couldn’t make up my mind as to what I wanted to do with it.  So every time I went to get in my car there it sat reminding me that I needed to get to work.  So here it is completed…

DIY painted compass table

I used Louis Blue Chalk Paint.  This time around, I found it to be very easy to use. I love the texture it gives to the piece. It looks weathered and kind of washed out.  It will fit in nicely at the Island home.  Once the paint dried, I applied a compass transfer that I order from amazon.com  Also, very easy to use.

DIY Painted compass table

So the next time you see a piece of furniture that has seen better days just remember with a little paint you can completely revamp it into something new.

So it went from this…

Road side rescue

to this…

DIY painted compass table

DIY Painted Compass Table

We are linking up to:

Design, Dining + Diapers

Crafty Scrappy Happy

Craftberry Bush

My Romantic Home

French Country Cottage

Homemaker on a Dime

CityFarmhouseButtonSmall  stacybutton2  lifeoftheparty  sunday_button  Wood-Grain-Button-257x180  TDCbutton  d17035f5-81a7-412b-86d2-920026553078_zpse68bbd5f 

Filed Under: Before and After, DIY Crafts, Fabulous Finds Tagged With: Chalk Paint, Compass, Paint, Transfer

Meet the Team

Hi, I'm Kathy! Mom to 3 boys, lover of thrift shopping and all things vintage.

Follow along with me as I revamp our home using thrifted finds!

Subscribe via Email


Visit Stylish Revamp's profile on Pinterest.

Our Favorite Posts

  • IKEA BILLY Bookcase Hack
    IKEA BILLY Bookcase Hack
  • DIY Headboard
    DIY Headboard
  • Revamping my Closet with the IKEA Pax Wardrobe
    Revamping my Closet with the IKEA Pax Wardrobe
  • How to Make A DIY Driftwood Wreath
    How to Make A DIY Driftwood Wreath
  • Home Office: How to Redesign a Space
    Home Office: How to Redesign a Space

Categories

  • Before and After
  • DIY Crafts
  • Fabulous Finds
  • Friday Favorites
  • Goodwill Goods
  • Home Tour
  • Projects and DIY
  • Thrift Shop
  • Thrift Shop Thursday
  • Uncategorized

Topics

Basket Chairs Chalk Paint Christmas Christmas Decor Christmas Tour Consignment Shop Consignment Shopping Desk DIY Driftwood Fall Flea Market gold Goodwill Halloween Holiday HomeGoods Home Office Home Tour IKEA Kitchen ladder Master Bedroom Michaels Milk Cans Nautical Paint paint pen Pillows pumpkins Shopping Sign spray paint thrift Thrifting thrift shop Thrift Shopping thrift shop thursday Tour Vintage White dishes wine rack Wood Wreath

Archives

Follow us on Pinterest!

Visit Stylish Revamp's profile on Pinterest.

Follow us on Twitter!

Tweets by @StylishRevamp

Follow us on Instagram

Screen Shot 2018-09-16 at 8.50.53 PM

Like us on Facebook!

Like us on Facebook!

Copyright © 2025 · Chic Pro Theme On Genesis Framework · WordPress · Log in